Install and configure PostgreSQL
PostgreSQL (also known as Postgres) is an object-relational database system that has the features of traditional commercial database systems with enhancements to be found in next-generation database management systems (DBMS).
Installation
To install PostgreSQL, run the following command in the command prompt:
The database service is automatically configured with viable defaults, but can be customised based on your specific needs.
Configuration
PostgreSQL supports multiple client authentication methods. In Ubuntu, peer is the default authentication method used for local connections, while scram-sha-256 is the default for host connections (this used to be md5 until Ubuntu 21.10). Please refer to the PostgreSQL Administrator’s Guide if you would like to configure alternatives like Kerberos.
The following discussion assumes that you wish to enable TCP/IP connections and use the MD5 method for client authentication. PostgreSQL configuration files are stored in the /etc/postgresql/<version>/main directory. For example, if you install PostgreSQL 14, the configuration files are stored in the /etc/postgresql/14/main directory.
Tip:
To configure IDENT authentication, add entries to the /etc/postgresql/*/main/pg_ident.conf file. There are detailed comments in the file to guide you.
By default only connections from the local system are allowed, to enable all other computers to connect to your PostgreSQL server, edit the file /etc/postgresql/*/main/postgresql.conf . Locate the line: #listen_addresses = ‘localhost’ and change it to * :
Note:
‘*’ will allow all available IP interfaces (IPv4 and IPv6), to only listen for IPv4 set ‘0.0.0.0’ while ‘::’ allows listening for all IPv6 addresses.
For details on other parameters, refer to the configuration file or to the PostgreSQL documentation for information on how they can be edited.
Now that we can connect to our PostgreSQL server, the next step is to set a password for the postgres user. Run the following command at a terminal prompt to connect to the default PostgreSQL template database:
The above command connects to PostgreSQL database template1 as user postgres. Once you connect to the PostgreSQL server, you will be at an SQL prompt. You can run the following SQL command at the psql prompt to configure the password for the user postgres.
After configuring the password, edit the file /etc/postgresql/*/main/pg_hba.conf to use scram-sha-256 authentication with the postgres user, allowed for the template1 database, from any system in the local network (which in the example is 192.168.122.1/24) :
Note:
The config statement ‘hostssl’ used here will reject tcp connections that would not use ssl. Postgresql in Ubuntu has the ssl feature built in and configured by default, so it works right away. On your postgresql server this uses the certificate created by ‘ssl-cert’ package which is great, but for production use you should consider updating that with a proper certificate from a recognized CA.
Finally, you should restart the PostgreSQL service to initialise the new configuration. From a terminal prompt enter the following to restart PostgreSQL:
Warning:
The above configuration is not complete by any means. Please refer to the PostgreSQL Administrator’s Guide to configure more parameters.
You can test server connections from other machines by using the PostgreSQL client as follows, replacing the domain name with your actual server domain name or IP address:
Streaming replication
PostgreSQL has a nice feature called Streaming Replication which provides the capability to continuously ship and apply the Write-Ahead Log (WAL) XLOG records to some number of standby servers in order to keep them current. Here is presented a very basic and simple way to replicate a PostgreSQL server (main) to a standby server.
First, create a replication user in the main server to be used from the standby server:
Let’s configure the main server to turn on the streaming replication. Open the file /etc/postgresql/*/main/postgresql.conf and make sure you have the following lines:
Also edit the file /etc/postgresql/*/main/pg_hba.conf to add an extra line to allow the standby server connection for replication (that is a special keyword) using the replicator user:
Restart the service to apply changes:
Now, in the standby server, let’s stop the PostgreSQL service:
Edit the /etc/postgresql/*/main/postgresql.conf to set up hot standby:
Back up the current state of the main server (those commands are still issued on the standby system):
After the above this will have done a full single pass copying the content of the main database onto the local system being the standby. In the pg_basebackup command the flags represent the following:
- -h : The hostname or IP address of the main server
- -D : The data directory
- -U : The user to be used in the operation
- -P : Turns on progress reporting
- -v : Enables verbose mode
- -R : Creates a standby.signal file and appends connection settings to postgresql.auto.conf
Finally, let’s start the PostgreSQL service on standby server:
To make sure it is working, go to the main server and run the following command:
As mentioned, this is a very simple introduction, there are way more great details in the upstream documentation about the configuration of replication as well as further High Availability, Load Balancing, and Replication.
To test the replication you can now create a test database in the main server and check if it is replicated in the standby server:
You need to be able to see the test database, that was created on the main server, in the standby server.
Backups
PostgreSQL databases should be backed up regularly. Refer to the PostgreSQL Administrator’s Guide for different approaches.
Resources
As mentioned above, the PostgreSQL Administrator’s Guide is an excellent resource. The guide is also available in the postgresql-doc package. Execute the following in a terminal to install the package:
This package provides further man pages on postgresql ‘dblink’ and ‘server programming interface’ as well as the html guide that you’d find upstream. To view the guide enter xdg-open /usr/share/doc/postgresql-doc-*/html/index.html or point your browser at it.
For general SQL information see the O’Reilly books Getting Started with SQL: A Hands-On Approach for Beginners by Thomas Nield as an entry point and SQL in a Nutshell as a quick reference.
How to Install PostgreSQL on Ubuntu + Usage Instructions for Effective Database Management
PostgreSQL is a popular open-source relational database management system (RDBMS) known for its scalability and efficiency in handling large amounts of data.
Due to its high performance, PostgreSQL is ideal for large enterprise websites or applications. It also supports various data types and programming languages, including PHP and Python.
In this tutorial, we will explain how to install PostgreSQL on Ubuntu 20.04 and later. We will also cover the pgAdmin installation process and solutions to common PostgreSQL issues.

What Is PostgreSQL?
PostgreSQL is a relational database management system (RDBMS) popular for its performance. Unlike a standard DBMS, it arranges data in a logical structure for more efficient access.
Highly efficient and capable of handling many queries, the database solution is excellent for large enterprises. Moreover, it is free, open-source, and compatible with various data types.
How to Install PostgreSQL on Ubuntu
Before proceeding, ensure your virtual private server (VPS) runs Ubuntu 20.04 or later. Otherwise, follow our guide to change the operating system in Hostinger’s VPS.
1. Install PostgreSQL
PostgreSQL installation involves executing Linux commands on your machine. For a local system, run them directly via Terminal, the Linux command prompt.
For a remote machine like VPS, connect using an SSH application or Terminal. Hostinger users can find their remote machine login credentials by navigating to VPS overview → SSH access in hPanel.
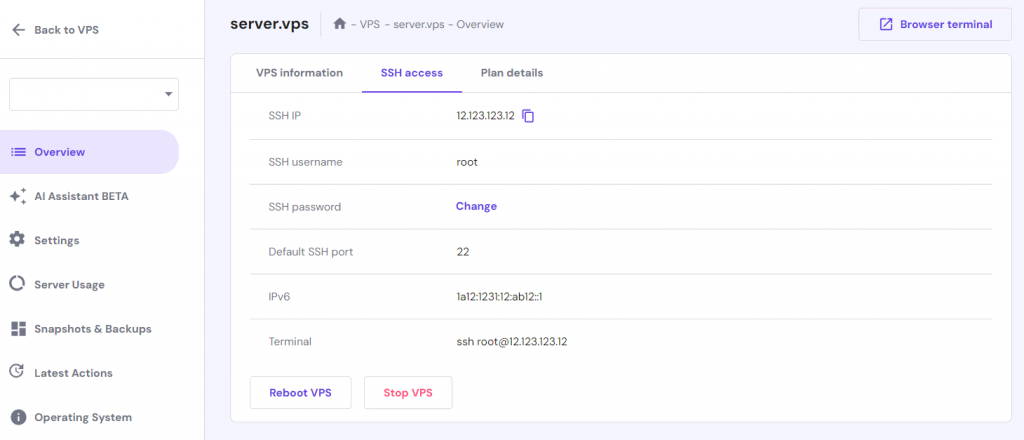
You can install PostgreSQL Ubuntu packages from the local repository or using the APT package manager. We recommend the latter to ensure you get the latest version.
Option 1 – Installation From APT Repository
The popular method to install PostgreSQL on Ubuntu is from the official repository via the APT package manager. Here are the steps to do so:
- Run these commands to import the key from PostgreSQL’s official repository to the APT package manager:
- Refresh APT to synchronize all repositories using this command:
- Install the latest version of PostgreSQL with APT and sudo privileges:
- To confirm the installation, run this command:
- Enter the PostgreSQL version query statement:
Pro Tip
To install a specific version, add the number in your command, for example sudo apt-get -y install postgresql-12. In this example, the command will install PostgreSQL version 12.
Option 2 – Installation Using Local Ubuntu Repository
The alternative PostgreSQL installation method uses the local Ubuntu repository. Here are the steps:
- Run this command to refresh the Ubuntu repository:
- Verify the available PostgreSQLaptrepository using this command:
- Run this command to install the latest available version. In our case, it is version 12.15:
- To verify whether the PostgreSQL installation is successful, run the following:
- Then, run this command to check the current PostgreSQL version:
The command line should show that the PostgreSQL server version 12.15 is successfully installed, similar to this:

2. Check the PostgreSQL Status
After installing PostgreSQL, check whether it is enabled and active. Use the systemctl or service command utility to verify the service status:
If PostgreSQL is enabled, your command line will output active and loaded, similar to the following:

In addition to the service status, check whether PostgreSQL is ready to accept a connection using this command:
3. Connect to PostgreSQL
During the installation, PostgreSQL automatically creates the default postgres role for logging in to the database. To switch to this user, run the following command:
Your command line should now begin with postgres. To connect to the PostgreSQL database, use the PostgreSQL shell using the following:
The psql command will create a session in the default database. If the command isn’t found, manually install the PostgreSQL client using this command:
To check the connection status, run this command using the PostgreSQL prompt:

To quit the PostgreSQL prompt and return to the regular system user, use the exit command. Meanwhile, use \q to detach from the database’s interactive session.
4. Change User Password
Changing the default postgres role password is essential to improve database security. Here’s how to do it:
- Activate the PostgreSQL prompt using this command:
- Run this statement to change the postgres account password. Don’t forget to replace NewPassword with your actual password:
- Check whether the change is applied successfully using the following command:
- Restart the PostgreSQL service using this command:

5. Create a User on PostgreSQL
To manage database access and ensure proper data organization, you will need multiple PostgreSQL users. The easiest way to create one is to use the interactive mode. Here are the steps:
- Switch to the postgres user:
- Run this command to create a new user:
- Enter the new PostgresQL account name. For this tutorial, it is TheNewUser.
- To validate the new role, log in to PostgreSQL with the postgres account:
- Check all the users with the following command:
Important! As a part of security best practices for PostgreSQL, avoid granting the new role a superuser privilege unless necessary.
As shown in the output, the database successfully creates TheNewUser.

6. Create a Database on PostgreSQL
PostgreSQL assumes the role and the database will have the same name. Therefore, if you create a TheNewUser role, PostgreSQL will access a database with the same name.
Important! PostgreSQL uses Linux information for authentication. In the previous example, you need a user called TheNewUser.
Here are the PostgreSQL database setup steps:
- Run the following to switch to the postgres user and create a new database:
- To log in to the new database, create a Linux user account with the same name. Since the username contains capital letters, add the –force-badname option.
- Enter the interactive PostgreSQL prompt using the new user account:
- Confirm the connection using this command:

The user should now connect to the new database and be able to create a new table. For example, enter the following to create a buyer data table:
When creating a database table, consider the six PostgreSQL constraints:
- PRIMARY KEY – indicates that a column can be a row’s unique identifier.
- FOREIGN KEY – specifies that the values in a column must be the same as the ones in another table’s rows.
- NOT NULL – ensures a column’s value is not empty.
- CHECK – sets a column’s value so that it must satisfy a Boolean expression, which is either “true” or “false”.
- UNIQUE – guarantees that the values in a column are unique among all rows.
- EXCLUSION – prevents values in two rows from overlapping when compared.
To add values to your table, use the following statement. Don’t forget to replace the placeholders with the appropriate value and adjust the number of rows accordingly:
To show the table, enter the following statement:
7. Configure the PostgreSQL Server
Configure your PostgreSQL server to allow other systems to access the database remotely. To do so, let the server listen to all IP addresses by editing the configuration file.
Before proceeding, use the exit command to quit the PostgreSQL shell and return as the regular system user. Then, follow these steps:
- Open the configuration file using a text editor. Replace vim if you use another editor and change the directory accordingly:
- Find the listen_addresses line.
- Remove the # symbol and change the value to an asterisk. Here’s how it should look:
- Use the :wq command to save the changes and quit vim.
- Set the access policy to authenticate client connection to your PostgreSQL server. To do so, open the pg_hba.conf file in the same directory using vim. The command should look like this:
- Add a new policy at the bottom of the file using this syntax:
- For instance, we will enable all TCP/IP connections from all users to every PostgreSQL database. These users can use any IP address with an MD5-encrypted password. The rule looks as follows:
- Restart the PostgreSQL service to apply the changes.
8. Set up a Remote Database Connection
After configuring the database, set up remote access to PostgreSQL using the psql command. To do so, use this command syntax in the client machine:
For example, run this command to connect to the TheNewUser database hosted in a VPS with the 185.185.185.185 IP address using the TheNewUser account:
Remember that the default PostgreSQL port is 5423. To verify if the connection is successful, run this command:
Once connected, you can send database queries to retrieve data. To enable PostgreSQL remote access in your application, install a database driver and import the module into your code.
For this tutorial, we will show you how to do so in a Python application hosted in an Ubuntu 20.04 VPS. After connecting via SSH, follow these steps:
- Install the pip package manager using this command. If you already have it, skip this step:
- Download and install the psycopg2 database driver using pip:
- Add the following line to your application code to import the module and establish a connection with the PostgreSQL database. Remember to change the value accordingly:
9. Install pgAdmin
Install the pgAdmin web-based GUI to simplify your PostgreSQL database management tasks. We will use the APT package manager to install it:
- Run these commands individually to add the pgAdmin official repository:
- Update the package lists to synchronize the repository.
- Run the following command to install pgAdmin:
- After the GUI setup finishes, initiate the primary pgAdmin configuration with this command:
- Enter your email address and password. It should look like the following:
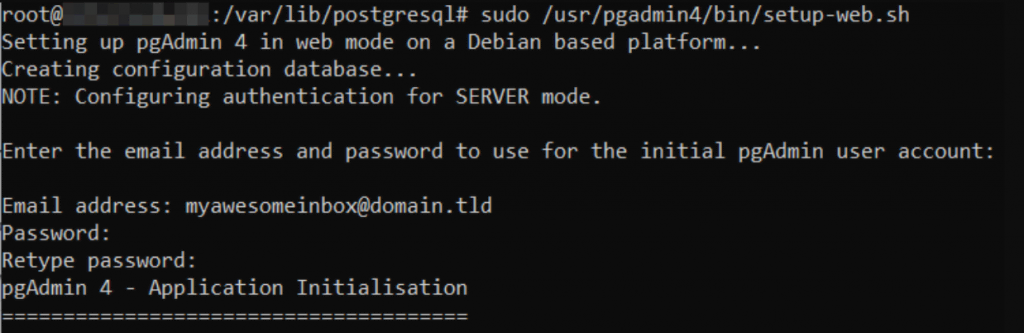
To access the pgAdmin web-based interface, enter the following in your web browser’s address bar:
Replace the IP address with your VPS’. Then, enter your email address and password. Click Login to enter the main pgAdmin dashboard.
To connect PostgreSQL, select Add New Server and proceed with the configuration process.
Troubleshooting PostgreSQL Installation
In this section, we will explore common issues regarding PostgreSQL installation and their solutions.
1. Unable to Connect to PostgreSQL Server
First, you should check whether the client system is properly connected to the internet. If the internet connection isn’t the issue, other common causes for this error include an inactive database or misconfigured file permission.
Check PostgreSQL status and ensure it is loaded and active. Otherwise, restart it using the following command:
If that doesn’t work, check whether the PostgreSQL directory and files permissions are set to 0700 and 0600. To do so, use the following command:
Then, use the chmod command to change their permissions.
2. PostgreSQL Connection Issues from Remote Host
A misconfigured connection policy may cause remote host issues that prevent you from accessing the PostgreSQL server. To solve it, open your pg_hba.conf file and add the access policy from every client’s IP address:
Then, check the listen_address value in your postgres.conf configuration file. Ensure it has an asterisk to ensure PostgreSQL can listen to all IP addresses.
If that doesn’t work, check if your firewall closes the PostgreSQL listening port. For Ubuntu server, run the ufw command:
If the connection from and to port 5432 is disabled, open it using the following command:
Learn more about Ubuntu Firewall
3. pgAdmin Login Issues
pgAdmin login issues may occur due to a database connection error. If it is network-related, try the previous solutions and reinstall pgAdmin.
If the problem is related to the user account login credentials, enter the psql session and reset the password using this statement:
You may also encounter login issues if the user doesn’t have the LOGIN privilege. To grant one, use the following statement:
4. PostgreSQL Version Conflict
Version conflicts occur when PostgreSQL is incompatible with the database or other applications. Its common cause includes not updating PostgreSQL, resulting in a version mismatch.
To solve it, reinstall or update PostgreSQL from the APT official repository. Also, update all third-party applications since they may be outdated.
We recommend testing the newest version in a development environment to avoid further issues in the live server.
5. Unable to Create PostgreSQL User or Database
An incorrect command syntax often triggers PostgreSQL user and database creation errors. To fix it, ensure your command ends with a semicolon (;).
Also, you must run the command using the postgres user and the psql command line. To do so, run this command:
If your Terminal shows the following, you should be able to create a user and database.
Learn More About PostgreSQL and VPS
Conclusion
PostgreSQL is an open-source, community-driven database management system. It uses a logical structure to efficiently store large amounts of data and simplify access.
In this relational database management system tutorial, we have explained the steps to install PostgreSQL on Ubuntu 20.04 via the Linux command prompt. Here is the recap:
- Install PostgreSQL from the official repository using APT.
- Run systemctl status to check if Postgresql is active.
- Connect to the PostgreSQL account using sudo su – postgres.
- Change the default admin account’s password to improve security.
- Create a new PostgreSQL user to manage your databases.
- Make a new database using the createdb command.
- Set up the PostgreSQL server by configuring its connection policy.
- Configure a connection to your remote PostgreSQL database.
- Install pgAdmin to provide a graphical user interface.
To avoid issues, ensure the connection policies and pgAdmin login credentials are set correctly. Moreover, install the latest version of the RDBMS via APT to avoid incompatibility issues.
How to Install PostgreSQL on Ubuntu FAQ
In this section, we will answer several commonly asked questions about installing PostgreSQL on an Ubuntu server.
Where Is Postgres Installed on Ubuntu?
On Ubuntu, the main PostgreSQL server files are in the /usr/lib/postgresql/<version/bin/postgres directory. All database clusters are stored in /var/lib/postgresql/main directory. Meanwhile, the PostgreSQL settings are in the /etc/postgresql/main/postgresql.conf file.
How Do I Know if PostgreSQL Is Installed on Ubuntu?
The easiest way to check if PostgreSQL is installed on an Ubuntu server is to run sudo -u postgres psql or which psql. Terminal should output the installation path if it is installed.
Should I Use PostgreSQL 13 or 14?
PostgreSQL 14 has an improved connection scaling. It makes PostgreSQL 14 more suitable for large enterprises with many database connections. We recommend sticking to the newest version for the latest features, improvements, and patches.
Aris is a passionate IT professional and WordPress enthusiast. He loves to share his knowledge and inspire people to start their online journey. When he’s not working or blogging, Aris enjoys watching gadget reviews and scribbling random doodles.
Установка PostgreSQL в Ubuntu 20.04 [Краткое руководство]

PostgreSQL, или Postgres, — это система управления реляционными базами данных, которая представляет собой реализацию языка запросов SQL. Она соответствует стандартам и обладает множеством передовых функций, таких как надежность и параллельность операций без блокировки при чтении.
В этом обучающем руководстве мы рассмотрим, как установить Postgres на сервер Ubuntu 20.04.
Предварительные требования
Для выполнения данного руководства вам потребуется один сервер Ubuntu 20.04 с конфигурацией, выполненной согласно руководству по первоначальной настройке сервера Ubuntu 20.04. После выполнения всех предварительных действий ваш сервер должен иметь пользователя без прав root с разрешениями sudo и базовый брандмауэр.
Шаг 1 — Установка PostgreSQL
Для установки PostgreSQL в первую очередь обновите локальный индекс пакетов вашего сервера:
После этого установите пакет Postgres вместе с пакетом -contrib , который содержит дополнительные утилиты и функциональные возможности:
Шаг 2 — Использование ролей и баз данных в PostgreSQL
По умолчанию Postgres использует концепцию «ролей» для выполнения аутентификации и авторизации. В некоторых аспектах они аналогичны обычным пользователям и группам в Unix.
После установки Postgres настроена на использование аутентификации ident, что значит, что выполняется привязка ролей Postgres с соответствующей системной учетной записью Unix/Linux. Если роль существует внутри Postgres, пользователь Unix/Linux с тем же именем может выполнить вход в качестве этой роли.
В ходе установки была создана учетную запись пользователя postgres, которая связана с используемой по умолчанию ролью postgres. Существует несколько способов использования этой учетной записи для доступа к Postgres. Один из способов — переход к учетной записи postgres на вашем сервере с помощью следующей команды:
Затем вы можете получить доступ к командной строке Postgres с помощью команды:
В результате вы можете получить доступ к командной строке PostgreSQL, а уже отсюда свободно взаимодействовать с системой управления базами данных.
Для выхода из командной строки PostgreSQL выполните следующую команду:
В результате вы вернетесь в командную строку postgres в Linux.
Также вы можете запустить необходимую вам команду с учетной записью postgres напрямую с помощью sudo :
Это позволит выполнить вход в Postgres без необходимости использования промежуточной командной строки bash .
Вы снова сможете выйти из интерактивного сеанса Postgres с помощью следующей команды:
Шаг 3 — Создание новой роли
Если вы выполнили вход в учетную запись postgres, то можете создать новую роль с помощью следующей команды:
Если же вы предпочитаете использовать sudo для каждой команды без переключения с обычной учетной записи, введите следующую команду:
В любом случае скрипт будет предлагать варианты на выбор и, исходя из ваших ответов, выполнять нужные команды Postgres для создания пользователя в соответствии с вашими спецификациями.
Шаг 4 — Создание новой базы данных
Еще одно предположение, которое система аутентификации Postgres использует по умолчанию, состоит в том, что для любой роли, используемой для входа, существует база данных с тем же именем, к которой роль может получить доступ.
Это означает, что если созданный вами в последнем разделе пользователь будет иметь имя sammy, эта роль попытается подключиться к базе данных, которая также называется «sammy» по умолчанию. Вы можете создать соответствующую базу данных с помощью команды createdb .
Если вы используете учетную запись postgres, необходимо ввести следующее:
Если же вы предпочитаете использовать sudo для каждой команды без переключения с обычной учетной записи, введите следующую команду:
Шаг 5 — Открытие командной строки Postgres с новой ролью
Чтобы выполнить аутентификацию с помощью ident , вам потребуется пользователь Linux с тем же именем, что и имя роли и базы данных в Postgres.
Если у вас нет соответствующего пользователя Linux, то вы можете создать его с помощью команды adduser . Вы должны воспользоваться учетной записи без прав root с привилегиями sudo (т.е. не выполняя вход в качестве пользователя postgres):
Когда новая учетная запись будет доступна, вы можете переключиться и подключиться к базе данных следующим образом:
Либо же вы можете сделать следующее:
Эта команда позволит выполнить вход автоматически, полагая, что все компоненты были настроены должным образом.
Если вы хотите, чтобы ваш пользователь подключился к другой базе данных, то вы можете сделать это с помощью следующей команды:
После входа вы можете проверить данные о текущем подключении:
Заключение
Вы настроили PostgreSQL на сервере Ubuntu 20.04. Если вы хотите узнать больше о системе Postgres и способах ее использования, мы рекомендуем вам изучить следующие руководства:
Thanks for learning with the DigitalOcean Community. Check out our offerings for compute, storage, networking, and managed databases.
Как установить PostgreSQL и pgAdmin4 в Ubuntu 20.04
В данном руководстве мы ознакомимся с установкой PostgreSQL 12, реляционной объекто-ориентированной системой управления базами данных (СУБД). А также, мы проинсталлируем pgAdmin4, инструментарий для работы с сервером баз данных PostgreSQL. Итак, наш мануал – о том, как установить PostgreSQL и pgAdmin4 в Ubuntu 20.04.
Все работы на нашем сервере мы будем производить под учётной записью, имеющей привилегии sudo . Также, на нашем сервере установлен и настроен брандмауэр UFW .
Установка PostgreSQL
Поскольку PostgreSQL устанавливается из стандартных репозиториев Ubuntu, для запуска установки подключитесь к вашему серверу под учётной записью, входящей в группу sudo , и наберите в командной строке:
При установке пакета инсталлятор создаст новый PostgreSQL-кластер. Данный кластер представляет из себя коллекцию баз данных, которая управляется одним сервером. Также, установщик создаст рабочие директории для PostgreSQL. Данные, необходимые для работы PostgreSQL, будут находится в каталоге /var/lib/postgresql/12/main , а файлы конфигурации – в каталоге /etc/postgresql/12/main .
После завершения установки вы можете убедиться, что служба PostgreSQL активна. Для чего в командной строке наберите:

Также, посмотрите, включена ли служба:

И наконец, вы можете увидеть статус службы PostgreSQL:
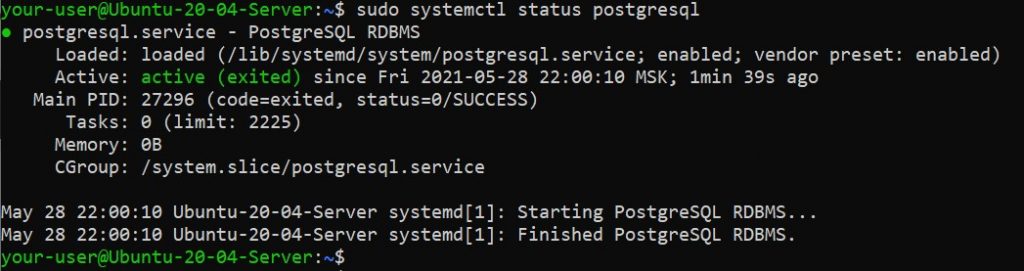
После чего, убедитесь, что PostgreSQL-сервер готов принимать подключения от клиентов:

Создание базы данных в PostgreSQL
Чтобы создать новую базу данных, вы должны получить доступ к программной оболочке PostgreSQL. Во-первых, подключитесь к системе с помощью учётной записи postgres :

Подключившись, выполните команду psql :
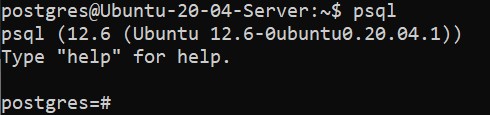
Если вы видите приглашение ко вводу команд postgres=# , значит вы находитесь в оболочке СУБД PostgreSQL. И значит, можно приступать к созданию базы данных. Первая команда добавит в PostgreSQL пользователя bob (на своём сервере вы можете использовать свои имена пользователей и баз данных):

Как вы понимаете, P@$$w0rd – это пароль для входа под учётной записью bob . В своём примере вы, конечно, можете использовать другой пароль.
Следующая команда создаст базу данных, которую мы назовём, например, bobdb :

Теперь, назначьте своему пользователю все права сразу на вашу базу данных. В нашем примере это будет выглядеть так:

Чтобы покинуть оболочку, наберите:

И теперь, можно отключить от системы пользователя postgres :

Настройка клиентской аутентификации PostgreSQL
СУБД PostgreSQL использует клиентскую аутентификацию для того, чтобы решать, какая учётная запись к какой базе данных и с какого хоста может подключаться. Это определяется настройками конфигурационного файла клиентской аутентификации. В Ubuntu таким файлом является файл pg_hba.conf . Он располагается в директории /etc/postgresql/12/main/ .
Откройте этот файл для редактирования, например, с помощью текстового редактора nano :
PostgreSQL использует много типов методов клиентской аутентификации, таких как peer, ident, password или md5. Тип md5 является наиболее безопасным и рекомендуемым по причине того, что он требует от клиента использовать для аутентификации пароли с двойным md5-хешированием. Поэтому нам остаётся лишь убедиться, что в строках ниже указан именно метод md5:

Если вы произвели в конфигурационном файле какие-либо изменения, не забудьте сохранить их при закрытии файла. В nano для этого необходимо нажать Ctrl X , затем Y и Enter . После чего, перезапустите службу:
Установка pgAdmin4
Пакет pgAdmin4 не доступен для установки из официальных репозиториев Ubuntu. Поэтому мы будем устанавливать его из репозитория pgAdmin4 APT . Для этого сначала необходимо установить данный репозиторий.
Добавьте публичный ключ для репозитория и создайте его конфигурационный файл. Для чего наберите следующие команды:
Затем запустите установку pgAdmin4:
Данной командой вы установили набор необходимых пакетов включая веб-сервер Apache2. После завершения инсталляции запустите скрипт для установки веб-компонентов. Данный скрипт должен был установиться вместе с пакетом pgdmin4. Во время своей работы скрипт попросит вас ввести адрес электронной почты. В нашем примере мы будем использовать mailofbob@mail.ru , вместо которого вам необходимо ввести свой. Также, скрипт потребует установить пароль, который необходимо ввести дважды. Учтите, что эти E-mail и пароль вы будете в дальнейшем использовать для подключения к веб-интерфейсу pgAdmin4.
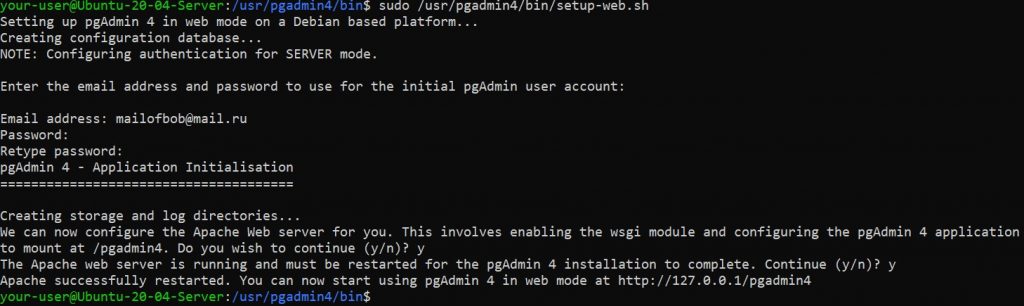
В процессе установки скрипт перезапустит службу Apache2 для того, чтобы вступили в силу произведённые изменения.
После того, как скрипт закончит свою работу, вам нужно будет добавить разрешение для Apache2 на доступ через брандмауэр. Чтобы сделать это, наберите:

Убедитесь, что служба Apache2 включена в список разрешённых на брандмауэре вашего сервера:
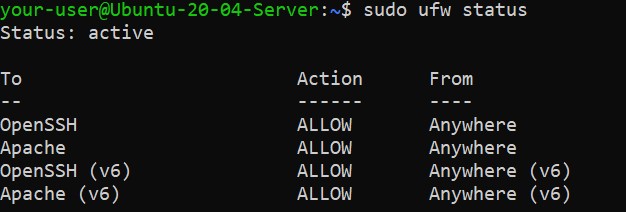
Настройка доступа через веб-интерфейс
Чтобы получить доступ к веб-интерфейсу pgAdmin4, откройте браузер и введите адрес в строке навигации:
где, Your-Server-IP-address – IP-адрес вашего VPS.
После этого вы увидите страницу для подключения к pgAdmin4. Для входа используйте адрес электронной почты и пароль, который вы вводили при работе скрипта setup-web.sh :
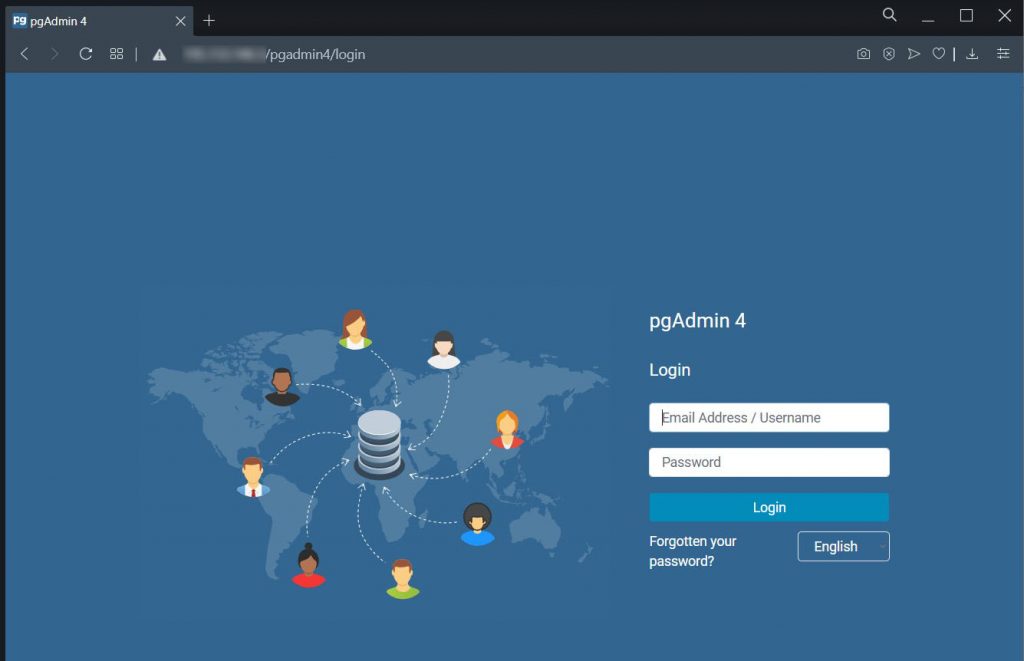
В случае успешной авторизации, вы попадёте на панель веб-приложения pgAdmin4. Там, вы можете подключиться к своему серверу PostgreSQL, нажав на ярлык Add New Server:
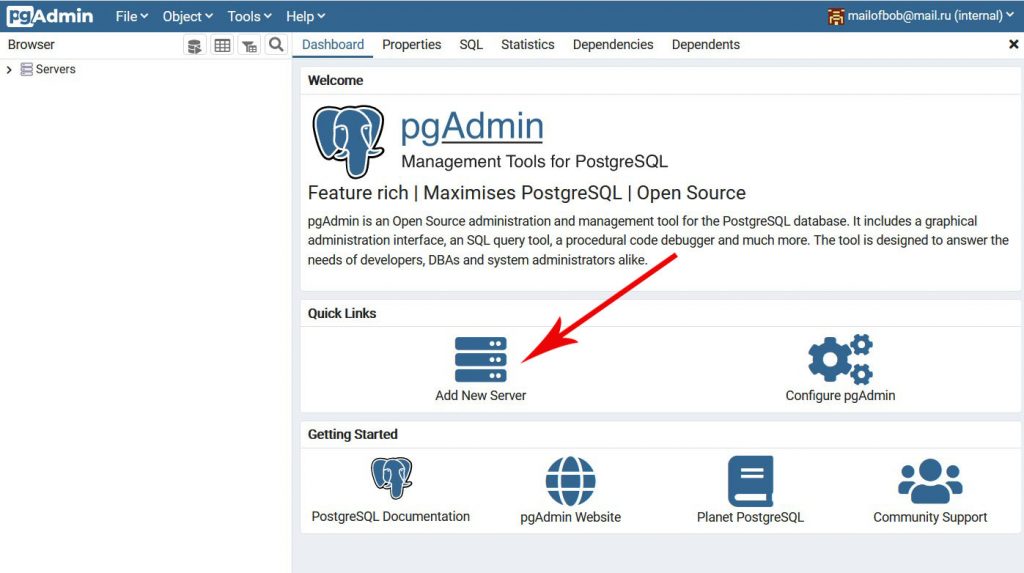
Далее, заполните данные нового сервера на закладке General и перейдите на закладку Connection :
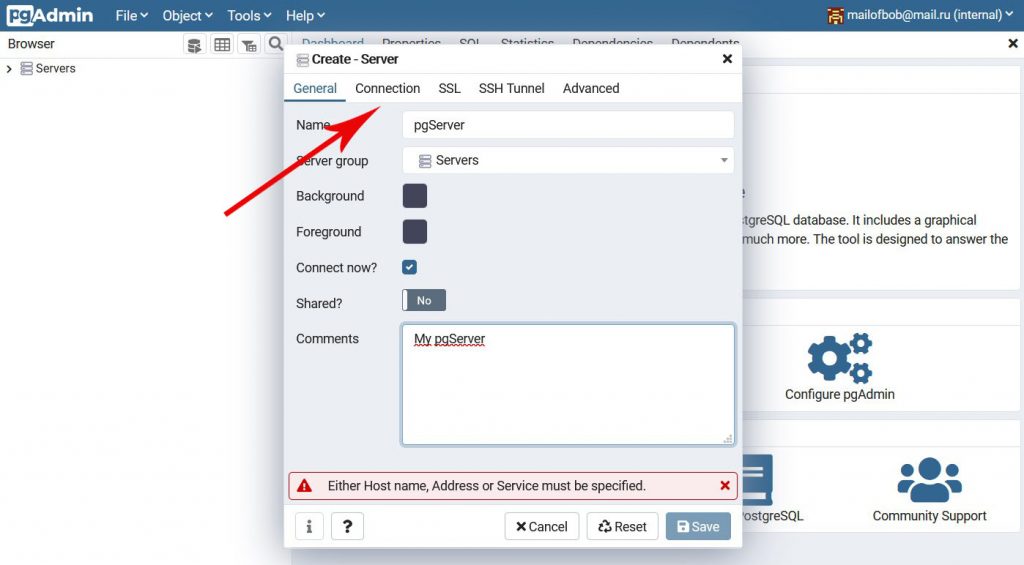
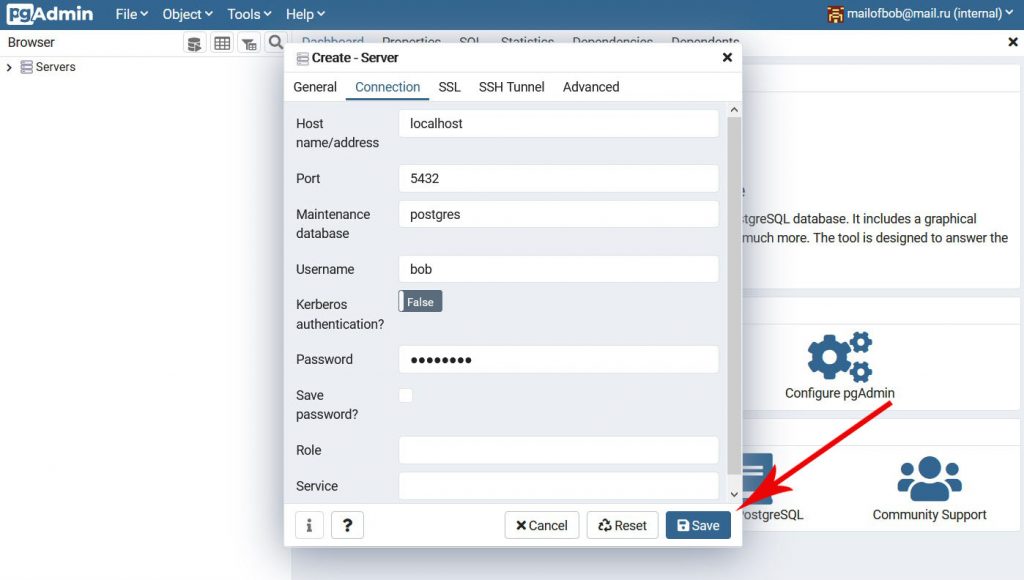
Теперь, заполните данные, необходимые для подключения к серверу. В строке Host name/address введите localhost , в строке Port можно оставить номер порта по умолчанию – 5432. В строке Maintenance database оставьте значение postgres . А вот, в строках Username и Password вы должны указать имя пользователя и его пароль, которые вы ранее добавили в PostgreSQL. В нашем примере это был пользователь bob с паролем P@$$w0rd . Вам, разумеется, необходимо использовать данные своей учётной записи PostgreSQL. Когда всё будет готово, нажмите Save .
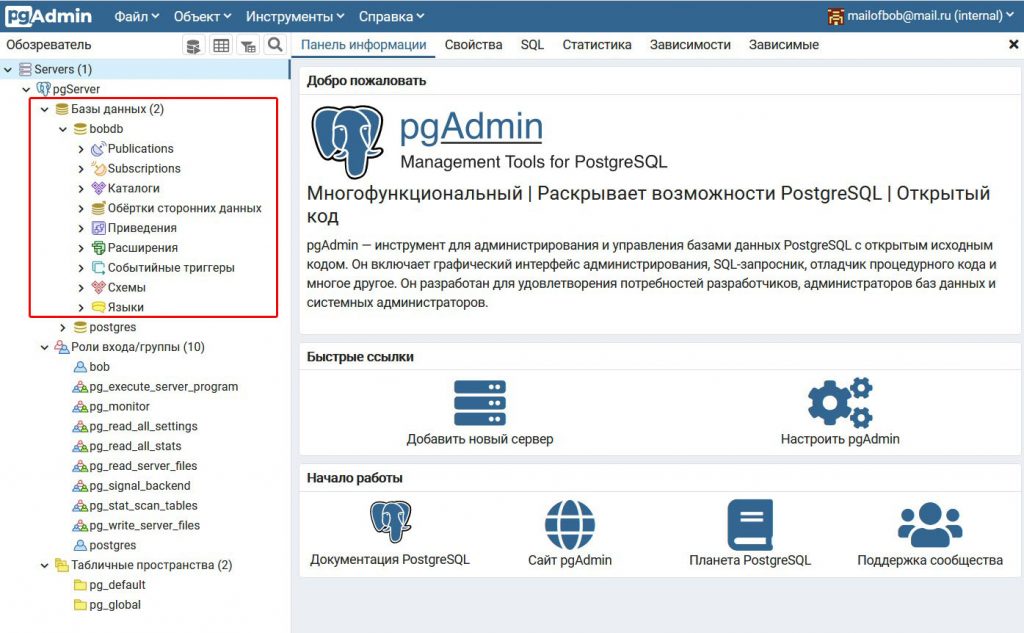
Если введённые учётные данные корректны, вы попадёте в панель управления pgAdmin4. Здесь, вы даже можете найти ту базу данных, которую вы создавали при настройке PostgreSQL. В нашем примере это была база данных bobdb .
Таким образом, мы установили СУБД PostgreSQL, создали там учётную запись, базу данных и добавили созданному пользователю набор полномочий по отношению к созданной базе. После чего, мы подключились к СУБД PostgreSQL при помощи веб-интерфейса pgAdmin4. Основой всего нам послужил виртуальный выделенный сервер (VPS), работающий под управлением операционной системы Ubuntu 20.04.