How to Use DiskPart Utility in Windows
The Disk Management Tool is a useful, effective tool for managing your Windows disks and partitions, but it isn’t as powerful to use as Diskpart. This command-line tool lets you delete, create and modify partitions on any hard drives or USB storage your PC can detect.
We’d recommend using the Disk Management Tool for most situations, but if Windows isn’t starting up properly, or if you prefer to use the PowerShell terminal, Diskpart is the perfect alternative. Here are some of the more common Diskpart commands to help you learn how to use Diskpart effectively.
How To Use Diskpart
If you want to use Diskpart, you need to open up a Windows command line or PowerShell terminal. Diskpart is a destructive tool, so you’ll need to open a terminal window with the right administrative privileges.
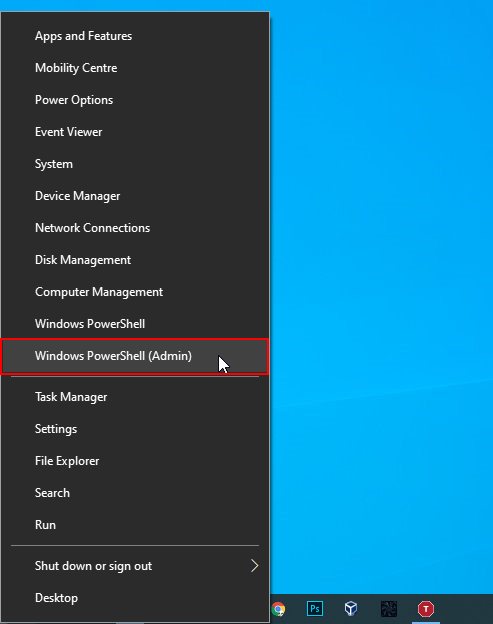
- To open Diskpart in Windows, right-click your Windows Start menu button and click Windows PowerShell (Admin).
- In your admin-level PowerShell terminal (or similar Windows command line), type diskpart and hit enter.
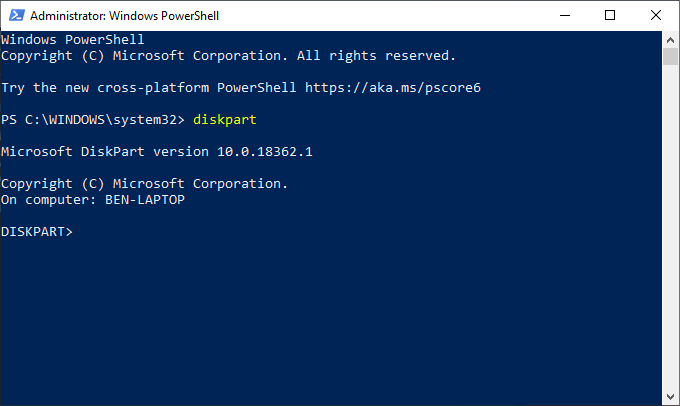
- The Diskpart tool will launch within the window, ready for you to use. Type exit at the “DISKPART>” prompt and hit enter once you’ve finished using it.
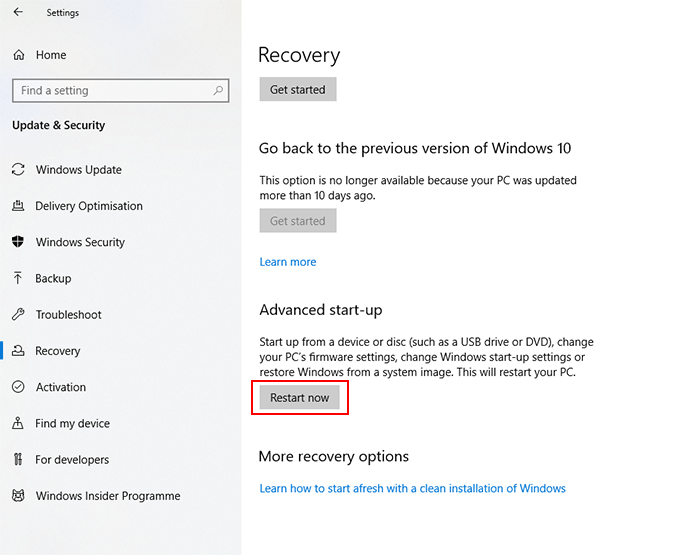
- Diskpart is also available for users booting into the Windows Recovery Environment, available when you boot your PC using the Advanced Startup mode in your Settings > Windows Update & Security > Recovery menu.
- Click Restart Now to boot to WinRE.
We’ll explore some of the most common Diskpart commands in this article, but if you want to quickly see the full list of available Diskpart commands, type help at the “DISKPART>” prompt and hit enter.
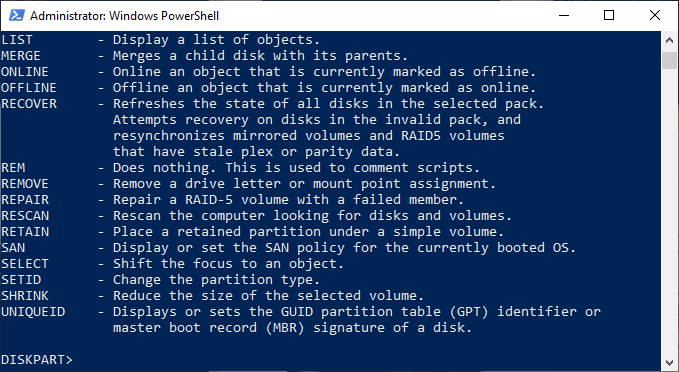
Listing Existing Hard Drives, Volumes & Partitions
Once Diskpart is open, the first thing you should do is check the current layout of your hard drives and attached storage.
- At the “DISKPART>” prompt, type list disk and hit enter. This will list all of the available storage drives (including hard drives, USB storage, SD cards, etc.) that your PC can currently detect.
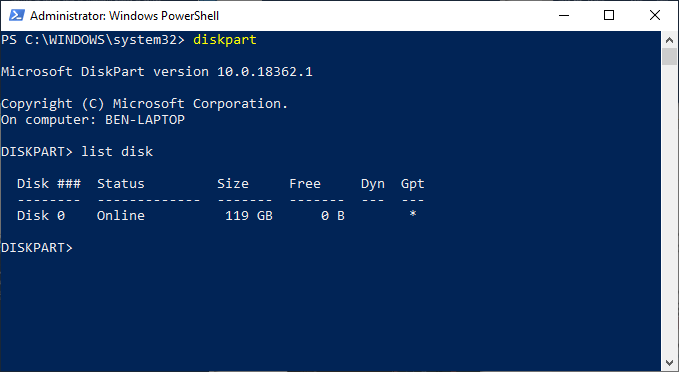
- Starting with the number zero, Diskpart will list any detected disks. You’ll need to remember the disk number (for instance, “0” for your Windows hard drive) to use with future Diskpart commands.
- Along with your list of disks, you can also ask Diskpart for a list of detected volumes. At the “DISKPART>” prompt, type list volume.
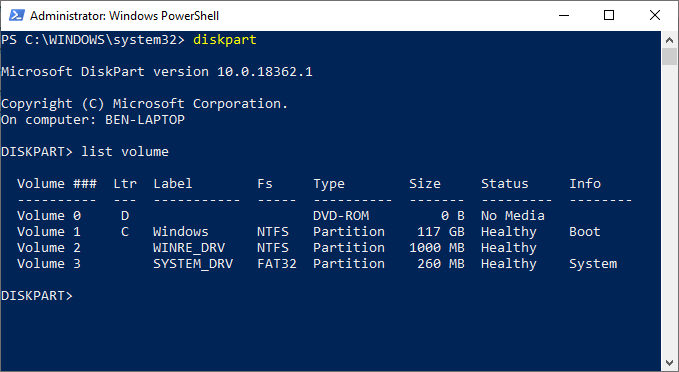
- Diskpart can also let you list individual hard drive partitions (some of which may match the volumes listed with the “list volume” command). You’ll need to select a hard disk first with the list disk command.
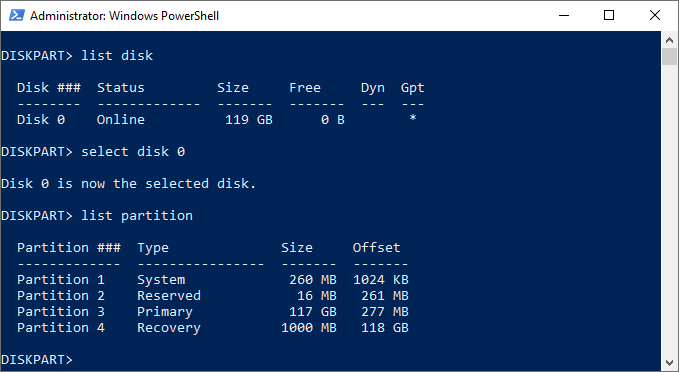
- At the “DISKPART>” prompt, type select disk followed by the disk number (for instance, select disk 0). Diskpart will confirm that the disk is selected at this point.
- Once a disk is selected, type list partition. This will list the current partitions on your drive. You’ll be able to delete or modify these partitions from here, using the partition number in a later Diskpart command.
Deleting a Hard Drive Partition Or Volume Using Diskpart
A hard drive (disk) is separated into partitions, which are often the same as listed volumes. If your hard drive is separated into several partitions or volumes, and you wish to delete one, you can do that using Diskpart commands.
- Select your hard drive using select disk.
- At the “DISKPART>” prompt, type list partition, then select partition #, replacing # with your partition number.
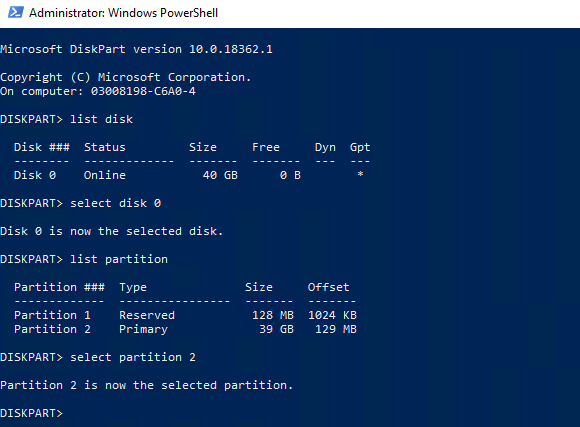
- Once a partition is selected, type delete partition. Diskpart will confirm whether or not the partition has been deleted afterward.
- You can also delete disk volumes directly if you’d prefer. Type list volume, locate your chosen volume number, then type select volume #, replacing # with your volume number.
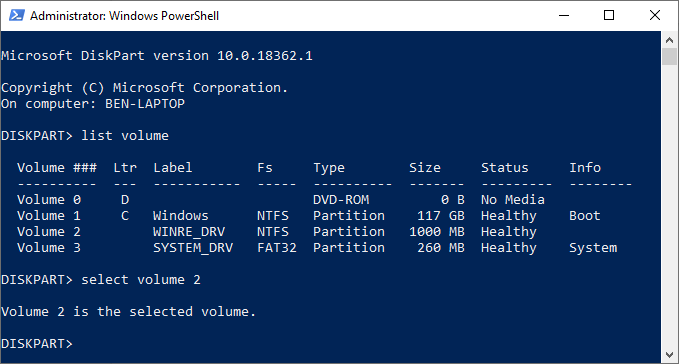
- Type delete volume to delete the volume completely. Diskpart will confirm if the command was successful or not afterward.
Wiping a Hard Drive Completely Using Diskpart Clean
Rather than removing individual volumes or partitions on a drive, you can wipe a hard drive completely using the Diskpart clean command. You can also use this command if you’re looking to wipe a USB flash drive, ready for formatting.
You won’t be able to do this on your system drive (nor would you want to!) unless you’re using Diskpart on a Windows installation
- At the “DISKPART>” prompt, select the disk you wish to wipe by typing select disk #, replacing # with your disk number. If you don’t know your disk number, type list disk first.
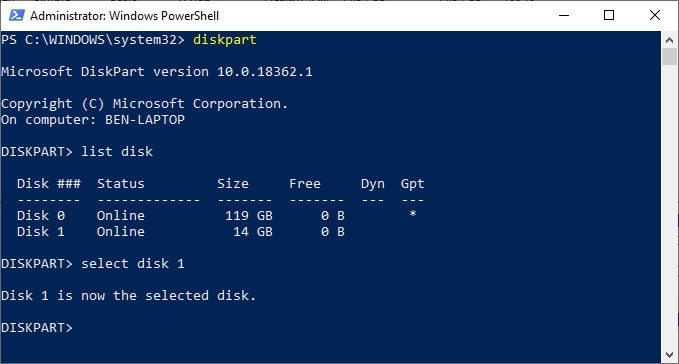
- If you’re sure you want to wipe the disk completely (deleting all drive volumes/partitions), then type clean and hit enter. You won’t be asked for confirmation, so be sure you wish to do this before you begin.
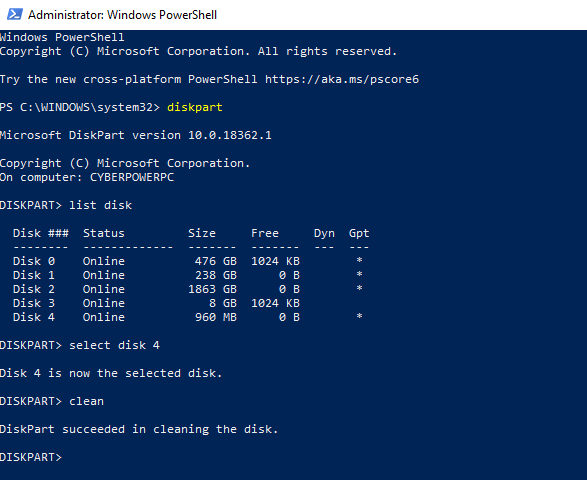
- Diskpart will confirm that the drive has been “cleaned”, ready for new partitions to be created.
Creating & Formatting New Hard Drive Partitions
With a “clean” drive, you’re ready to create a partition in the free space using the Diskpart create partition command. You can then format that new partition with a Windows-friendly file system like NTFS or FAT32 using the Diskpart format command.
- Start by selecting your chosen disk with select disk #, replacing # with your disk number (and using list disk to find your disk number, if you don’t know.)
- With your disk selected, type create partition primary to create a partition using the entire space on that drive.
- If you want to create a partition to take up only some of the free space (letting you create more than one partition), type create partition primary size=X instead, replacing X with the partition size, measured in megabytes (for example, size=1024 for 1GB of space).
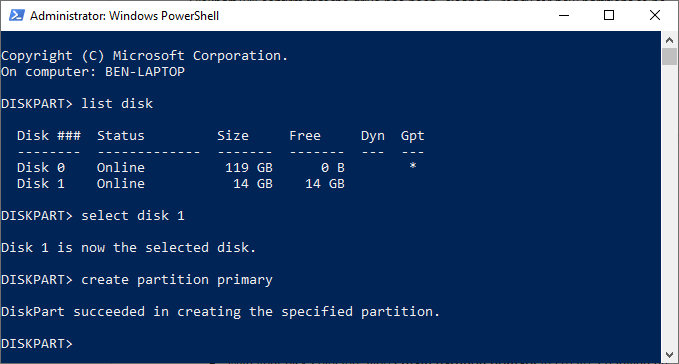
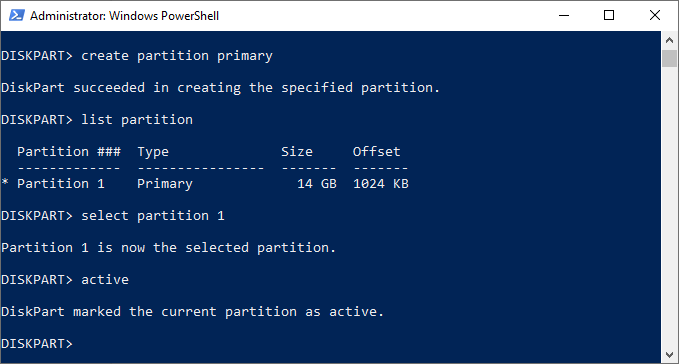
- Type list partition to make sure that your new partition is listed, then type select partition 1 to select it. Mark the partition as active by typing active at the “DISKPART>” prompt. This is necessary if you want to use it as a bootable drive.
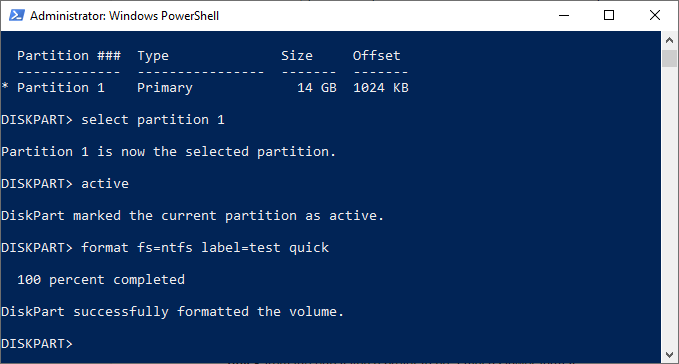
- To quickly format the drive with the NTFS file system, type format fs=NTFS label=Y quick. You can replace Y with any label you’d prefer to use.
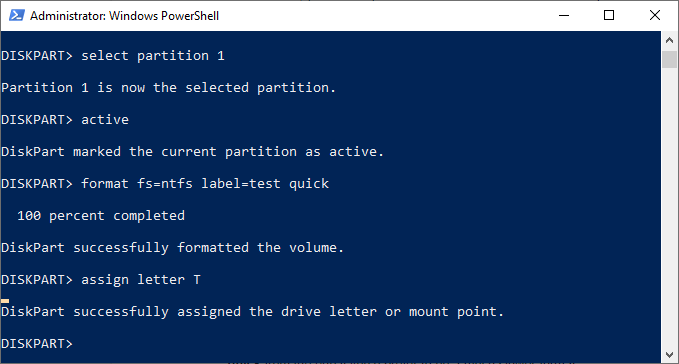
- Once formatted, Windows will likely assign a drive letter automatically. If it doesn’t, type assign letter Z, replacing Z with a free drive letter.
Extend a Hard Drive Volume
If you have an existing hard drive volume that doesn’t take up all of the free space on a drive, and you wish to enlarge it, Diskpart commands allow you to do that.
- Start by selecting your chosen disk with select disk #, replacing # with your disk number (and using list disk to find your disk number, if you don’t know.)
- Type list volume to list all the available volumes on your PC, then type select volume #, replacing # with the volume you’re looking to extend.
- Type extend to expand it to the maximum size available. Diskpart will confirm whether or not the extend command has worked correctly. Confirm the size of the volume has increased by typing list volume for a second time afterward.
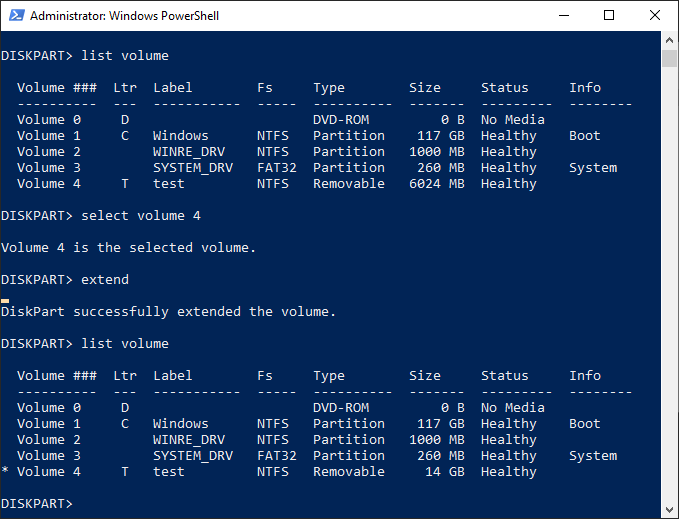
Diskpart has other options available, as the help command briefly explains. If you need further information on how to use Diskpart, Microsoft has further Diskpart support information available.
Ben Stockton is a freelance technology writer based in the United Kingdom. In a past life, Ben was a college lecturer in the UK, training teens and adults. Since leaving the classroom, Ben has taken his teaching experience and applied it to writing tech how-to guides and tutorials, specialising in Linux, Windows, and Android. He has a degree in History and a postgraduate qualification in Computing. Read Ben’s Full Bio
diskpart – Guide for Windows XP, Vista, 7, 8, 10
The diskpart utility (available in Windows 2000, XP, Vista, 7, 8, 8.1 and 10) can be used to create or delete partitions on your PC.

Command Prompt: list disk
The utility allows you to:
- Partion
- Remove partitions
- Remove formatting
- Assign and remove drive letters and mount points
- Convert disks from basic to dynamic
- Create and extend volumes
Most commands that you can perform in Disk Management (see Boot partitions) are available with diskpart. Because it’s a command line utility, you need to open Command Prompt and type diskpart .
On Windows Vista, 7, 8 and 10 systems, you can type diskpart at Run, click OK or press Enter and Command Prompt will automatically open with diskpart loaded.
When the utility is loaded, you will notice the version installed on your computer:
Commands and parameters
The diskpart tool has the following commands and parameters available:
- select can set the focus on a specific target
- select disk – use this command to set the focus on a specific disk

Command Prompt: select disk
Error Codes
You can find a list error codes to debug various errors:
- Code 0 means that no errors occurred
- Code 1 means that a fatal exception occurred
- Code 2 means that the parameters you specified for a command are incorrect
- Code 3 means that diskpart is unable to open the specified file
- Code 4 means that diskpart (one of the services used by the utility) returned a failure
- Code 5 means a command syntax error
diskpart in Windows XP
Note that the fdisk utility found in pre-Windows XP systems is now known as diskpart on Windows XP systems.
If you can boot into Windows XP
If you can boot into your computer, you simply need to open Command Prompt to access diskpart:
- Boot into Windows XP
- Click Start
- Click Run
- Type cmd
- Press Enter or click OK
- At the Command Prompt window, type diskpart
- Press Enter
If you can’t boot into Windows XP
If you can’t boot into Windows XP to access diskpart, you have 2 options:
- Use the original CD to access Recovery Console
- Use Easy Recovery Essentials to launch Command Line
If you have the original CD:
If you can’t boot into Windows XP, but you have the original CD, you can access the Recovery Console:
- Insert the Windows XP CD
- Reboot the computer
- Press any key to boot from the CD
- At the Microsoft Setup menu, press R
- Select the operating system and enter the Administrator password, if requested
- When Command Line appears, type diskpart
- Press Enter
If you use Easy Recovery Essentials:
- Download Easy Recovery Essentials
- Burn the ISO Image. Follow our instructions on how to burn a bootable ISO image. If you’d like to have a recovery USB instead, follow our instructions on how to make a recovery USB.
- Boot Easy Recovery Essentials from the CD, DVD or USB
- Select Launch Command Line
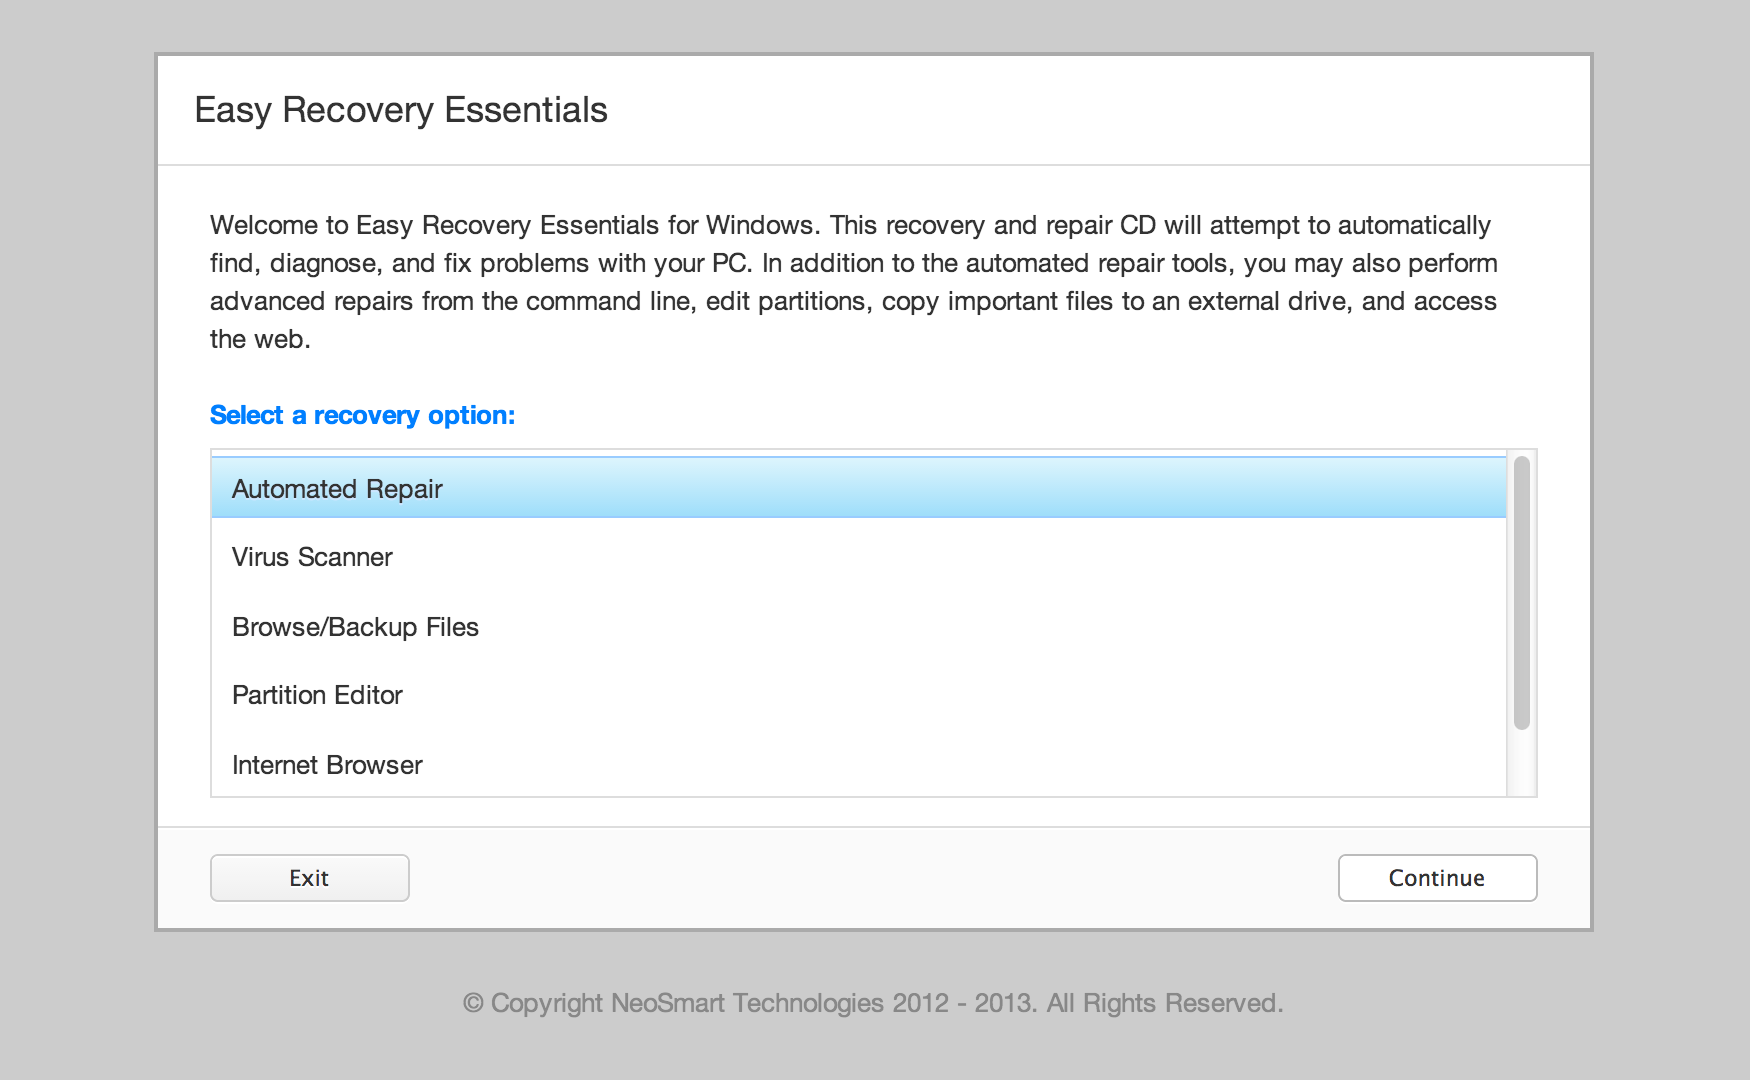
diskpart in Windows Vista
You need to run these steps as an Administrator on Windows Vista systems.
If you can boot into Windows Vista
You simply need to open Command Prompt, if you can boot into Windows Vista:
- Boot into Windows Vista
- Click Start
- Type cmd
- Click Command Prompt from the search results list. You may need to right-click Command Prompt > Run as Administrator, if you are not logged in as Administrator already
- Type diskpart
- Press Enter
For the full list of diskpart commands and paremeters, go to Commands and Parameters.
If you can’t boot into Windows Vista
If you can’t boot into your system, you have the following options:
- Use the installation disc to access System Recovery Options
- Access System Recovery Options without the installation disc (if installed)
- Use Easy Recovery Essentials and access Command Line
If you have the installation disc:
If you can’t boot into Windows Vista, but you have the Windows Vista disc, follow these steps to open diskpart:
- Insert the original CD/DVD in the optical drive
- Boot your computer
- Press any key to boot from the CD/DVD
- Select your language, time and keyboard
- Click Next
- Click Repair your computer
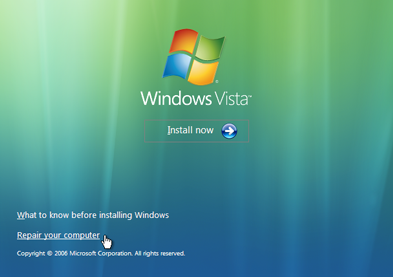
- Select the operating system
- Click Next
- When the System Recovery Options screen appears, click Command Prompt
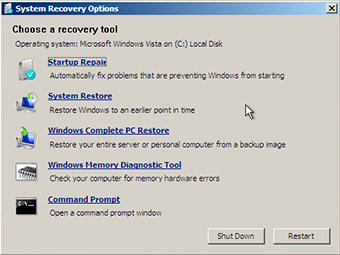
- Type diskpart :
- Press Enter
For the full list of diskpart commands and paremeters, go to Commands and Parameters.
If you don’t have the installation disc:
If your Windows Vista has the System Recovery Options installed and is available at the Advanced Boot Options menu, you can run Command Prompt from there. Otherwise, see the “If you use Easy Recovery Essentials” set of instructions below.
Follow these steps below to access diskpart without the installation disc:
- Reboot the computer
- Press F8 as your computer starts to boot, but before the Windows Vista logo appears
- Select Repair Your Computer, at the Advanced Boot Options menu
- Select Command Prompt at the System Recovery Options menu
- Type diskpart
- Press Enter
- Download Easy Recovery Essentials
- Burn the ISO Image. Follow our instructions on how to burn a bootable ISO image. If you’d like to have a recovery USB instead, follow our instructions on how to make a recovery USB.
- Boot Easy Recovery Essentials from the CD, DVD or USB
- Select Launch Command Line
- Boot into Windows 7
- Click Start
- Type cmd
- Click Command Prompt from the search results list. Right-click on Command Prompt > Run as Administrator.
- When Command Prompt loads, type diskpart
- Press Enter
- Use the installation disc
- Boot into the Advanced Boot Options menu to access System Recovery Options
- Use Easy Recovery Essentials and access Command Line
- Insert the disc in the optical drive of your computer
- Restart the computer
- Press any key to boot from the disc
- Select your preferred language, time and keyboard
- Click Next
- Click Repair your computer at the Install Windows screen
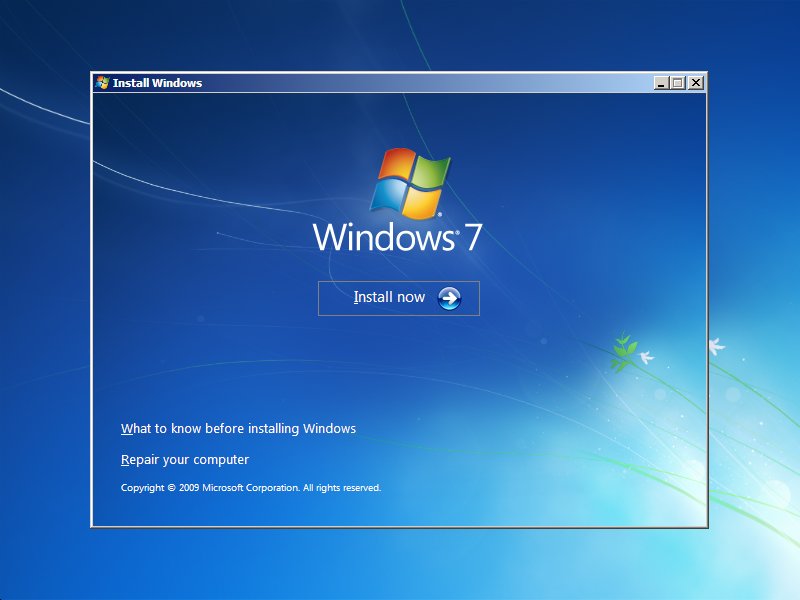
- Select the operating system from the list
- Click Next
- Select Command Prompt
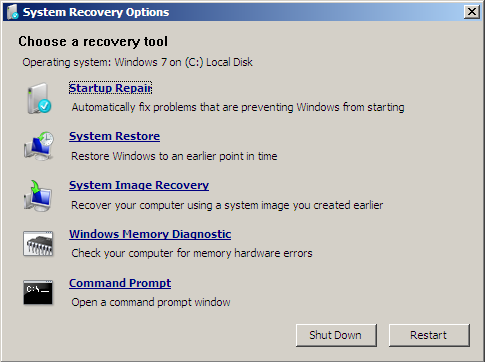
- Type diskpart
- Press Enter
- Restart the computer
- Press F8 as the computer starts to boot. Press F8 before the Windows 7 logo appears.
- Select Repair Your Computer at the Advanced Boot Options screen
- Download Easy Recovery Essentials
- Burn the ISO Image. Follow our instructions on how to burn a bootable ISO image. If you’d like to have a recovery USB instead, follow our instructions on how to make a recovery USB.
- Boot Easy Recovery Essentials from the CD, DVD or USB
- Select Launch Command Line
- Boot into Windows 8
- Press the key and C to open the charm bar
- Type cmd
- Click Command Prompt
- When Command Prompt opens, type diskpart
- Press Enter
- Use the original DVD or USB with Windows 8 or Windows 8.1 to access the Repair your computer option
- Boot into the System Recovery Options with Shift and F8
- Use Easy Recovery Essentials to launch Command Line
- Insert the Windows 8 DVD or 8.1 USB
- Restart the computer
- Press any key to boot from the media
- Click Repair your computer or press R
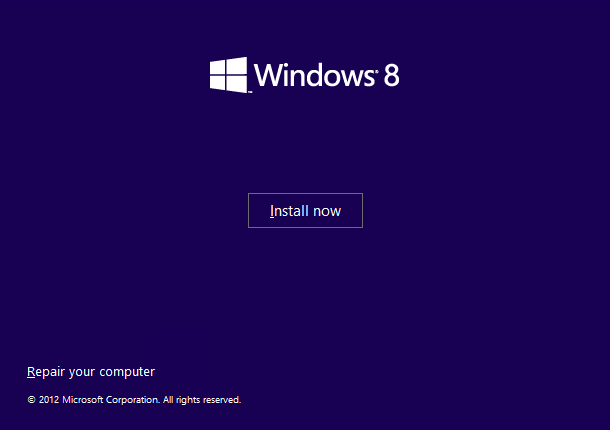
- Select Troubleshoot
- Select Command Prompt
- Type diskpart
- Press Enter
- Reboot the system
- Press Shift and F8 very quickly
- At Choose an option, select Troubleshoot
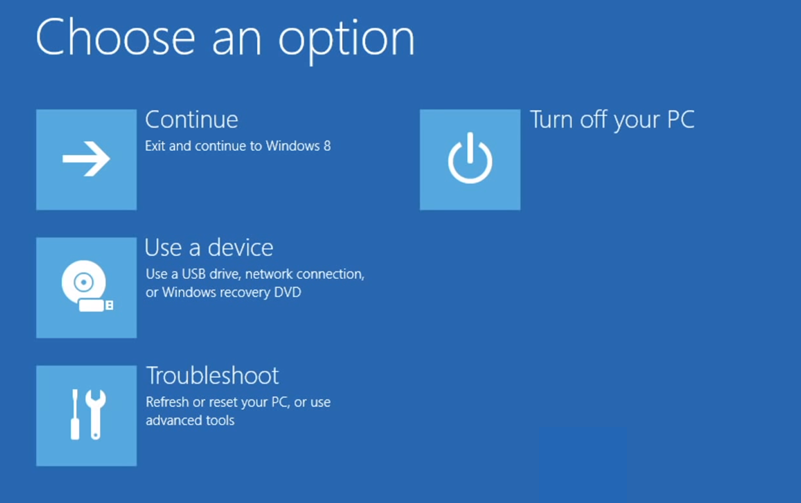
- Select Command Prompt
- Type diskpart
- Press Enter
- Download Easy Recovery Essentials
- Burn the ISO Image. Follow our instructions on how to burn a bootable ISO image. If you’d like to have a recovery USB instead, follow our instructions on how to make a recovery USB.
- Boot Easy Recovery Essentials from the CD, DVD or USB
- Select Launch Command Line
- Boot into Windows 10
- Press the key and C to open the charm bar
- Type cmd
- Click Command Prompt

- When Command Prompt opens, type diskpart
- Press Enter
- Use the original DVD or USB with Windows 10 to access the Repair your computer option
- Boot into the System Recovery Options with Shift and F8
- Use Easy Recovery Essentials to launch Command Line
- Insert the Windows 10 or USB
- Restart the computer
- Press any key to boot from the media
- Click Repair your computer or press R
- Select Troubleshoot
- Select Command Prompt
- Type diskpart
- Press Enter
- Reboot the system
- Press Shift and F8 very quickly
- At Choose an option, select Troubleshoot
- Select Command Prompt
- Type diskpart
- Press Enter
- Download Easy Recovery Essentials
- Burn the ISO Image. Follow our instructions on how to burn a bootable ISO image. If you’d like to have a recovery USB instead, follow our instructions on how to make a recovery USB.
- Boot Easy Recovery Essentials from the CD, DVD or USB
- Select Launch Command Line
- Use the original CD/DVD or USB of your Windows to access Recovery Console (for Windows XP) or System Recovery Options (for Windows Vista-8)
- Boot into the recovery mode of your Windows
- Use Easy Recovery Essentials, our recovery and repair disk, and open Command Line to access diskpart
- Download Easy Recovery Essentials
- Burn the ISO Image. Follow our instructions on how to burn a bootable ISO image. If you’d like to have a recovery USB instead, follow our instructions on how to make a recovery USB.
- Boot Easy Recovery Essentials from the CD, DVD or USB
- Select Launch Command Line
- Open the utility by typing diskpart in Command Prompt
- Press Enter
- Once loaded, type list disk :
- Press Enter
- Determine which of the disks listed is your USB flash drive, e.g. Disk 2.
- Type select disk 2 , if #2 is the USB flash drive presented by the list disk command
- Press Enter
- Type clean to clean the USB flash drive:
- Press Enter
- Type this command:
- Press Enter
- Type active :
- Press Enter
- You should now receive this confirmation message:
- Type this command to format the USB flash drive:
If a “Repair Your Computer” option isn’t listed, System Recovery Options is not installed on your computer. Use the original installation disc or go to the “If you use Easy Recovery Essentials”set of instructions below .
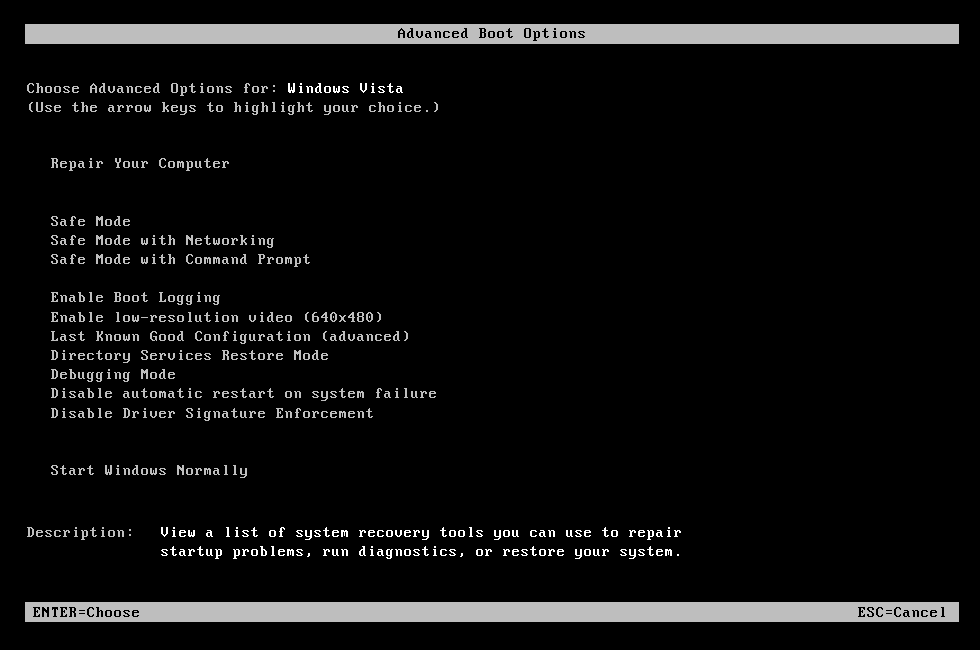
For the full list of diskpart commands and paremeters, go to Commands and Parameters.
If you use Easy Recovery Essentials:
If you don’t have the installation disc available, can’t boot into Windows Vista or you don’t have the “Repair Your Computer” option listed at the Advanced Boot Options menu, you can use Easy Recovery Essentials to access Command Prompt and load diskpart.
Follow these steps:
diskpart in Windows 7
On Windows 7 systems, you can access diskpart just as you do Windows Vista systems.
Note that you need to run these steps as an Administrator on Windows 7 computers.
If you can boot into Windows 7
If you can boot into your Windows 7 system, simply open Command Prompt:
For the full list of diskpart commands and paremeters, go to Commands and Parameters.
If you can’t boot into Windows 7
Similar to Windows Vista, if you can’t boot into your system, you have the following options:
If you have the installation disc:
If you can’t boot into Windows 7, but you have the installation disc, you can run diskpart using the disc. To do so, follow these steps:
For the full list of diskpart commands and paremeters, go to Commands and Parameters.
If you don’t have the installation disc:
Usually, Windows 7 systems should have the System Recovery Options installed on the hard drive. If it’s not (follow steps below), go to the “If you use Easy Recovery Essentials” set of instructions below for an alternative to access diskpart.
Follow these steps to access diskpart without an installation disc on a Windows 7:
If Repair Your Computer is not listed, System Recovery Options is not installed on your PC. Go to If you use Easy Recovery Essentials for an alternative.
For the full list of diskpart commands and paremeters, go to Commands and Parameters.
If you use Easy Recovery Essentials:
Easy Recovery Essentials can run from any CD, DVD or USB flash drives.
To access diskpart using Easy Recovery Essentials, follow these steps:
diskpart in Windows 8
If you can boot into Windows 8
If you can boot into your Windows 8 system, you simply need to open Command Prompt to access diskpart. To do so, follow these steps:
For the full list of diskpart commands and paremeters, go to Commands and Parameters.
If you can’t boot into Windows 8
If you can’t boot into your Windows 8, you have these options available:
If you have the installation disc:
If you can’t boot, but you have the installation disc, follow these steps:
For the full list of diskpart commands and paremeters, go to Commands and Parameters.
If you don’t have the installation disc:
If you don’t have the installation disc, you can boot into System Recovery Options or use Easy Recovery Essentials.
To access diskpart without an official Windows 8 or Windows 8.1 disc, follow these steps:
For the full list of diskpart commands and paremeters, go to Commands and Parameters.
If you use Easy Recovery Essentials:
Easy Recovery Essentials can run from any CD, DVD or USB flash drives.
To access diskpart using Easy Recovery Essentials, follow these steps:
diskpart in Windows 10
If you can boot into Windows 10
If you can boot into your Windows 10 system, you simply need to open Command Prompt to access diskpart. To do so, follow these steps:
For the full list of diskpart commands and paremeters, go to Commands and Parameters.
If you can’t boot into Windows 10
If you can’t boot into your Windows 10, you have these options available:
If you have the installation disc:
If you can’t boot, but you have the installation disc, follow these steps:

For the full list of diskpart commands and paremeters, go to Commands and Parameters.
If you don’t have the installation disc:
If you don’t have the installation disc, you can boot into System Recovery Options or use Easy Recovery Essentials.
To access diskpart without an official Windows 10 media, follow these steps:

For the full list of diskpart commands and paremeters, go to Commands and Parameters.
If you use Easy Recovery Essentials:
Easy Recovery Essentials can run from any CD, DVD or USB flash drives.
To access diskpart using Easy Recovery Essentials, follow these steps:
Troubleshooting
Download diskpart
You can not download diskpart utility. This utility is a command line utility part of Windows.
To access diskpart, you have the following options:
Instructions on how to access diskpart if you use Easy Recovery Essentials:
Instructions on how to access diskpart if you have the installation disc:
Instructions on how to access diskpart if you don’t have the installation disc:
Format USB with diskpart
To format a USB flash drive with diskpart, follow these steps:
Bootable USB with diskpart
To create a bootable USB using diskpart, follow the steps from Format USB with diskpart.
Once successfully formatted the drive, simply copy the files to the USB drive.
USB not showing in diskpart
diskpart will not list external media, e.g. USB flash drive, if you’re using Windows XP.
Windows Vista to Windows 8 systems will show the USB flash drives in diskpart.
More Information
Support Links
It’s an easy-to-use and automated diagnostics disk. It’s available for Windows 8, Windows 7 and Windows Vista. It’s also available for Windows XP and Windows Server.
Applicable Systems
This Windows-related knowledgebase article applies to the following operating systems:
Как узнать букву диска в командной строке?
Вы можете получить список доступных объектов и определить число или букву диска с помощью: list disk — Отображает все диски на компьютере. list volume — Отображает все тома на компьютере. list partition — Отображает разделы на диске, на котором находится фокус на компьютере.Apr 2, 2022
Чтобы проверить диск сначала нужно запустить командную строку с правами администратора. Это можно сделать несколькими способами. Самый простой вариант, это воспользоваться поиском в меню « Пуск ». Как уже было сказано, для проверки диска через командную строку используется команда « chkdsk », которой нужно передать букву проверяемого диска и опции.
Например, если вы смените букву для диска D, то придется переустанавливать все приложения, которые обращаются к нему, так как в их памяти будут стоять координаты D. Изменить букву системного диска Windows можно, но это приведет к сбою работы всей операционной системы, поэтому не стоит это делать, особенно сторонними утилитами.
Для начала зайдите в меню Пуск и введите в строку поиска «Управление компьютером» после нажатия клавиши Enter откроется необходимое для дальнейшей работы окно. Если нет окон, то введите «Создание и форматирование разделов жесткого диска».
Как посмотреть имя диска?
кликните правой кнопкой мышки по ярлыку «Мой Компьютер»; щелкните на пункт «Управление»; перейдите во вкладку «Запоминающие устройства» – «Управление дисками»; также во вкладке «Диспетчер устройств» выберите «Дисковые устройства», там вы увидите модель диска.
Как дать диску букву через командную строку?
Введите команду assign letter= буква и нажмите Enter. Вместо буква вам нужно поставить букву, которую вы хотите присвоить выбранному диску. К примеру, мы меняем диск d на F, и мы уже выполнили предыдущие пункты инструкции выше, вводим команду assign letter= F и нажимаем Enter.
Как перейти на диск C в командной строке?
Команда CD диск: отображает имя текущего каталога указанного диска. Команда CD без параметров отображает имена текущих диска и каталога. Параметр /D используется для одновременной смены текущих диска и каталога.
Как дать диску букву?
Вот как изменить букву диска:Откройте модуль управления дисками с правами администратора. . В оснастке управления дисками выберите и удерживайте (или щелкните правой кнопкой мыши) том, для которого хотите изменить или добавить букву диска, а затем выберите команду Изменить букву или путь к диску.
Как изменить букву диска через diskpart?
Для того чтобы задать букву T для раздела диска, нужно задействовать команду assign letter=t; если вы не указываете букву, Diskpart автоматически назначает следующую доступную букву для раздела.
Как узнать букву диска в командной строке? Ответы пользователей
Оказавшись в Windows PE или среде восстановления (Windows RE), вы видите командную строку. Очень часто первой задачей становится определение .
Наглядное определение букв дисков в CMD WinRE · Находясь в командной строке наберите команду notepad и нажмите Enter . Должен открыться всем .
Для того, чтобы определить букву диска нам поможет командная строка. Наберите там команду notepad и нам откроется блокнот. Жмем Ctrl+O.
Система Windows XP, как средствами командной строки узнать какие диски . disc перестала показывать список дисков, выдается только help.
Как сделать диск системным через командную строку? Как преобразовать диск из MBR в GPT? Как изменить букву диска в Windows 10, например флешки, .
Как определить букву диска с помощью командной строки?
Запускаем командную строку. Пуск — Выполнить — cmd — Ok. или Windows+R 2. В командной строке запускаем утилиту DiskPart:.
Собственно и всё – единственная строка кода вернёт нам букву нашего загрузочного диска. Только не стоит пренебрегать обработкой ошибок, .
Как определить флешку в Командной строке, если её буква диска неизвестна? Windows Решение и ответ на вопрос 1742735.
Как получить полный набор сведений о жестком диске в командной строке
Н еобходимость получить подробные сведения о жёстком диске вовсе не обязывает использовать стороннее программное обеспечение. С этой задачей превосходно справляется консольная утилита wmic с параметром diskdrive . В свою очередь объект diskdrive поддерживает более пятидесяти ключей, подставляя которые в команду, можно узнать о винчестере практически всё — от производителя и серийного номера до типа интерфейса и общего количества считывающих головок на диске.
Откройте командную строку, можно от имени администратора, можно без, и выполните команду следующего вида:
wmic diskdrive get Name, Manufacturer, Model, DeviceID, Partitions, Status, InterfaceType, SerialNumber
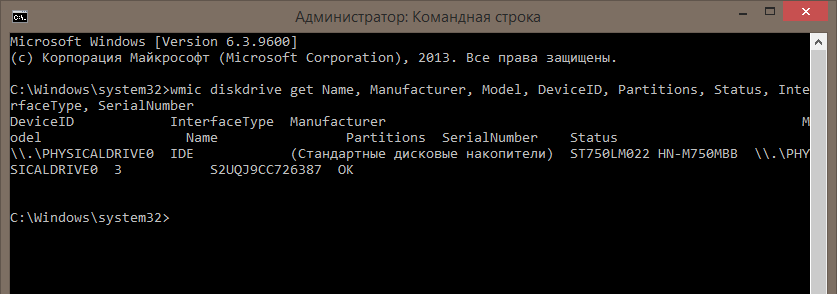
Всё, что идёт после «wmic diskdrive get» является свойствами или объектами diskdrive . В приведённом примере мы по порядку запросили следующие данные:
• Определяющую устройство метку
• Название производителя
• Номер модели
• Уникальный идентификатор диска
• Количество читаемых системой разделов
• Состояние (исправен или нет)
• Тип интерфейса
• Серийный номер устройства, определенный производителем