BIOS for Beginners
This area of the BIOS seems to be the most misunderstood. When these settings are not properly configured, the result can be systems that do not shut down correctly, or that enter or awaken from the Standby or Hibernate modes improperly. Since Windows has built-in power management, you’ll want to disable all power management in the BIOS. Otherwise, the two fight with each other, and neither works properly. Motherboard manufacturers don’t assume that everyone is using Windows, so many of these settings exist for non-Windows users.
ACPI Suspend to RAM : ACPI stands for Advanced Configuration and Power Interface — not to be confused with APIC or IPCA, which some people may find as options in their BIOS setup programs. The Suspend to RAM feature, sometimes referred to as S3/STR, lets the PC save more power when in Standby mode, but all devices within or attached to the computer must be ACPI-compliant. Some BIOS’s offer an S1/POS option for this scenario. If you enable this feature and experience problems with the standby mode, simply go back into the BIOS and disable it.
Video Off Method : The DPMS (Display Power Management System) option allows the BIOS to control the video display card if it supports the DPMS feature. The Blank Screen option simply blanks the screen — use this for monitors without either power-management or «green» features. The V/H SYNC Blank option blanks the screen and turns off vertical and horizontal scanning. If your computer and monitor were built within the last four years, I recommend setting this to DPMS.
HDD Down In Suspend : This feature determines whether the hard-disk drive is automatically shut down when the computer enters Suspend mode. While most power settings of this type are controlled within Windows, if you find the hard drive is not powering down when the computer enters Suspend mode — assuming your computer even allows Suspend and Hibernate modes — then enable this option. Otherwise, the recommended setting is Disabled.
PWR Button < 4 Secs : By default, all ATX computers will power off after the power button is held for more than four seconds. This setting tells the computer what to do if the power button is held down for less than four seconds. The options are to power off the system or enter Suspend mode. This setting is up to you.
Power Up On PCI Device : If you use Wake-On-LAN — typically employed in large office environments to turn on computers for remote administration — you will want this setting Enabled. Otherwise, I recommend you set it to Disabled.
Wake/Power Up on Ext. Modem : This setting tells the computer to turn itself on when a phone line plugged into its modem rings. Once again, this is used for remote administration. For other environments — in other words, most users — I recommend you set this to Disabled.
Automatic Power Up : This feature, if enabled, lets you designate a specific time each day when the PC will turn itself on. If that’s useful to you, set it to Enabled. Otherwise, I recommend Disabled.
Time (hh:mm:ss) of Alarm : This field sets the time for automatic power-up, based on a military/24-hour clock. The Automatic Power Up field must be enabled to use this feature.
AC Power Loss Restart : This option lets you tell the PC what to do when power is restored after an unexpected loss of power. Disabled leaves the system off, while Enabled reboots the system. Previous State sets the system back to the state it was in before the power interruption. I recommend you set this to Disabled.
Power On By PS/2 Mouse : When enabled, this feature allows the use of a PS/2 (not USB) mouse to turn on the system. Disabled is recommended, so you don’t accidentally keep turning on your computer.
Power On By PS/2 Keyboard : When enabled, this feature lets specific keys on a PS/2 keyboard be used to turn on the system. Disabled is recommended, as most people find this of an annoyance when they accidentally press the wrong key.
- 1
- 2
- 3
- 4
- 5
- 6
- 7
- 8
- 9
- 10
Current page: Power Management Settings
Stay on the Cutting Edge
Join the experts who read Tom’s Hardware for the inside track on enthusiast PC tech news — and have for over 25 years. We’ll send breaking news and in-depth reviews of CPUs, GPUs, AI, maker hardware and more straight to your inbox.
By submitting your information you agree to the Terms & Conditions and Privacy Policy and are aged 16 or over.
What Does "Power-Up in Standby" Mean?
Power-Up in Standby (PUIS) is a mode available on some electronic devices that allows them to boot into standby, rather than active, mode. When the user actually needs to access the device, a signal tells it to switch to active mode. This saves energy by ensuring that equipment is only fully active when it is needed, and remains in standby when it is not. Some computer systems have components automatically programmed with a power-up in standby setting, and it may also be possible to adjust equipment and accessories to enable this feature.
Historically, when power was supplied to a device like a hard drive, it would immediately spin up and go into active mode. This created a power drain, although it also made the contents instantly accessible to the user. With power-up in standby, when the power is turned on, the hard drive or other device recognizes it and starts in standby mode. It uses less power, waiting for a command from the user.
Please enable JavaScript
To facilitate ease of use, a quick launch feature may be built into the equipment so the user gets a near-instantaneous response when signaling equipment to wake it up. It transitions between standby and active modes, spinning up and getting ready for use. The system may be programmed to put the device back into standby when it isn’t used for a set period of time, allowing idle components to conserve energy by returning to a mode that uses less power. When the user needs to access the equipment again, it starts back up into active mode.
Not all systems support power-up in standby, which can be an important consideration when ordering a custom system or modifying an existing one. Manufacturers who produce devices capable of this feature may have documentation available to help users determine what specs their systems need to support them. It may also be necessary to go into the system programming to adjust the settings in order to activate power-up in standby mode, or to turn it off if it is not desired.
This is one among a range of options provided by computer manufacturers to reduce energy use. In addition to being more environmentally friendly, this can help systems last longer by reducing heat and not making the cooling system work as hard. Consumers who want a power-up in standby option on new computers and accessories can search for products specifically advertising this feature or ask for assistance from sales representatives.
Ever since she began contributing to the site several years ago, Mary has embraced the exciting challenge of being a EasyTechJunkie researcher and writer. Mary has a liberal arts degree from Goddard College and spends her free time reading, cooking, and exploring the great outdoors.
Ever since she began contributing to the site several years ago, Mary has embraced the exciting challenge of being a EasyTechJunkie researcher and writer. Mary has a liberal arts degree from Goddard College and spends her free time reading, cooking, and exploring the great outdoors.
You might also Like
AS FEATURED ON:
AS FEATURED ON:
Related Articles
- What Is a Socket Timer?
- What is Energy Efficiency?
- What is the Eco Button™?
Discussion Comments
A lot of peeps are interested in this since hard drives got bricked by 9879 of win10.
Post your comments
alt=»Ezoic» width=»» height=»» /> report this ad alt=»Ezoic» width=»» height=»» /> report this ad

report this ad
Как отключить питание USB портов при выключении компьютера или ноутбука
Многие пользователи обращают внимание на то, что после завершения работы разъемы USB на компьютере, а в некоторых случаях — и на ноутбуке продолжают подавать питание: индикаторы не периферийных устройствах светятся, зарядка устройств через USB возможна. При желании, это поведение можно изменить.
В этой инструкции подробно о том, как отключить питание USB портов при выключении компьютера: часть действий выполняются в Windows, часть — в БИОС/UEFI. А также кратко о том, что делать в случае, если предложенные действия не срабатывают.
Отключение функции «Быстрый запуск»
Прежде чем приступить к отключению питания на USB портах на выключенном компьютере в UEFI или БИОС, рекомендую выключить функцию «Быстрый запуск» в Windows 11 или Windows 10. Эта функция включена по умолчанию и при этом, когда вы выполняете «Завершение работы», ваш компьютер по факту не выключается полностью — в результате питание на USB может присутствовать.
Для отключения быстрого запуска в Windows 11 и Windows 10 используйте следующие шаги:
- Нажмите клавиши Win+R на клавиатуре (либо нажмите правой кнопкой мыши по кнопке «Пуск» и выберите пункт «Выполнить», введите powercfg.cpl и нажмите Enter.
- В панели слева нажмите «Действия кнопок питания».
- Нажмите «Изменение параметров, которые сейчас недоступны».

- Снимите отметку «Включить быстрый запуск (рекомендуется)» и примените настройки.

Не исключено, что уже после этого действия при завершении работы питание на USB-портах компьютера будет отключаться. В случае, если этого не происходит, переходим к следующему способу, не включая при этом быстрый запуск повторно.
Отключение питания на USB разъемах в БИОС/UEFI
Питание на USB-портах при выключенном компьютере можно отключить в БИОС/UEFI ПК или ноутбука.
В зависимости от конкретной модели материнской платы или ноутбука названия пунктов и их местонахождение может отличаться. Общая логика при отключении питания USB портов после выключения — найти параметр, отвечающий за ErP или Deep Sleep и включить его (если есть возможность выбора — то для режимов S4 и S5), либо отключить функции USB Standby Power или USB Power Delivery.
Далее — несколько примеров (предварительно потребуется зайти в БИОС), по аналогии нужные пункты можно найти и на материнских платах других производителей.
Материнские платы ASUS
Шаги для отключения питания USB-портов на ПК с материнской платой ASUS будут следующими:
- После входа в БИОС включите Advanced Mode, обычно — это клавиша F7.
- Перейдите на вкладку «Advanced» и раскройте пункт APM Configuration.
- Обратите внимание на параметр ErP Ready. Есть два варианта, которые могут помочь выключить питание USB-портов на выключенном ПК. Первый и предпочтительный — выбрать режим S4+S5 для ErP Ready и сохранить настройки на вкладке Exit или с помощью клавиши F10.

- Если это не помогло, второй вариант — переключить Erp Mode в Disabled, нажать Esc для возврата на экран «Advanced», открыть «Onboard Devices Configuration» и переключить «USB Power delivery in Soft Off State» в Disabled и сохранить настройки.

ASRock
На материнских платах ASRock шаги будут следующими:

- Перейдите в раздел «Advanced» в UEFI и откройте пункт ACPI Configuration.
- Переключите параметр Deep Sleep в «Enabled in S4 & S5».
- Сохраните сделанные настройки.
Gigabyte
Действия для отключения питания USB после завершения работы на материнских платах Gigabyte похожи:
- Перейдите в режим «Classic Setup» при наличии.

- Откройте вкладку «Power Management».
- Переключите ErP в Enabled.

- Сохраните настройки.
Путь к нужной настройке на материнских платах MSI:

- Включите Advanced Mode клавишей F7.
- Перейдите в Settings — Advanced — Power Management.
- Переключите ErP Ready в Enabled, а USB Standby Power — в Disabled.
- Сохраните сделанные настройки.
Дополнительная информация
Некоторые дополнительные нюансы, знание о которых может пригодиться в контексте рассматриваемой темы:

- На некоторых устройствах, часто — ноутбуках, функция питания на USB портах при выключенном ноутбуке настраивается иначе: это может быть параметр «USB Charge» на вкладке «Chipset», опция «Always On USB» в разделе «Configuration» или аналогичный параметр.
- Даже после отключения питания USB портов при завершении работы, подключенные устройства могут короткое время продолжать получать питание после выключения компьютера, причина — остаточное напряжение.
- Отключение питания USB разъемов при выключенном компьютере также может отключить возможность пробуждения с мыши или клавиатуры и функцию Wake-on-LAN.
- На старых ПК возможность отключения питания по USB после выключения может отсутствовать.
- Иногда отсутствие драйверов чипсета и управления электропитанием от производителя материнской платы или ноутбука может приводить к тому, что настройки отключения питания на USB-разъемах не приводят к нужному эффекту.
И последнее: в некоторых редких случаях неисправности блока питания или электронных компонентов материнской платы могут приводить к тому, что питание на USB-разъемах есть всегда, пока устройство подключено к электросети, независимо от настроек БИОС/UEFI.
Contact Us
If you still have questions or prefer to get help directly from an agent, please submit a request.
We’ll get back to you as soon as possible.
How to use PUIS feature in OS—power in standby
Updated at August 25th, 2021
Contact Us
If you still have questions or prefer to get help directly from an agent, please submit a request.
We’ll get back to you as soon as possible.
Table of Contents
What Does Power-Up In Standby (PUIS) Mean?
Power Up in Standby (PUIS) is a specific hard disk drive (HDD) feature that allows the drive to spin up only when necessitated by a command, rather than when turning on the computer. This helps save energy or allows staggered spin-up times for multiple disk drives.
How to Enable this function with HighPoint products (Windows/Linux)
The following procedure refers to the RR3740 (RocketRAID 3740). However, it can be applied to any current RocketRAID series controller.
First, Check whether the disk supports PUIS
1. Connect the disk to the RR3700 using the appropriate cable.
2. Download the latest version of the WebGUI management software and RR3740 driver from the official HighPoint website, and install them.
3. Start the WebGUI, and click the Physical tab. Click the Spin up menu option on the right-hand side of the interface: 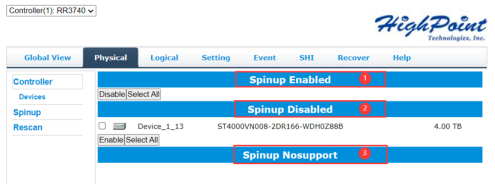
Note: The WebGUI will display the model and serial number for each drive entry.
1) Drives that do not support spin up will be displayed under section 3; Spinup Nosupport .
2) Drives that support spin up features, but do not allow the function to be turned on, will be displayed under section 2; Spinup Disabled .
3) Drives that support spin up features, and allow these functions to be turned on (enabled), will be displayed under the first section; Spinup Enabled .
N ote :PUIS only applies to SATA disks. SAS disks do not support PUIS and will not be displayed under these menus. For more information about the characteristics of your drives, please consult the manufacturer.
How to enable Spin Up support using the WebGUI or Controller BIOS
1. WebGUI. We recommend using the WebGUI to enable or disable Spin Up settings. First, access the Physical tab and click Spinup .
Check the box before the target disk and click Enable : 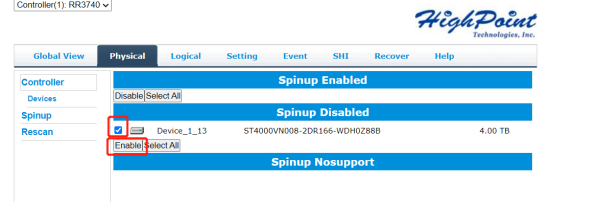
When booting the system, you can access the controller BIOS using the “ Ctrl ” + “ H ” command when prompted. To access the Settings menu, highlight the Settings command from the toolbar, and press the Enter key. Scroll down and select the Staggered Drive spin up setting. 
Staggered Spin up: The default value of this option is “Disabled”. Enabling this setting will instruct the card to power up the hard disks, sequentially (one disk approximately every 2 seconds). Note: not all drives can support this setting – please consult the drive documentation for more information.
3. UEFI Utility (RR3700 series)
After enabling spin up using the WebGUI, the UEFI Utility will support this setting. However, the current UEFI utility cannot enable or disable PUIS. Future releases may include this option.
Trouble S hooting
Q: Why do my drives no longer spin up after enabling PUIS or Staggered Drive spin up?
Answer :Make sure the latest driver and WebGUI/CLI have been installed for the controller. The latest versions are available from the Software Downloads section of the product website.
Q: Why is the controller BIOS unable to detect the drives after enabling PUIS or Staggered drive spin up?
Some drives do not support spin up functions. Make sure you to check if each drive supports these features before attempting to enable the. If the drives are not detected, try disabling this setting using the controller’s BIOS menu.
Answer: Some disks do not support the spin up function, and you need to reset the staggered spin up to Disable in the BIOS; Please enter the system and enter the management software to check whether the disk supports spin up.