How to collect all project files in Premiere Pro
In this tutorial, we’ll learn how to save and organize all the files from a project.
Let’s take a look at this project as an example. Here we have video files: sound track, adjustment layer, graphic elements and watermark.This is how our sequence looks like with all these elements.
To create this video, I`ve used a set of templates and graphic elements from the Hyper project by EasyEdit studio office.
There is a huge variety of titles, graphics, transitions, sounds and even more.Now we need to save the entire assembled project in this form.To do this, click. File > Project Manager.
In this window, select the sequence that we need to save the video >Collect files and copy to a new location > Press Exclude Unused Clips to keep only the original files that you used in your project.Include Audio Conform Files > Include Previev Files > Rename Media Files to Match Clip Names.
This window displays information about the size of your disk and the size of the entire project. And the size of what we are going to copy now.By disabling these features, our file size will be smaller.Press OK button and let`s start copying.
After that close Premiere Pro. And now go to a video folder with all the elements of our project.
This folder can be sent to another person so that he can fully and correctly open the project. By clicking on the file with the name of the project, it will open already in Premiere Pro. Just wait a few seconds and all our files will be uploaded. All files are in place and everything works correctly.With this method, you can easily share your projects with all required files.
10k elements for Reels and Stories
Looking to add a splash of creativity to your Instagram stories and reels? You're just a click away! Discover our iOS app infi: packed with 10,000+ unique stickers and design elements to breathe life into your social media content.
Consolidate, transcode, and archive projects
Use Premiere Pro’s powerful Project Manager to copy projects and associated media files, or consolidate and transcode projects into a single codec for easy archiving.
The Premiere Pro Project Manager helps facilitate an efficient archiving or transcoding workflow by performing two functions:
- Collecting or copying the current project and all of its associated media files to a single location for sharing
- Consolidating files associated with a project for transcoding into a single codec for easy archiving
Copying projects to a new location
The Project Manager can help you collect a project to a new location. Collecting files copies the current project and all of its associated media files to a single storage location. There is no conversion of files when the files are copied.
When collecting a project, you can specify whether the new project retains any of the unused clips from the original project. You also reduce storage requirements by using only the media required to create and export the sequences in the project.
You can use this workflow to gather and copy a project’s source media files stored in various locations into a single location for easy sharing.
Consolidating and archiving projects
The Project Manager lets you effectively manage media and projects, especially large projects with many clips and different media formats.
You can easily archive large projects by transcoding all relevant files in projects and sequences into an intermediate or mezzanine codec.
The Project Manager provides several options to consolidate relevant files into a mezzanine codec based on user-defined preferences. While consolidating the files, the Project Manager copies only portions of source footage used in sequences and automatically creates a trimmed project.
You can easily archive this single codec, or share with other teams and systems. At any point, you can re-edit the archived projects in Premiere Pro.
The functionality of the Create New Trimmed Project option, available in previous versions of Premiere Pro, is included the Consolidate And Transcode option. That is, you can choose to trim your media while archiving a project.
How to copy, transcode, or archive a project
Choose File > Project Manager.
In the Project Manager window, under Sequence, select the check box next to each sequence that you want to select. To check all boxes, Shift-click any one box.
Nested sequences are not automatically selected. If the sequences you are selecting contain nested sequences, ensure that you include these nested sequences in your selection.
You can copy or transcode your project by selecting one of the following options:
Collect Files and Copy to New Location
To collect and copy the footage you used in the selected sequences to a single storage location.
Project Manager does not collect and copy After Effects compositions that are dynamically linked to an Adobe Premiere Pro project. Project Manager does save the Dynamic Link clip in the trimmed project as an offline clip, however.
Consolidate and Transcode
To consolidate the footage you used in the selected sequences and transcode into a single codec for archiving.
- Match: Match the settings of the newly created media with the sequence settings, individual clip settings, or presets.
Uses the frame size, frame rate, field type, and pixel aspect ratio of the selected sequence, and transcodes the matching clips to these settings.
Clips that don’t match these settings are only copied and not transcoded.
Uses the frame size, frame rate, field type, and pixel aspect ratio of each individual clip in the sequence, and transcodes them using their individual settings.
When the source cannot be matched, the clip is only copied and not transcoded. For example, if the clip contains an attribute that the chosen format or preset does not support.
Uses the frame size, frame rate, field type, and pixel aspect ratio of the chosen preset and transcodes all clips to these settings.
When the sources cannot be matched, the clips are only copied and not transcoded.
- Format: You can choose from MXF OP1a files, MXF OP1a files in DNXHD format, or QuickTime format.
- Preset: Based on the selected format, the applicable preset options appear.
The only preset that supports alpha is the GoPro CineForm With Alpha preset. All other presets flatten any alpha channel.
Premiere Pro creates a new project file that links to the selected media based on the following options.
The options that are available depend on the option you choose in the previous step.
Exclude Unused Clips
Specifies that Project Manager will not include, or copy, media you did not use in the original project.
Specifies the number of additional frames to retain before the In point and after the Out point of each transcoded clip. You can set a value from 0 to 999 frames.
For example, a value of 30 means that 30 frames are retained before the In point, and 30 frames are retained after the Out point. Handles function as extra frames that allow for additional minor adjustments to the edits in the new project.
Include Audio Conform Files
Ensures that the audio you conformed in the original project remains conformed in the new project. When not selected, the new project occupies less disk space, but Premiere Pro conforms the audio again when you open the project. This option is available only if you select Collect Files And Copy To New Location.
Convert Image Sequences To Clips
Specifies that Project Manager converts a sequence of still-image files into a single video clip. Where, each still image becomes one frame of video. Selecting this option often improves playback performance.
Include Preview Files
Specifies that effects you rendered in the original project remain rendered in the new project. When not selected, the new project occupies less disk space, but the effects are not rendered. This option is available only if you select Collect Files And Copy To New Location.
Rename Media Files To Match Clip Names
Renames the copied footage files with the same names as your captured clips. Select this option if you rename your captured clips from within the Project window and want the copied footage files to have the same name. (Captured files that you import, especially those captured using scene detection, may not have intuitive names, so you may want to rename them from within the Project window.) This option ensures that the filename of the actual captured footage is updated to reflect the new name in the Project window, greatly simplifying the organization of your footage files. Selecting this option for an MXF file will not change the User Clip Name in the file’s XML; however, it will change the filename of the clip copied for the trimmed project to match the clip name shown in the project panel.
Convert After Effects Compositions To Clips
Converts any After Effects compositions in your project into flattened video clips.
If your project contains dynamically linked After Effects compositions, selecting this option flattens the composition into a video clip. The advantage of selecting this option is that you can play back the converted video clips even on systems that don’t have After Effects installed.
Once you flatten the compositions into video clips, you cannot edit the original compositions in the newly created project. You can however edit the original compositions in the source project using Dynamic Link.
Designates where Project Manager saves the files you specified. Click Browse to navigate to a location other than the default.
When copying a project, Project Manager creates a folder named “Copied_[Project Name]” and copies the project, footage files, and other specified files into the folder.
When consolidating a project for transcoding, Project Manager creates a folder named "Transcoded_[Project Name]” and saves the project, footage files, and other specified files into the folder.
If a folder already exists in the same location with a name identical to the project you are copying or transcoding, Project Manager appends a number to the name. For example, identically named successive projects may have appendages of “_001, _002, _003, _004. ”
Displays a comparison between the size of the current project’s files and the estimated size of the copied or consolidated files. Click Calculate to update the estimate.
When copying files or consolidating files for transcoding, the Project Manager does not produce a P2-compliant MXF file structure for media files that came from a P2 source.
How to Save or Export a Premiere Pro Project with all Files
No matter how well you organise your video editing projects, they can end up becoming bloated with unused video clips, audio files, and images that didn’t make it into the final cut. This is a problem because not only does it make the project more difficult to work with if you need to revisit it in the future, but it also costs more to keep the project long term. Whether you archive to the cloud or keep hard disks in a filing cabinet, it has a cost.
Fortunately, Premiere Pro has a feature that allows you to archive your video projects efficiently.
Premiere Pro projects and all the files used, including any LUTs, can be exported by navigating to File > Project Manager, and choosing what to export, and where it should be saved. A single folder will be created, and the files copied to it. You can then manually organise the files into subfolders.
That’s obviously an overview of the project export process, so I’ll go into more detail, providing step-by-step instructions along with screen-shot images.
Table of Contents
How to export Premiere Pro project with all files
In this step-by-step guide I show how to export a Premiere Pro project to another folder, without transcoding the original clips and only copying over the media used in the project. The intention is to reduce the size of the project to where it equates to the finished video that has been rendered and exported. This is good if your project uses assets that are from other folders on your computer, from other video projects, or from After Effects projects.
Although here the intention is to consolidate all the media assets in one folder while minimizing the overall project size, some steps offer options that will enable you to change the outcome to suit your needs.
Step 1: Open the Project Manager
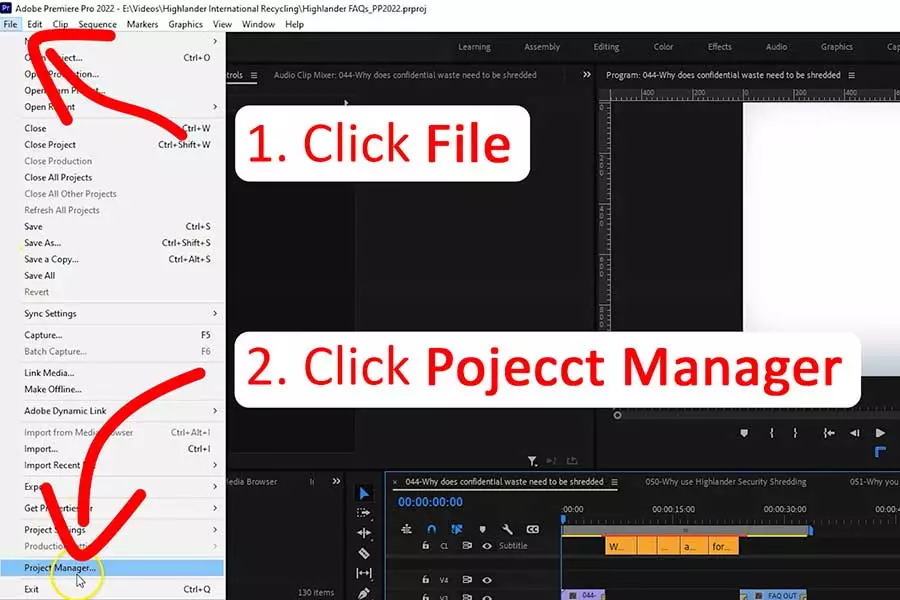
Click on Fil e in the menu bar and then go down to almost the bottom of the drop down menu and click on Project Manager .
Step 2: Choose the sequences you want to export
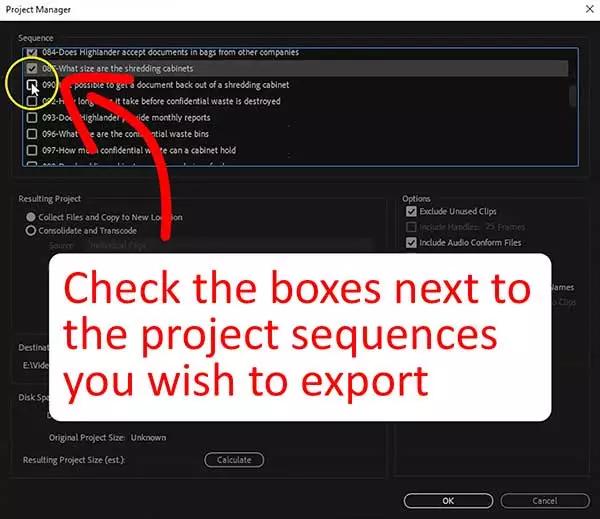
Once the Project Manager has opened, you will see the Sequence pane at the top. It’s populated with a list of all the sequences in your Premiere Pro project. If you have enough sequences, you will be able to scroll through the list.
Click check box next to each sequence you wish to export .
Once you have selected the sequences you wish to export, I would suggest scrolling through the list to visually confirm the sequences you require have been checked.
Step 3: Choose your options
There are eight option you can choose for your exported project. I’ve listed these below and marked in bold green the ones I recommend selecting.
- Exclude unused clips
- Include handles
- Include audio conform files
- Convert image sequences to clips
- Include preview files
- Rename media files to match clip names
- Preserve alpha
Step 4: Choose what happens to the files in the Resulting Project
In the Resulting Project pane, you have two basic choices. The first keeps things simple, in the second you need to make choices and understand the available options. Unless you are confident in what you need to select, I would recommend sticking with the forst option, which is…
- Collect files and copy to new location
Step 5: Choose where the exported project will be saved
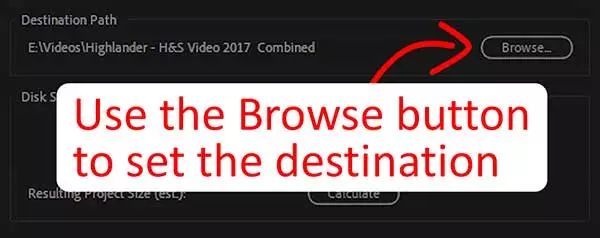
The Destination Path pane indicates where the project will be saved. To change this, click on the Browse button, navigate to the folder where you wish to save the project and then click the Select Folder button .
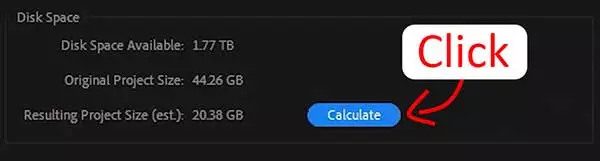
Step 6: Check the resulting project size
In the Disk Space pane
- Click on the Calculate Button
After a few seconds you should see how much available disk space there is on the disk, the size of the original project, and the estimated size of the resulting project.
This step is important. It will tell you whether you have enough space on the selected drive to accommodate the exported project.
If the space is insufficient, choose a different location with enough space, otherwise proceed.
Step 7: Export the project
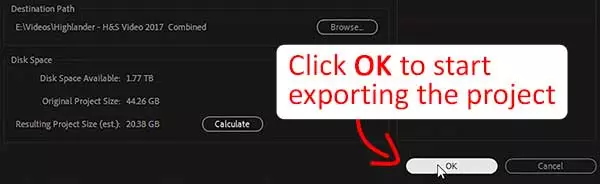
If you have completed all the previous steps
- Click OK
The time taken to export the project will depend upon how large the project is and the speed of your computer. In my case, with an original project size of 44.26GB and a resulting project of 20.38GB, the export took 2 minutes.
WARNING: When exporting/saving a Premiere Pro project, only the sequences you have checked in Sequences pane and the media/files used in those sequences will be exported.
Organizing the exported project folder
Proemiere Pro will save your project in a folder that has the original PremPro prohect name but with “Copied_” at the start. For instance, Copied_EXAMPLE PROJECT , where EXAMPLE PROJECT was the original name of the Premiere Pro project.
If you followed the instructions above, you should have a folder that contains the following:
- Your media assets, consisting of audio, image, and video files, any LUT files you used, plus the Premiere Pro project file (.prproj)
- Subfolder called Adobe Premiere Pro Audio Previews
- Subfolder called Adobe Premiere Pro Video Previews
- Subfolder called Media Cache
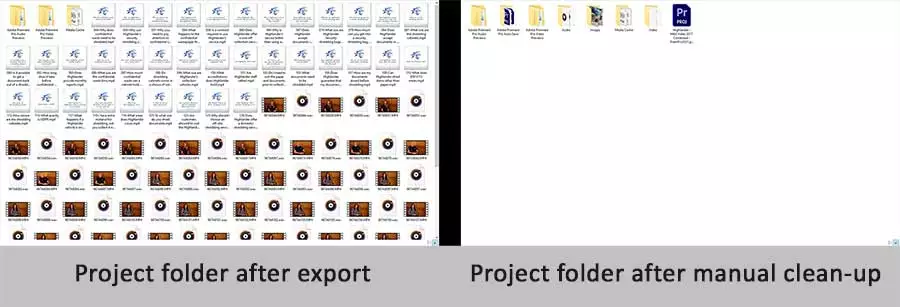
For me, this is a little untidy, especially if there are a lot of audio, image, and video assets. I prefer to keep these in separate folders.
If you want to keep a tidy project, create three folders, and name them Audio, Video, and Images. Then cut and paste or drag and drop the assets in the appropriate folders. The only remaining files should be any LUTs and the .prproj or Premiere Pro project file. Below you can see a before and after shot of the exported project folder. If your project included many media files, you can see that a manual clean-up will make it easier to work with the project if you meed to make a revision in the future.
Save Premiere Project with ALL additional files
The above step-by-step guide does not export all the clips, since the goal is to have a complete project without unused assets. However, if you also wish to archive selected unused clips, or you wish to include a copy of the finished video file, you will need to take some extra steps.
There are three ways to do this.
Option 1: Copy them over manually
This is a reasonable option if you want to add the exported video to the project. I normally export my finished videos to a folder I call FINAL MIX. So to add the video to my archive I would copy the FINAL MIX folder over to the exported project folder I had just created.
I would not recommend using this manual copying method to copy unused media assets, especially if you only want a few clips from a large collection of clips.
Option 2: Use Project Manager to include the clips
This method would be the recommended way if you want your exported project to include all the clips, whether they have been used or not.
In the Options pane of Project Manager, uncheck Exclude Unused Clips. This is ideal if you suspect you or a client will ask for a revision of the video at some time in the future.
Option 3: Create a sequence with clips you want to keep
Your unused clips may include media you have rejected and therefore will not want to keep. But your unused clips may also include alternative takes that you may want to use later on. This method allows you to keep unused clips with the exported project but leave out clips you know will never be used.
Create a new sequence in your Premiere Pro project, then drag the clips you want to keep into this sequence. When you come to export the project make sure you select this sequence for export.
Do the same for your finished and exported video file. Create a sequence and import the video into that sequence. Again, ensure the sequence is selected when you export the project.
You might also like…
Tosh Lubek runs an audio and video production business in the UK and has been using the Canon EOS R since it was released in the Autumn of 2018 and the Canon EOS R6 in 2020. He has used both cameras to shoot TV commercials broadcast on Sky TV, promotional business videos, videos of events and functions, and YouTube creator content. He has also won several international awards for his advertising and promotional work. You can meet him by visiting his “video booth” at HashTag Business Events across the country.
Как заархивировать проект в Premiere Pro
Пункт «Менеджер проектов» (Project Manager) можно найти в конце меню «Файл» (File). В открывшемся диалоговом окне вы увидите поле выбора эпизода, где можно отметить определенные эпизоды, которые нужно включить в архив.
Допустим, мы собираем этот проект для другого монтажера, и ему потребуется работать только с timelapse-эпизодом, который состоит из одного видео- и одного аудиоклипа. В таком случае просто выделите нужный эпизод и снимите выделение с остальных.
Шаг 2: Выберите способ обработки проекта
Есть два варианта обработки проекта: «Собрать проект в новом расположении» (Collect Files and Copy to a New Location) и «Объединить и перекодировать» (Consolidate and Transcode). В нашем случае нужно передать все ресурсы в их оригинальном формате, для чего подойдет первая опция.
Опция «Объединить и перекодировать» отвечает за кодирование оригинального контента в новый формат. Вы можете перекодировать эпизод или отдельные клипы, а также выбрать один из множества предлагаемых форматов и шаблонов. Сейчас же нам нужна опция «Собрать проект в новом расположении».
Шаг 3: Настройка параметров
- «Исключить неиспользуемые клипы» (Exclude Unused Clips) – полезна в случае, если вам нужны только те медиафайлы, которые присутствуют в выбранном эпизоде.
- «Включить маркеры» (Include Handles) – выбрав опцию «Объединить и перекодировать», вы можете поместить кадры в начало и в конец каждого клипа, получив возможность добавить переходы или провести незначительную корректуру.
- «Включить файлы согласования аудио» (Include Audio Conform Files) – позволяет сразу включить файлы согласования аудио или пересогласовать его позже.
- «Преобразовать наборы изображений в клипы» (Convert Image Sequences to Clips) – удобная функция, позволяющая на лету преобразовать изображения в клип.
- «Включить файлы изображений предпросмотра» (Include Preview Files) – вы можете включить файлы предпросмотра сразу или создать их позже, из архива проекта.
- «Переименовать медиафайлы в соответствии с именами клипов» (Rename Media Files to Match Clip Names) – возможность переименовать архив проекта придется весьма кстати, если вы до этого переименовывали названия клипов.
- «Преобразовать композиции After Effects в клипы» (Convert After Effects Compositions to Clips) – выбрав «Объединить и перекодировать», вы можете преобразовать композиции After Effects в клипы с помощью «Менеджера проектов».
- «Сохранить альфа-канал» (Preserve Alpha) – еще одна возможность опции «Объединить и перекодировать», сохраняющая альфа-канал. Это важно при передаче проекта другому монтажеру и в случае, если вы планируете вносить в него изменения позже.
Шаг 4: Выбор папки назначения и место на диске
Заключительный этап – выбор папки для сохранения архивированного проекта, после чего «Менеджер проектов» покажет доступное вам место на диске. Вы можете нажать «Рассчитать» (Calculate), чтобы узнать примерный размер проекта после архивации, а также размер оригинального проекта.
После завершения архивации откройте файл вашего архива для просмотра в Premiere Pro. Убедитесь, что в него включено все необходимое прежде, чем передать проект коллеге или удалить оригинальные файлы.