Горячие клавиши в FL Studio

Эти сочетания клавиш доступны, когда активно любое из окон программы.
Ctrl+P Включить/выключить отсчет 3-2-1 перед записью.
Ctrl+I Включить/выключить ожидание входного сигнала для начала записи.
Ctrl+T Включить/выключить игру на клавиатуре как на клавишах фортепьяно.
Ctrl+E Включить/выключить пошаговый режим редактирования.
Ctrl+M Включить/выключить метроном.
Ctrl+B Включить/выключить добавление записываемых нот к уже существующим.
Ctrl+Shift+H Расположить окна по умолчанию.
F10 Открыть окно настроек системы.
F11 Открыть окно настроек проекта.
Операции с файлами
Ctrl+O Открыть файл. Вызывает диалог для выбора файла.
Alt+1,2..9 Открыть файл из списка недавно использованных.
Ctrl+S Сохранить файл. Вызывает диалог для сохранения файла в форматах flp, zip,wav, mp3 или mid.
Ctrl+N Сохранить текущий проект как новую версию.
Ctrl+R Экспортировать проект в файл формата wav.
Ctrl+Shift+R Экспортировать проект в файл формата mp3.
Ctrl+Shift+M Экспортировать проект в файл формата midi.
1,2. 9(num pad) Выбор соответствующего паттерна от №1 до №9.
+/-(num pad) Следующий/предыдущий паттерн в секвенвере.
стрелка влево/вправо(num pad) Следующий/предыдущий паттерн.
Ctrl+Z Откат назад на один шаг. Повторное нажатие возвращает состояние до отката.
Ctrl+F Поиск в броузере по ключевым словам.
Ctrl+H Остановить воспроизведение в "аварийном" случае.
Alt+P Send to piano roll/открыть piano roll для выбранного канала.
Shift+R Включить/выключить запись.
Shift+L Переключение воспроизведения между паттерном и плейлистом.
Enter Максимизировать/минимизировать активное окно программы (piano roll и playlist).
Space bar (пробел) Начать/остановить воспроизведение.
TAB Переключение между всеми открытыми окнами программы.
Esc Закрыть активное окно.
F1 Справка.
F2 Назвать текущий паттерн в плейлисте.
F4 Следующий пустой паттерн.
F5 Показать/выбрать/скрыть плейлист.
F6 Показать/выбрать/скрыть секвенсер.
F7 Показать/выбрать/скрыть piano roll.
F8 Показать/выбрать/скрыть броузер.
F9 Показать/выбрать/скрыть микшер.
F12 Закрыть все окна, кроме секвенсера.
2. Секвенсер (Step sequencer)
Работа с каналами
стрелка влево/вправо(num pad) Следующий/предыдущий канал.
Ctrl+Del Удалить выбранные каналы.
Page Up Перейти к следующей группе каналов.
Page Down Перейти к предыдущей группе каналов.
Ctrl+1,2. 9 Включить/выключить mute для соответствующего номера канала.
Ctrl+Shift+1,2. 9 Включить/выключить соло для соответствующего номера канала.
Alt+C Выбрать цвет отмеченных каналов.
Alt+G Filter group name — группирует выбранные каналы.
Alt+Z Заархивировать выбранные каналы.
Alt+U Разархивировать выбранные каналы.
Ctrl+Shift+C Клонировать выбранные каналы.
Ctrl+Alt+C Выбрать заливку градиентом отмеченных каналов.
Alt+стрелка вниз/вверх Сдвинуть выбранные каналы вниз/вверх.
Работа с шагами
Ctrl+C Копировать установленные шаги.
Ctrl+V Вставить установленные шаги.
Ctrl+X Вырезать установленные шаги.
Alt+P Послать шаги на piano roll.
Alt+R Рандомизировать ноты в Keyboard editor.
Shift+G Открыть Graph editor.
Shift+K Открыть Keyboard editor.
Shift+стрелка вправо Сдвинуть установленные шаги вправо.
Shift+стрелка влево Сдвинуть установленные шаги влево.
Здесь работают стандартные сочетания Ctrl+Z, Ctrl+X, Ctrl+C и Ctrl+V. Выбрать нужные ноты можно так: зажать Ctrl и левую кнопку мыши, затем двигаем мышь для выделения нужной прямоугольной области. Или так: зажимаем Ctrl+Shift и левой кнопкой мыши щелкаем на нужных нотах. Аналогично можно удалять ноты. Все пункты из раздела Tools будут применяться только к выделенным нотам.
Ctrl+A Выделить все.
Ctrl+M Импорт MIDI-файла.
Shift+Ctrl+V Вставить из MIDI-буфера.
Shift+M Переключение между режимами отображения виртуальной клавиатуры: large, small, names.
Shift+S Slide.
0 Поставить по центру текущую позицию при воспроизведении.
Shift+P Draw — карандаш.
Shift+B Paint — кисть.
Shift+D Delete — удалить.
Shift+C Cut — разрезать.
Shift+E Select — выбрать.
Shift+Z Zoom — приблизить/отдалить.
Shift+Y Playback — воспроизведение.
Shift+стрелка вправо/влево Сместить выбранное вправо/влево.
Shift+стрелка вверх/вниз Транспонировать выбранное вверх/вниз.
Del Удалить выбранное.
Ctrl+стрелка вверх/вниз Транспонировать выбранное вверх/вниз на одну октаву.
Ctrl+стрелка влево/вправо Выбрать предыдущий/следующий.
Ctrl+Ins Добавить пространство.
Ctrl+Del Удалить пространство.
Ctrl+I Вставить текущее значение контроллера.
Ctrl+L Quick legato — поставить легато.
Alt+L Articulate — диалог выбора легато, портато или стаккато с настройками.
Ctrl+Q Quick quantize — квантизовать .
Alt+Q Quantize — диалог квантизации с настройками.
Ctrl+U Quick chop — разрезать ноты в соответствии с настройками snap.
Alt+U Chop — диалог выбора типа разреза нот с использованием паттернов.
Ctrl+G Glue — склеить смежные ноты.
Alt+A Arpreggiate — использовать арпрежиатор, основанный на паттернах.
Alt+S Strum — создать аккорды из нот.
Alt+F Flam — создать форшлаг ударных.
Alt+K Key limiter — ограничитель диапазона нот.
Alt+Y Flip — перевернуть установленные ноты.
Alt+R Randomize — рандомизировать ноты.
Alt+X Scale levels — масштабирование уровней (velocity, pan и т. д.).
Alt+O LFO — использовать LFO event editor.
Alt+G Grid color — выбрать цвет фона piano roll.
Alt+B Показать note helpers — темные полосы для черных клавиш.
Alt+V Ghost channels — показать ноты других каналов в текущем паттерне.
1 Far — минимальное приближение.
2 Medium — среднее приближение.
3 Close — близкое приближение.
4 Best fit — наилучшее приближение.
5 On selection — приблизить выбранное.
Alt+стрелка влево/вправо Сместить выбранный канал микшера влево/вправо.
Alt+L Выбрать каналы, соединенные с выбранным каналом микшера.
Ctrl+L Соединить выбранные каналы секвенсера с выбранным каналом микшера.
Shift+Ctrl+L Соединить выбранные каналы секвенсера, начиная с текущего канала микшера.
F2 Назвать выбранный канал.
Shift+S Соло для выбранного канала.
Alt+S Alt solo — активирует выбранный канал и все каналы, посылающие/принимающие сигналы через/от него.
Alt+R Arm rendering — запись канала в wav-файл.
5. Плейлист (Playlist)
Здесь также как и в piano roll работают все обычные сочетания клавиш, а также все из разделов Zoom и Инструменты.
Shift+Ctrl+Ins Добавить паттерн (перед выбранным).
Shift+Ctrl+Del Удалить выбранные паттерны.
Shift+Ctrl+C Клонировать выбранный паттерн.
Alt+стрелка вверх/вниз Сдвинуть выбранный паттерн вверх/вниз.
Alt+G Выбрать цвет фона.
Alt+C Выбрать цвет выбранных паттернов.
Al+P Открыть в броузере проектов.
Alt+Q Quick quantize.
Ctrl+Q Quantize.
стрелка вправо/влево Перемещение по горизонтали в пределах плейлиста, если все не помещается в окне.
0 Поставить по центру текущую позицию при воспроизведении.
Alt+F Clips Flat Display.
Ctrl+Alt+F Clips Glass Effect.
FL Studio Copy & Paste (How-to Guide)
Knowing the keyboard hotkeys to copy and paste in FL Studio is fundamental. That’s why, if you want to get the most out of the hours of work invested and increase the speed when producing audio tracks, then this guide is the right one for you.
Please enable JavaScript
Copying and pasting with keyboard shortcuts in FL Studio 20 is very simple, you just have to select the element to duplicate, then you must make a combination of keys simultaneously pressing Ctrl+C to copy it. Then you must go to the destination place to paste the desired element and use the key combination Ctrl+V to paste it.
Roughly speaking, this is how to copy and paste quickly in FL Studio, but that’s not all. There are other methods and situations in which you should know and learn how to use the keyboard hotkeys accordingly to save time and in this basic guide, I explain them to you.
This hotkeys tutorial will change your life.
Table of Contents
How to copy and paste with shortcuts in FL Studio 20
When I was a beginner, it was a little difficult for me to have a good workflow because I didn’t know well many of the basic options of Fruity Loops Studio and I confess that just learning the most important keys my work speed increased considerably.
In Fruity Loops Studio the process of duplicating content is very simple and to achieve it you must perform the following key shortcuts that are normally the most used:
- Ctrl+C: Copy
- Ctrl+V: Paste
- Ctrl+X: Cut
- Ctrl+B: Duplicate
- Ctrl+A: Select all
As you have been able to observe, if you are a Microsoft operating system user, these combinations are very familiar to you.
These combinations are almost the same as those used in Windows in all its versions.
The following are the most frequent scenarios where you will use these keyboard shortcuts in FL Studio 20.
How to copy and paste notes
If you want to copy and paste notes, you must follow a sequence similar to the one mentioned above.
- The first you need to do is go to the channel and select the note to be copied.
- Press the left mouse button on it to select and press the Ctrl+C keys at the same time.
- Later choose the place where you want to paste the copied item.
- And finally, press at the same time the Ctrl+V key combination to paste.
In general, this is what you need to know to clone notes in FL Studio 20 quickly.
Copying and pasting in Piano Roll
The Piano Roll is a versatile and very useful tool with which you can do unique and interesting things in FL Studio. If you want to access this utility you can do it in 2 ways.
In the first one, you have to press the F7 key on your pc keyboard and the Piano Roll will be shown.
The second way is to go to the tools section and left click on the show Piano Roll option, that’s all.
With the Piano Roll, you can access the channels located in the Channel Rack to send and automate notes and instruments, being in this place where countless MIDI files are stored, and for such reasons, it is well recognized by users as an indispensable functionality.
To copy and paste into the Piano Roll you need to follow these steps:
- Open the Piano Roll tool by pressing the F7 key.
- Go to the Channel Rack and select the element to copy into one of its channels.
- Copy the note using the Ctrl+C combination.
- Then go to the channel where you want to paste the previously copied file.
- And finally, paste the element using Ctrl+V.
It is also important to mention that while using the Piano Roll you can also use the hotkeys Ctrl+B to clone notes if you like. Just execute the key combination to clone a note, which will appear on the same channel you are working on.
Another trick would be to use the Ctrl+A hotkeys to select all the elements of the channel you are working on so you can move, copy, duplicate or delete them as you like and do all this in a quick and easy way, which will help you streamline your work instead of making the process of selecting each element one by one more tedious.
How to copy and paste in the Playlist
To go to the FL Studio 20 Playlist just press the F5 hotkey, there you can see all MIDI elements and sound effects you are using in your current music creation.
The Fruity Loops Studio playlist keyboard shortcuts are used as follows:
- The first thing to do is to open the playlist using the F5 key to display the playlist.
- Then, manually select the notes or files you want to copy or if you want to select all of them at once use Ctrl+A.
- After that, to copy them press Ctrl+C.
- Now move to the place in the playlist where you want to paste the copied items.
- Finally, press in combination Ctrl+V to paste into the FL Studio playlist.
I also recommend that you use the combinations Ctrl+B (to clone elements) or Ctrl+X (to cut them) as needed at the moment, which will help you to have the files you only need.
This last one is very important, since working step by step and in an organized way is vital if you want to be a pro using Fruity Loops, and this way you will avoid having the playlist full of notes or files that you are not going to use, which could cause confusion and decrease considerably your workflow.
Copying and pasting Patterns
Among all the methods I’ve learned to speed up the work in FL Studio 20, undoubtedly knowing how to clone patterns is great to avoid doing the manual process, wasting valuable time.
But don’t worry, I’m going to show you a trick to do it easily so you can optimize your time while producing music.
- The first thing you need to do is to have the Channel Rack open.
- Then you must choose the pattern you want to copy and load it.
- Then go to the top where the toolbar is located.
- Choose the pattern selector and right-click on it.
- A window with several options will appear.
- Find the clone option and click on it to clone the entire previously selected pattern.
- That’s it, that’s all you have to do.
You will automatically go to a new pattern with the same values and elements as the original pattern, that’s all.
If you want to copy a pattern in FL Studio 20 even faster than the previous method, you must select the pattern you want to copy, then use the hotkey Shift+Ctr+C, and this way you will clone between patterns instantly without having to move much between menus.
How to copy and paste patterns in the playlist
Method #1
If you want to copy and paste patterns into the playlist using keyboard shortcuts just select the pattern to duplicate, press the Ctrl+C keys at the same time to copy the element. Then move in the playlist to the place where you want to put the pattern and use the Ctrl+V keys to paste it.
You can also use the combinations Ctrl+X, to cut elements, Ctrl+B, to duplicate them, and Ctrl+A to select all the patterns contained in the playlist.
Method #2
Another interesting way to duplicate patterns that almost nobody knows is to highlight the pattern and then press the duplicate shortcut (Ctrl+B) to clone that element instantly. Isn’t it cool?
Copy and paste in FL Studio 20 for Macbooks
Copying and pasting on macOS with keyboard shortcuts while using FL Studio 20 is just as easy as it is on Windows, except that instead of using Control, we will use the “Command” key.
- Copy: Cmd+C
- Paste: Cmd+V
- Duplicate: Cmd+B
- Cut: Cmd+X
- Select all: Cmd+A
How to copy and paste in FL Studio Mobile 3
- Just select the file you want to copy by holding down your finger on it.
- Then a small menu will appear where you can see several options, choose copy.
- After that, go to the place where you want to paste it, and again keep your finger pressed on an empty area of the playlist and select the paste option, that’s all.
If you have any doubt about this process just watch the next video or leave me a comment down below to help you.
Final thoughts
As you have seen, learning how to use the keyboard shortcuts in Fruity Loops is a basic and essential skill to use this DAW in a more intuitive way.
While working in music production, time and workflow are fundamental elements to obtain optimal performance and get the most out of the hours we invest in this Digital Audio Workstation.
Knowing these methods is really useful for professionals and beginners as well, so I encourage you to learn them to improve your workflow and save valuable time.
If you want to know any other method that has not been explained in this post to increase your work speed let me know in the comments, and I’ll be glad to help you.
Also, continue reading our other articles about Fruity Loops.
How to Copy and Paste in FL Studio 20 – The Right Way

In this article we’re going to discuss copying and pasting notes in FL Studio.
We’ll also talk a little bit about some FL Studio keyboard shortcuts and hotkeys to make the process a lot easier when it comes to working with the Sequencer, Piano Roll, native and third-party VSTs, automation clips, and I’ll quickly touch on copying presets and effects between mixer tracks in FL Studio 20.
I’ll break down copying and pasting for each section in Fruity Loops:
You’ll be happy to hear that copying and pasting in FL Studio is the same as Windows shortcuts!
Copy CTRL + C , Cut CTRL + X , and Paste CTRL + V are all their respective shortcuts.
If you’re one to never use the cut shortcut, you’ll be happy to know, it’s super useful in FL Studio! – I’ll show you some tricks to speed up your workflow!
Copying Patterns and Notes in FL Studio’s Sequencer
Inside the sequencer, there’s a couple routes you can take to copy and paste notes from sound to sound, or pattern to pattern.
We’ll start with the steps inside the Sequencer.
The keyboard shortcut to open FL Studio’s step Sequencer is F6 .

You first must make sure you select the bar in between the sound name and the steps (where the arrow is pointing; the green bar).
Simply press CTRL + C . It’s now on your clipboard, just like in Windows!
Now an important thing to understand is that since we highlighted steps – the kick drum sounds I clicked in – it will paste steps. (If we’re copying notes from the Piano Roll, we’d see MIDI notes when we paste.)
From here, you can paste what you’ve just copied into a new sound by first clicking the bar beside the sound to go green and using CTRL + V . Or you can paste the steps into a new pattern to allow for better arrangement flexibility.
You can see I copied the drum steps and pasted them into the clap sound:

Now a pro tip, which saves tons of time, is you can actually copy multiple sounds at once in FL Studio. When you paste multiple sounds, FL Studio starts from the first sound which is highlighted, and pastes each copied line downward. (Explained more below.)
In this image, I’ve changed up the clap steps, and highlighted both sounds to be copied:

Here’s how to select multiple sounds inside FL Studio’s step Sequencer:
- Left Click (Hold) + Drag Up or Down
- Shift + Left Click
- Middle Click
Now as mentioned above, I’ll show you how FL Studio goes about pasting sounds.
I’m going to start at the Snare sound, and you’ll see that my copied sounds when pasted, will continue to the 707 Crash sound. (Again, FL Studio pastes downward from the starting sound you’ve selected.)

You can see that I am highlighted on the Snare sound.
When I pasted with CTRL + V , the Snare sound got the drum’s notes. But, FL Studio has also pasted the clap’s steps into the 707 Crash sound.
That’s how simple it is to copy and paste notes inside FL Studio’s Sequencer when dealing with steps, which you click in.
And if you don’t like the shortcuts, there’s always the mouse way of copying/cutting/pasting. Just Right Click on a sound, and you’ll see Cut, Copy, and Paste.

Now for another pro tip:
I often use copy + paste, and sometimes cut, when I have built a drum loop all inside one pattern, but want to break it apart later for arrangement.
I find building a drum loop all in one pattern way easier to make a beat because you can just keep building the loop as a whole, not wasting time creating new patterns!
But, come arrangement time, you usually don’t want all of the drum loop playing all the time. For example, maybe you have percussion sounds, cymbals, or hi-hats which you only want during your chorus.
This is where we’ll take those sounds out, put them into their own pattern, and have full flexibility when building the song’s arrangement.
Here’s a drum loop from a beat of mine. (It’s called Real Gangst):

In this song, I actually removed the two shaker sounds (which are the green MIDI notes) from the drum loop, and put them into their own pattern. This is because I only wanted those shakers to play at certain parts of the song.
To do that, I’d highlight both shakers by Left Click (Hold) + Drag Down .
I’d then cut these sounds with CTRL + X because I still want the shakers, I just don’t want the shakers in the same pattern as the drum loop because then I can’t arrange the song! (It handcuffs my arrangement creativity!)

For another FL Studio keyboard shortcut, let me introduce you to the number pad! Now if your keyboard or laptop doesn’t have a number pad, that is sad �� . It truly is an amazing tool for a fast workflow. (You can always buy a USB Number Pad!)
Anyways, to go to the next pattern, just push + .
To go to a previous pattern, press — .
(No, the + and — above [ and ] don’t work).
If you don’t have a number pad and can’t use the + shortcut, here’s an image where you can see your existing patterns, or create a new pattern.

Once on the new pattern, I selected the first shaker sound and used CTRL + V to paste in our MIDI notes.
But in this song, I actually gave each shaker it’s own pattern for even more control in my arrangement.
I would approach this by pasting in both MIDI notes of each shaker into one pattern, deleting the second shaker’s MIDI notes, then going to a new pattern, pasting in both MIDI notes again, and deleting the first shaker’s MIDI notes.
Now I’m left with two new shaker patterns for ultimate flexibility in my song’s arrangement.
Here’s the shortcuts I used to delete the notes:
Since we’re working with MIDI notes, deleting works a little bit differently in FL Studio. If our shakers were just the steps we’d click in, like in the previous images, I could just press del when highlighted on a sound. But since these shakers were MIDI notes within the Piano Roll, I have to open up the Piano Roll and then press del .
To quickly repeat that.
We went to our first pattern and pasted in both shaker’s MIDI notes.
We opened the Piano Roll on the second shaker, and pressed del .
And not to worry if we delete – Both shakers are still on my clipboard which I cut earlier with CTRL + X . I haven’t lost my shaker patterns.
I’d then go to a new pattern a second time, paste the shakers in with CTRL + V , select the first shaker’s Piano Roll, and again, press del .
I now have full flexibility on arranging my song.

As you can see where I’ve put the arrow, I’ve set my arrangement so my drums and shakers are playing at different times, allowing for full flexibility in my arrangement!
Hope that helps ��
Onto copying and pasting notes within the Piano Roll now!
5 Keys to a Successful Beat

How to Copy a Melody to Another Pattern with FL Studio’s Piano Roll MIDI Notes
Dealing with the Piano Roll and MIDI notes has a different approach than the Sequencer.
However, MIDI notes give easier flexibility in terms of editing your sound. (Extending a note’s the length, pitch, velocity, or panning, for example.)
I usually keep my one-shot samples (drums, claps, hi-hats) as steps; it’s easier to click in when building your drum loop.
But if I want to create a melody with an instrument, that is where I will use MIDI notes and the Piano Roll. Or, if I want to be creative with my one-shot sounds, I may Right Click on the sound and go to the Piano Roll. (Maybe I want to play some sounds up high or down low on the one-shot sample; the Piano Roll makes this easy.)
As mentioned above, to delete sounds with steps, you just have to select the sound and press del . But with MIDI notes in the Piano Roll, you have to open up the Piano Roll first, then press del .
But a little shortcut with MIDI notes: You can use CTRL + X to cut the sound, which gets copied to your clipboard, and removed from the pattern. But be careful if you already have a sound copied to your clipboard, it would overwrite that, and you’ll lose your pattern!
But if you do make a mistake, all is not lost. You can easily undo in FL Studio and get your adjustments and patterns back.

I like to have Maximum undo levels set at 100 (with Undo knobs tweaks enabled). You’ll find this menu under the General tab within Settings. The keyboard shortcut to access settings is to hit F10 .
I tell you that because if you’ve lost a sound you’ve cut, just hit CTRL + ALT + Z a couple times to go back in history until the sound you’ve cut comes back!
Or, inside FL Studio’s browser, you can select Current Project -> History -> [Whatever Last Event You Want to Go Back to].

Okay, with those details covered, let’s tackle how to copy and paste melodies from one pattern to another within the Sequencer.
MIDI notes and steps work the exact same way in the Sequencer. Select the bar beside a sound to go green, hit CTRL + C , go to a new pattern, then paste with CTRL + V into the sound you’d like.
But working with the Piano Roll and your MIDI notes is a bit trickier when it comes to copying / pasting, though!
Now this is important:
MIDI notes which you’ve copied from inside the Piano Roll will not paste into the Sequencer! You must open another Piano Roll window to paste in your copied MIDI notes.
You can then use CTRL + V , or go File -> Edit -> Paste from within the Piano Roll.
Think of it like this:
– Sequencer notes work with the Sequencer
– Piano Roll notes work with the Piano Roll
There’s a couple ways to open the Piano Roll:
- Left Click the green MIDI notes.
- Right Click on a sound and select Piano Roll from the menu.
- Hightlight a sound’s green bar and press F7 (Piano Roll shortcut).
Once inside the piano roll, to select notes, there’s two options.
You can highlight the whole playlist with CTRL + A .
This selects all the notes within the Piano Roll, and is a cool looping feature, too.
You can now simply copy or cut these notes with CTRL + C or CTRL + X .

For more precise control, and how to select individual notes in the Piano Roll, you can use CTRL + Shift + Left Click on individual notes to highlight or deselect notes.
If you want to drag and select many notes, use CTRL + Shift + Left Click (Hold) .
You can also select multiple notes, after you’ve highlighted notes by using CTRL + Shift + Left Click (Hold) again.
(In addition, you can also select the square dashed icon from the Piano Roll’s tool bar [see red arrow in image], and Left Click (Hold) and drag over many notes. If you keep CTRL+ Shift held down, you can continue to select more notes.)

Here’s a cool pro-tip which allows you to duplicate notes to the next bar within the Piano Roll, or Playlist when arranging your song.
The keyboard shortcut to Duplicate Selection is CTRL + B .
Inside the Piano Roll, I’d typically highlight the notes I want, either with CTRL + A to highlight all notes, or CTRL + Shift + Left Click to select individual notes.
Once my desired notes are highlighted, I’d press CTRL + B and BAM! Your exact notes should be duplicated into the next musical bar.

This trick also works with the playlist! You can highlight full sections, press CTRL + B , and it duplicates your selected tracks on the playlist to the right of the highlighted tracks.
I think that wraps up copying notes in FL Studio’s Piano Roll, and pasting melodies into a new pattern.
How to Copy Knob and Slider Values from VST to VST in FL Studio
FL Studio is intuitive in many ways. Copying knobs and slider parameter values is one of those ways!
Let’s say you’re working on two kick drums and you’ve turned down the volume of the second drum’s mixer insert.
If you want the first drum’s mixer insert slider’s volume to be at the exact same position as the second, you can Right Click and select Copy.
You will then go to the new mixer insert slider, Right Click and select paste.

Yes, it’s that simple!
And now that VST3 is becoming widely supported, we can right click any knob within our third-party plugins to copy the value in the exact same way.

But if you’re still using VST2 versions of your third-party plugins, you’ll notice FL Studio doesn’t allow you to right click and copy values �� . (I recommend using VST3 where possible, also making sure that it runs well with FL Studio.)
So here’s how to automate third-party VST plugins in FL Studio (or right click in them), if using VST2 versions of the plugin.
- Move a parameter on the plugin (a knob, slider, button, etc.)
- Go to Tools -> Last Tweaked -> Copy (or Create Automation Clip)
It’s a little work around, but it’s what you have to do if using VST2 third-party plugins.
You’ll use Tools -> Last Tweaked very often if you’re wanting to right click in the plugin to copy a value, create an automation clip, link to a controller, or anything similar through the right-click pop-up menu.

Copying Values with Automation Clips the Easy Way
I personally feel automation clips a little bit cumbersome in FL Studio, but once you understand how FL Studio handles automation clips, you’ll be sailing!
For more information, you can check out my article on copying + pasting values with automation clips in FL Studio.
Let’s say you’re working on an automation clip.
As your song plays, it follows your automation clip. Whatever values you’ve adjusted, FL Studio will automate that parameter.
But here’s a real-world situation that happens to me quite often.
When creating an automation clip in FL Studio, it stores a snapshot in Current Project -> Patterns -> Initialized controls.
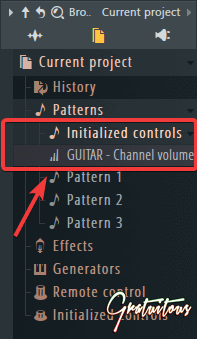
When I say snapshot, I mean FL Studio saves the initial value of where the parameter was at when you created the automation clip.
This means if you adjust the automation clip to have a different value than at the beginning of the clip, and you put the playlist cursor at an earlier point in that song of that automation clip, it will default to that initial value.
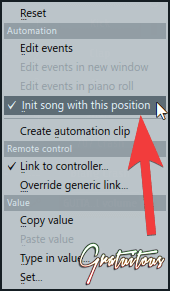
(This initial default value can be overwritten by Right Clicking on the parameter, and selecting Init song with this position.)
So here’s the quirk, and how I work efficiently with it.
I’ve created my automation clip in FL Studio, which saves a snapshot of my initial parameter’s position.
Now I want to be creative and tweak this automation clip halfway through to give my music some movement and emotion!
Well, sure – I can just Right Click on the automation clip’s line, it will create a new point for me, and I can simply Left Click (Hold) , and drag it to where I want.
But what if I want my automation clip to go back to its initial value half way through the clip? Or, what if I’m extending the automation clip to be longer in length and I accidentally move the end point up or down from its original value?
Well, to extend, you can hold down Shift , and that restricts vertical movement. So that one’s easy.
But making the automation clip go to it’s initial value in the middle of an automation clip after I’ve already increased or decreased the automation clip is super tedious by mouse!

In this image above, where I have the red arrow, if I want to make that automation point the same value as at the beginning, again, using the mouse is tedious.
Simply hover your mouse over the first automation point, Right Click , and select Copy from the pop-up menu.
You can now hover your mouse over the automation point again, Right Click , and paste it in!

Simple. No more tedious tweaking with the mouse struggling to adjust just that extra 1% so it’s the same value as the initial position!
How to Copy Effects Between Mixer Tracks in FL Studio
The keyboard shortcut to open up FL Studio’s mixer is F9 .
FL Studio has a unique approach of copying effects between mixer channels. In addition, you can also duplicate one mixer insert to another, too.
The feature to copy plugins between mixer inserts is Save preset as.
The feature to duplicate whole mixer inserts is Save mixer track state as.
We’ll cover copying plugins in FL Studio, first:
Inside the mixer, click on the insert where the plugin you want to copy is.

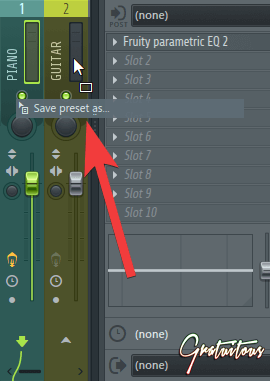
Left Click the arrow on the left of the plugin, and a pop-up will appear:

You can simply Left Click (Hold) and drag Save preset as onto a new mixer insert.
In addition, you can actually Left Click on Save preset as to actually save the preset if you’d like to recall the plugins’ state at a later date.
And when dragging, the icon looks like this:
If you want to copy the whole effects chain, from one mixer insert to another, you right click on the actual mixer insert, not the individual plugin.
On the mixer insert, it’s under File -> Save mixer track state as.

And that’s all it takes to copy and paste effects between mixer channels in FL Studio. Also, how to clone mixer inserts.
How to Copy and Paste in Between Projects in FL Studio
The easiest way to work in between projects is with Project bones.
You’ll find it under File -> Export -> Project bones.

Make sure to export this to a new folder to keep yourself organized.
Inside the files, you’ll want to open the Scores folder.

Now simply drag whichever file contains the info you need onto the sound you want:

BAM! – Super simple.
Thanks for making that one so easy, Image-Line! ��
A simple method I used to use when I only wanted to one instrument’s MIDI notes was to open the first project, hit CTRL + C to copy, then open the new project and paste with CTRL + V .
If working with only one or two instruments, this is a quick-and-dirty way to approach it, too.
Conclusion About Copying and Pasting in FL Studio
So there you have it FL Studio producers!
As you can see, there’s lots of different approaches to different situations with copy and paste within FL Studio.
If you’re working in Sequencer: only steps copy to steps and MIDI notes copy to MIDI notes.
If you’re working in the Piano Roll: only Piano Roll Notes copy to Piano Roll Notes.
If you don’t have FL Studio yet, I’d recommend reading this!:
Take advantage of right clicking to copy and save values when dealing with plugin parameters, automation clips, and other similar tasks. It will allow you to be precise with your values, and not waste time tweaking endlessly just for that extra 1%!
Как скопировать паттерн в fl studio 20
Reddit and its partners use cookies and similar technologies to provide you with a better experience.
By accepting all cookies, you agree to our use of cookies to deliver and maintain our services and site, improve the quality of Reddit, personalize Reddit content and advertising, and measure the effectiveness of advertising.
By rejecting non-essential cookies, Reddit may still use certain cookies to ensure the proper functionality of our platform.
For more information, please see our Cookie Notice and our Privacy Policy .