Setup FTP Server with VSFTPD on Ubuntu 20.04
FTP (File Transfer Protocol) is a standard network protocol used to transfer files to and from a remote network. There are several open-source FTP servers available for Linux. The most known and widely used are PureFTPd , ProFTPD , and vsftpd . We’ll be installing vsftpd (Very Secure Ftp Daemon), a stable, secure, and fast FTP server. We will also show you how to configure the server to restrict users to their home directory and encrypt the entire transmission with SSL/TLS.
Although FTP is a very popular protocol, for more secure and faster data transfers, you should use SCP or SFTP .
Installing vsftpd on Ubuntu 20.04
The vsftpd package is available in the Ubuntu repositories. To install it, execute the following commands:
The ftp service will automatically start once the installation process is complete. To verify it, print the service status:
The output should show that the vsftpd service is active and running:
Configuring vsftpd
The vsftpd server configuration is stored in the /etc/vsftpd.conf file.
Most of the server settings are well documented inside the file. For all available options, visit the vsftpd documentation page.
In the following sections, we will go over some important settings needed to configure a secure vsftpd installation.
Start by opening the vsftpd configuration file:
1. FTP access
We’ll allow access to the FTP server only to the local users. Search for the anonymous_enable and local_enable directives in /etc/vsftpd.conf and verify your configuration match to lines below:
2. Enabling uploads
Locate and uncomment the write_enable directive to allow filesystem changes, such as uploading and removing files:
3. Chroot jail
To prevent local FTP users to access files outside of their home directories, uncomment the lne starting with chroot_local_user:
By default, for security reasons, when chroot is enabled, vsftpd will refuse to upload files if the directory that the users are locked in is writable.
Use one of the solutions below to allow uploads when chroot is enabled:
- Method 1. — The recommended option is to keep the chroot feature enabled and configure FTP directories. In this example, we will create an ftp directory inside the user home, which will serve as the chroot and a writable uploads directory for uploading files:
- Method 2. — Another option is to enable the allow_writeable_chroot directive:
Use this option only if you must grant writable access to your user to its home directory.
4. Passive FTP Connections
By default, vsftpd uses active mode. To use passive mode, set the minimum and maximum range of ports:
You can use any port for passive FTP connections. When the passive mode is enabled, the FTP client opens a connection to the server on a random port in the range you have chosen.
5. Limiting User Login
You can configure vsftpd to permit only certain users to log in. To do so, add the following lines at the end of the file:
When this option is enabled, you need to explicitly specify which users can log in by adding the user names to the /etc/vsftpd.user_list file (one user per line).
6. Securing Transmissions with SSL/TLS
To encrypt the FTP transmissions with SSL/TLS, you’ll need to have an SSL certificate and configure the FTP server to use it.
You can use an existing SSL certificate signed by a trusted Certificate Authority or create a self-signed certificate. If you have a domain or subdomain pointing to the FTP server’s IP address, you can quickly generate a free Let’s Encrypt SSL certificate. We will generate a 2048-bit private key and self-signed SSL certificate that will be valid for ten years:
Both the private key and the certificate will be saved in the same file.
Once the SSL certificate is created open the vsftpd configuration file:
Find the rsa_cert_file and rsa_private_key_file directives, change their values to the pam file path and set the ssl_enable directive to YES:
If not specified otherwise, the FTP server will use only TLS to make secure connections.
Restart the vsftpd Service
Once you are done editing, the vsftpd configuration file (excluding comments) should look something like this:
Save the file and restart the vsftpd service for changes to take effect:
Opening the Firewall
If you are running a UFW firewall , you’ll need to allow FTP traffic.
To open port 21 (FTP command port), port 20 (FTP data port), and 30000-31000 (Passive ports range), run the following commands:
FTP Server
File Transfer Protocol (FTP) is a TCP protocol for downloading files between computers. In the past, it has also been used for uploading but, as that method does not use encryption, user credentials as well as data transferred in the clear and are easily intercepted. So if you are here looking for a way to upload and download files securely, see the OpenSSH documentation instead.
FTP works on a client/server model. The server component is called an FTP daemon. It continuously listens for FTP requests from remote clients. When a request is received, it manages the login and sets up the connection. For the duration of the session it executes any of commands sent by the FTP client.
Access to an FTP server can be managed in two ways:
In the Anonymous mode, remote clients can access the FTP server by using the default user account called “anonymous” or “ftp” and sending an email address as the password. In the Authenticated mode a user must have an account and a password. This latter choice is very insecure and should not be used except in special circumstances. If you are looking to transfer files securely see SFTP in the section on OpenSSH-Server. User access to the FTP server directories and files is dependent on the permissions defined for the account used at login. As a general rule, the FTP daemon will hide the root directory of the FTP server and change it to the FTP Home directory. This hides the rest of the file system from remote sessions.
vsftpd — FTP Server Installation
vsftpd is an FTP daemon available in Ubuntu. It is easy to install, set up, and maintain. To install vsftpd you can run the following command:
Anonymous FTP Configuration
By default vsftpd is not configured to allow anonymous download. If you wish to enable anonymous download edit /etc/vsftpd.conf by changing:
During installation a ftp user is created with a home directory of /srv/ftp . This is the default FTP directory.
If you wish to change this location, to /srv/files/ftp for example, simply create a directory in another location and change the ftp user’s home directory:
After making the change restart vsftpd:
Finally, copy any files and directories you would like to make available through anonymous FTP to /srv/files/ftp , or /srv/ftp if you wish to use the default.
User Authenticated FTP Configuration
By default vsftpd is configured to authenticate system users and allow them to download files. If you want users to be able to upload files, edit /etc/vsftpd.conf :
Now restart vsftpd:
Now when system users login to FTP they will start in their home directories where they can download, upload, create directories, etc.
Similarly, by default, anonymous users are not allowed to upload files to FTP server. To change this setting, you should uncomment the following line, and restart vsftpd:
Warning
Enabling anonymous FTP upload can be an extreme security risk. It is best to not enable anonymous upload on servers accessed directly from the Internet.
The configuration file consists of many configuration parameters. The information about each parameter is available in the configuration file. Alternatively, you can refer to the man page, man 5 vsftpd.conf for details of each parameter.
Securing FTP
There are options in /etc/vsftpd.conf to help make vsftpd more secure. For example users can be limited to their home directories by uncommenting:
You can also limit a specific list of users to just their home directories:
After uncommenting the above options, create a /etc/vsftpd.chroot_list containing a list of users one per line. Then restart vsftpd:
Also, the /etc/ftpusers file is a list of users that are disallowed FTP access. The default list includes root, daemon, nobody, etc. To disable FTP access for additional users simply add them to the list.
FTP can also be encrypted using FTPS. Different from SFTP, FTPS is FTP over Secure Socket Layer (SSL). SFTP is a FTP like session over an encrypted SSH connection. A major difference is that users of SFTP need to have a shell account on the system, instead of a nologin shell. Providing all users with a shell may not be ideal for some environments, such as a shared web host. However, it is possible to restrict such accounts to only SFTP and disable shell interaction.
To configure FTPS, edit /etc/vsftpd.conf and at the bottom add:
Also, notice the certificate and key related options:
By default these options are set to the certificate and key provided by the ssl-cert package. In a production environment these should be replaced with a certificate and key generated for the specific host. For more information on certificates see Security — Certificates.
Now restart vsftpd, and non-anonymous users will be forced to use FTPS:
To allow users with a shell of /usr/sbin/nologin access to FTP, but have no shell access, edit /etc/shells adding the nologin shell:
This is necessary because, by default vsftpd uses PAM for authentication, and the /etc/pam.d/vsftpd configuration file contains:
The shells PAM module restricts access to shells listed in the /etc/shells file.
Most popular FTP clients can be configured to connect using FTPS. The lftp command line FTP client has the ability to use FTPS as well.
Как настроить FTP на Ubuntu 20.04 LTS
FTP – это протокол, который позволяет передавать файлы по сети от одного узла другому. Данный протокол является самым старым протоколом прикладного уровня, который появился намного раньше, чем HTTP или TCP/IP. С помощью протокола FTP могут быть организованы соединения с удаленными серверами для просмотра и передачи необходимых данных. При подключении к серверам и рабочим станциям при помощи протокола FTP необходимо использовать специальные приложения, которые именуются FTP-клиентами. Далее о том, как настроить работу с протоколом FTP на сервере, работающем под управлением Ubuntu 20.04 LTS.
Для того чтобы развернуть свой FTP-сервер на Ubuntu 20.04 LTS, необходимо:
- установить FTP-сервер с поддержкой SSL для безопасного подключения;
- настроить учетную запись FTP-пользователя;
- проверить подключение к FTP-серверу.
Установка FTP-сервера
Как всегда при работе с Ubuntu необходимо произвести первоначальную настройку сервера в соответствии с посвящённой данной процедуре статье. Далее следует обновить списки пакетов:
После чего необходимо установить программу vsftpd :
По окончании установки можно убедиться, что сервис vsftpd уже успешно работает:
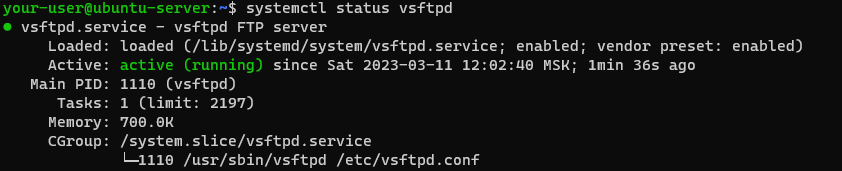
Далее необходимо произвести некоторые настройки в конфигурационном файле. Для этого откройте при помощи текстового редактора файл vsftpd.conf :
Вот те основные изменения, которые необходимо внести для корректной работы FTP-сервера:
После внесения изменений в файл настроек необходимо сохранить их и перезапустить службу vsftpd :
Защита передачи данных при помощи SSL/TLS
Для защиты передачи ваших данных между FTP-клиентом и FTP-сервером в данной инструкции мы будем использовать генерацию самозаверяющего SSL-сертификата. Закрытый ключ и сертификат будут сохранены в одном файле, для чего следует применить команду:
После установки SSL-сертификата необходимо внести изменения в конфигурационный файл:
А именно, внесите изменения в следующие строки данного файла:
Настройка учётной записи FTP-пользователя
Для авторизации на FTP-сервере необходимо создать учетную запись пользователя. Изначально, подключаться к серверу можно и под локальным пользователем. Но более целесообразно для этих целей использовать специальную учётную запись. Для её создания используйте следующую команду:
Таким образом, у нас теперь есть пользователь ftpuser . Следующей командой нужно создать для него домашний каталог:
После этого для него необходимо создать пароль на вход:
Настройка брандмауэра
Если вы производили работы по первоначальной настройке виртуального сервера, то на нём должен быть запущен межсетевой экран UFW. Соответственно, для того, чтобы брандмауэр вашего VPS позволял осуществлять подключения, необходимо внести небольшие изменения в настройки UFW. Проще говоря, нужно будет добавить в брандмауэр исключения для TCP-портов 20 и 21. Делается это следующими командами:
После чего брандмауэр следует перезапустить:
И убедиться, что служба работает без ошибок:
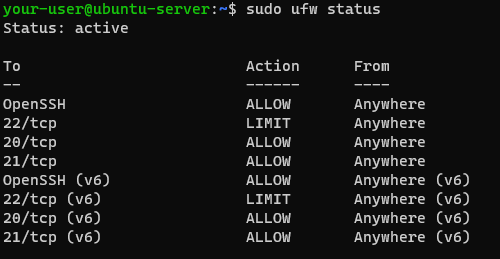
Проверка подключения к FTP-серверу
Корректность произведённых настроек можно проверить через осуществление подключения к FTP-серверу. Для этой цели можно воспользоваться бесплатным FTP-клиентом FileZilla. После запуска приложения в FileZilla следует заполнить поля Хост и Имя пользователя . После нажатия кнопки Быстрое соединение система попросит ввести пароль учётной записи, под именем которой происходит подключение к FTP-серверу.
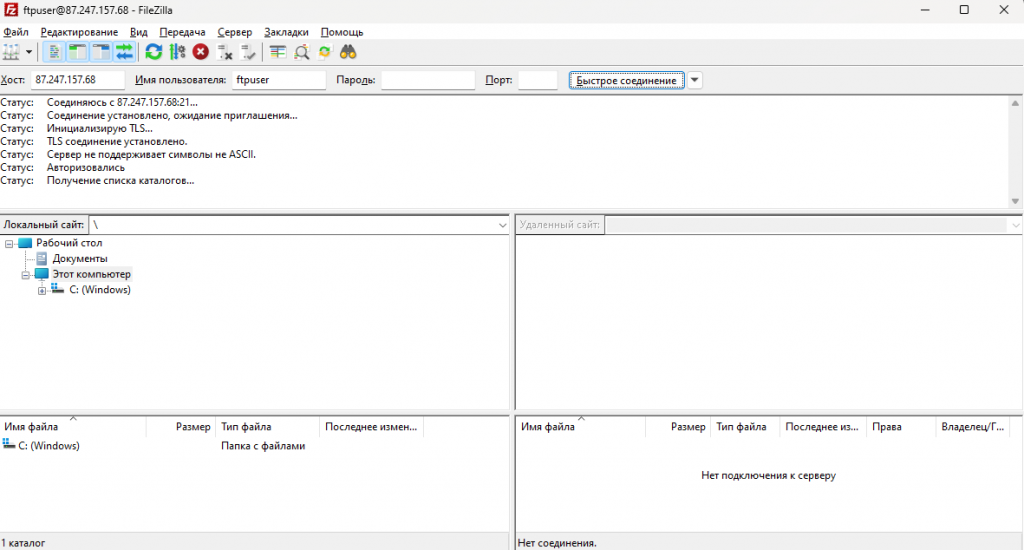
Подключение к серверу осуществлено успешно, значит произведенные настройки в конфигурационном файле корректны. В статусе подключения видно, что в данной сессии TLS соединение установлено , значит передача данных между клиентом и сервером шифруются.
Установка и настройка vsFTPd на Ubuntu или Astra
vsFTPd и proFTPd — одни из самых простых способов поднять сервер FTP на Linux. В данной инструкции пойдет речь о vsFTPd и Ubuntu (на примере версий 20 и 22), а также Debian и Astra Linux.
Установка и настройка
Обновляем списки портов в репозиториях:
apt install vsftpd
Открываем конфигурационный файл:
И снимаем комментарий со следующих строк:
* write_enable — разрешить копировать файлы на сервер; chroot_local_user — использовать для пользователей изолированное окружение.
И дописываем следующее:
allow_writeable_chroot=YES
pasv_enable=YES
pasv_max_port=60000
pasv_min_port=65535
* где allow_writeable_chroot разрешаем использовать домашние каталоги с правом на запись; pasv_enable включает пассивный режим работы FTP-сервера; pasv_max_port и pasv_min_port определяют диапазон портов для пассивного режима.
Если используется брандмауэр, необходимо добавить правила и разрешить следующие порты:
- 20 — основной порт FTP для передачи.
- 21 — для активного режима. Используется для передачи команд.
- 60000-65535 — диапазон динамических портов, который нами был определен в конфигурационном файле. Используется для пассивного режима.
Для этого вводим команду:
iptables -I INPUT -p tcp —match multiport —dports 20,21,60000:65535 -j ACCEPT
Для сохранения правил можно использовать утилиту:
apt install iptables-persistent
Разрешаем и перезапускаем сервис:
systemctl enable vsftpd
systemctl restart vsftpd
Добавление пользователя
По умолчанию, авторизация выполняется с использованием локальных пользователей. Чтобы использовать специальную учетную запись, для подключения к FTP, создаем пользователя следующей командой:
useradd ftpuser -d /ftp -s /bin/false -m
* где ftpuser — имя учетной записи; /ftp — домашний каталог (в него будем попадать при подключении); /bin/false — запрет пользователю на локальный вход в систему.
Открываем на редактирование следующий файл:
И добавляем следующее:
* мы добавили /bin/false в список разрешенных оболочек. В противном случае, может вернуться ошибка 530 Login incorrect.
Проверка
Для проверки подключения можно воспользоваться FTP-клиентом на другом компьютере (например, FileZilla или Total Commander).
Также можно установить FTP-клиент на сервер:
apt install ftp
И для подключения используем следующую команду:
Система запросит логин и пароль.
Настройка SSL/TLS
TLS позволяет настроить безопасный FTP, передача данных через который осуществляется по шифрованному каналу.
Для данной цели можно использовать самоподписанный сертификат. Чтобы его создать, вводим команду:
openssl req -new -x509 -days 1461 -nodes -out /etc/ssl/certs/vsftpd.pem -keyout /etc/ssl/private/vsftpd.key -subj "/C=RU/ST=SPb/L=SPb/O=Global Security/OU=IT Department/CN=ftp.dmosk.local/CN=ftp"
* в данном примере мы создаем самоподписанный сертификат на 4 года для URL ftp.dmosk.local или ftp. Открытый ключ будет сохранен в файле /etc/ssl/certs/vsftpd.pem, закрытый — /etc/ssl/private/vsftpd.key. При желании, мы можем использовать купленный сертификат или получить его бесплатно у Let's Encrypt.
Открываем на редактирование конфигурационный файл vsFTPd:
rsa_cert_file=/etc/ssl/certs/vsftpd.pem
rsa_private_key_file=/etc/ssl/private/vsftpd.key
ssl_enable=YES
* где ssl_enable разрешает использование шифрования; rsa_cert_file — путь к открытому ключу; rsa_private_key_file — путь к закрытому ключу.
И дописываем следующие:
allow_anon_ssl=NO
force_local_data_ssl=NO
force_local_logins_ssl=NO
ssl_tlsv1=YES
ssl_sslv2=NO
ssl_sslv3=NO
ssl_ciphers=HIGH
- allow_anon_ssl разрешает использовать SSL анонимным пользователям;
- force_local_data_ssl требует использования шифрования, и если установить YES, клиенты без шифрования не смогут подключиться;
- force_local_logins_ssl также требует подключение по SSL;
- ssl_tlsv1 — использовать TLS версии 1;
- ssl_sslv2 и ssl_sslv3 — использовать SSL версии 1 и 2;
- ssl_ciphers — выбор шифра. В данном примере мы говорим использовать максимально безопасный.
systemctl restart vsftpd
Виртуальные пользователи
Устанавливаем pam-модуль, позволяющий аутентифицировать пользователей с помощью passwd-like файлов:
apt install libpam-pwdfile
Открываем конфигурационный файл vsftpd и добавляем следующее:
user_config_dir=/etc/vsftpd_virtuser_conf
guest_enable=YES
virtual_use_local_privs=YES
pam_service_name=vsftpd
nopriv_user=vsftpd
guest_username=vsftpd
- user_config_dir — каталог для хранения настроек пользователя.
- guest_enable — разрешаем гостевой вход.
- virtual_use_local_privs — виртуальные пользователи используют привилегии, как локальные, а не анонимные.
- pam_service_name — имя pam-сервиса.
- nopriv_user — под каким пользователем работает сервер, когда ему не нужны привилегии.
- guest_username — имя гостевого пользователя.
Для возможности использовать утилиту htpasswd ставим следующий пакет:
apt install apache2-utils
Создаем каталог для хранения файла виртуальных пользователей и двух пользователей:
htpasswd -cd /etc/vsftpd/ftpd.passwd virt1
htpasswd -d /etc/vsftpd/ftpd.passwd virt2
* обратите внимание, опция -c команды htpasswd используется только при создании файла (при первом вводе команды). Мы создаем два пользователя — virt1 и virt2.
Архивируем имеющийся pam-сервис для vsftpd:
mv /etc/pam.d/vsftpd /etc/pam.d/back_vsftpd
Создаем новый со следующим содержимым:
auth required pam_pwdfile.so pwdfile /etc/vsftpd/ftpd.passwd
account required pam_permit.so
В самой системе создаем пользователя, которого используем как гостевого:
useradd vsftpd -d /home/vsftpd -g nogroup -m -s /bin/false
* с домашней директорией /home/vsftpd, основной группой nogroup и без возможности входа в систему (-s /bin/false).
Создаем каталог хранения настроек виртуальных пользователей:
и создаем настройку для первого:
* local_root — домашняя директория для FTP пользователя virt1.
Создаем домашний каталог для нашего пользователя virt1 и задаем правильные права: