Introduction to collision
Unity handles collision between GameObjects with colliders, which attach to GameObjects and define the shape of a GameObject The fundamental object in Unity scenes, which can represent characters, props, scenery, cameras, waypoints, and more. A GameObject’s functionality is defined by the Components attached to it. More info
See in Glossary for the purposes of physical collisions. A collider is invisible, and does not need to be the exact same shape as the GameObject’s mesh The main graphics primitive of Unity. Meshes make up a large part of your 3D worlds. Unity supports triangulated or Quadrangulated polygon meshes. Nurbs, Nurms, Subdiv surfaces must be converted to polygons. More info
See in Glossary . A rough approximation of the mesh is often more efficient and indistinguishable in gameplay.
The simplest (and least processor-intensive) colliders are primitive collider types. In 3D, these are the Box Collider A cube-shaped collider component that handles collisions for GameObjects like dice and ice cubes. More info
See in Glossary , Sphere Collider A sphere-shaped collider component that handles collisions for GameObjects like balls or other things that can be roughly approximated as a sphere for the purposes of physics. More info
See in Glossary and Capsule Collider A capsule-shaped collider component that handles collisions for GameObjects like barrels and character limbs. More info
See in Glossary . In 2D, you can use the Box Collider 2D and Circle Collider 2D. You can add any number of these to a single GameObject to create compound colliders.
Compound colliders
Compound colliders approximate the shape of a GameObject while keeping a low processor overhead. To get further flexibility, you can add additional colliders on child GameObjects. For instance, you can rotate boxes relative to the local axes of the parent GameObject. When you create a compound collider like this, you should only use one Rigidbody A component that allows a GameObject to be affected by simulated gravity and other forces. More info
See in Glossary component, placed on the root GameObject in the hierarchy.
Primitive colliders do not work correctly with shear transforms. If you use a combination of rotations and non-uniform scales in the Transform hierarchy so that the resulting shape is no longer a primitive shape, the primitive collider cannot represent it correctly.
Mesh colliders
There are some cases, however, where even compound colliders are not accurate enough. In 3D, you can use Mesh Colliders A free-form collider component which accepts a mesh reference to define its collision surface shape. More info
See in Glossary to match the shape of the GameObject’s mesh exactly. In 2D, the Polygon Collider 2D does not match the shape of the sprite A 2D graphic objects. If you are used to working in 3D, Sprites are essentially just standard textures but there are special techniques for combining and managing sprite textures for efficiency and convenience during development. More info
See in Glossary graphic perfectly but you can refine the shape to any level of detail The Level Of Detail (LOD) technique is an optimization that reduces the number of triangles that Unity has to render for a GameObject when its distance from the Camera increases. More info
See in Glossary you like.
These colliders are much more processor-intensive than primitive types, so use them sparingly to maintain good performance. Also, a mesh collider cannot collide with another mesh collider (i.e., nothing happens when they make contact). You can get around this in some cases by marking the mesh collider as Convex in the Inspector A Unity window that displays information about the currently selected GameObject, asset or project settings, allowing you to inspect and edit the values. More info
See in Glossary . This generates the collider shape as a “convex hull” which is like the original mesh but with any undercuts filled in.
The benefit of this is that a convex mesh collider can collide with other mesh colliders so you can use this feature when you have a moving character with a suitable shape. However, a good rule is to use mesh colliders for scene A Scene contains the environments and menus of your game. Think of each unique Scene file as a unique level. In each Scene, you place your environments, obstacles, and decorations, essentially designing and building your game in pieces. More info
See in Glossary geometry and approximate the shape of moving GameObjects using compound primitive colliders.
Static colliders
You can add colliders to a GameObject without a Rigidbody component to create floors, walls and other motionless elements of a Scene. These are referred to as static colliders. At the opposite, colliders on a GameObject that has a Rigidbody are known as dynamic colliders. Static colliders can interact with dynamic colliders but since they don’t have a Rigidbody, they don’t move in response to collisions.
Physics materials
When colliders interact, their surfaces need to simulate the properties of the material they are supposed to represent. For example, a sheet of ice will be slippery while a rubber ball will offer a lot of friction and be very bouncy. Although the shape of colliders is not deformed during collisions, their friction and bounce can be configured using Physics Materials. Getting the parameters just right can involve a bit of trial and error. A slippery material like ice, for example, has zero (or very low) friction. A grippy material like rubber has high friction and near-perfect bounciness. See the reference pages for Physic Material and Physics Material 2D for further details on the available parameters. Note that for historical reasons, the 3D asset is actually called Physic Material A physics asset for adjusting the friction and bouncing effects of colliding objects. More info
See in Glossary (without the S) but the 2D equivalent is called Physics Material 2D Use to adjust the friction and bounce that occurs between 2D physics objects when they collide More info
See in Glossary (with the S).
Triggers
The scripting system can detect when collisions occur and initiate actions using the OnCollisionEnter function. However, you can also use the physics engine A system that simulates aspects of physical systems so that objects can accelerate correctly and be affected by collisions, gravity and other forces. More info
See in Glossary simply to detect when one collider enters the space of another without creating a collision. A collider configured as a Trigger (using the Is Trigger property) does not behave as a solid object and will simply allow other colliders to pass through. When a collider enters its space, a trigger will call the OnTriggerEnter function on the trigger object’s scripts A piece of code that allows you to create your own Components, trigger game events, modify Component properties over time and respond to user input in any way you like. More info
See in Glossary .
Collision callbacks for scripts
When collisions occur, the physics engine calls functions with specific names on any scripts attached to the objects involved. You can place any code you like in these functions to respond to the collision event. For example, you might play a crash sound effect when a car bumps into an obstacle.
On the first physics update where the collision is detected, the OnCollisionEnter function is called. During updates where contact is maintained, OnCollisionStay is called and finally, OnCollisionExit indicates that contact has been broken. Trigger colliders call the analogous OnTriggerEnter , OnTriggerStay and OnTriggerExit functions. Note that for 2D physics, there are equivalent functions with 2D appended to the name, eg, OnCollisionEnter2D . Full details of these functions and code samples can be found on the Script Reference page for the MonoBehaviour class.
With normal, non-trigger collisions, there is an additional detail that at least one of the objects involved must have a non-kinematic Rigidbody (ie, Is Kinematic must be switched off). If both objects are kinematic Rigidbodies then OnCollisionEnter , etc, will not be called. With trigger collisions, this restriction doesn’t apply and so both kinematic and non-kinematic Rigidbodies will prompt a call to OnTriggerEnter when they enter a trigger collider.
Collider interactions
Colliders interact with each other differently depending on how their Rigidbody components are configured. The three important configurations are the Static Collider (ie, no Rigidbody is attached at all), the Rigidbody Collider and the Kinematic Rigidbody Collider.
Static Collider
A static collider is a GameObject that has a Collider but no Rigidbody. Static colliders are mostly used for level geometry which always stays at the same place and never moves around. Incoming Rigidbody objects collide with static colliders but don’t move them.
In particular cases, the physics engine optimizes for static colliders that never move. For instance, a vehicle resting on top of a static collider remains asleep even if you move this static collider. You can enable, disable, or move static colliders in runtime without specially affecting the physics engine computation speed. Also, you can safely scale a static Mesh Collider as long as the scale is uniform (not skewed).
Rigidbody Collider
This is a GameObject with a Collider and a normal, non-kinematic Rigidbody attached. Rigidbody colliders are fully simulated by the physics engine and can react to collisions and forces applied from a script. They can collide with other objects (including static colliders) and are the most commonly used Collider configuration in games that use physics.
Kinematic Rigidbody Collider
This is a GameObject with a Collider and a kinematic Rigidbody attached (ie, the IsKinematic property of the Rigidbody is enabled). You can move a kinematic rigidbody object from a script by modifying its Transform Component A Transform component determines the Position, Rotation, and Scale of each object in the scene. Every GameObject has a Transform. More info
See in Glossary but it will not respond to collisions and forces like a non-kinematic rigidbody. Kinematic rigidbodies should be used for colliders that can be moved or disabled/enabled occasionally but that should otherwise behave like static colliders. An example of this is a sliding door that should normally act as an immovable physical obstacle but can be opened when necessary. Unlike a static collider, a moving kinematic rigidbody will apply friction to other objects and will “wake up” other rigidbodies when they make contact.
Even when immobile, kinematic rigidbody colliders have different behavior to static colliders. For example, if the collider is set to as a trigger then you also need to add a rigidbody to it in order to receive trigger events in your script. If you don’t want the trigger to fall under gravity or otherwise be affected by physics then you can set the IsKinematic property on its rigidbody.
A Rigidbody component can be switched between normal and kinematic behavior at any time using the IsKinematic property.
A common example of this is the “ragdoll” effect where a character normally moves under animation but is thrown physically by an explosion or a heavy collision. The character’s limbs can each be given their own Rigidbody component with IsKinematic enabled by default. The limbs move normally by animation until IsKinematic is switched off for all of them and they immediately behave as physics objects. At this point, a collision or explosion force will send the character flying with its limbs thrown in a convincing way.
Collision action matrix
When two objects collide, a number of different script events can occur depending on the configurations of the colliding objects’ rigidbodies. The charts below give details of which event functions are called based on the components that are attached to the objects. Some of the combinations only cause one of the two objects to be affected by the collision, but the general rule is that physics will not be applied to an object that doesn’t have a Rigidbody component attached.
Как использовать функции столкновений в Unity: OnCollisionEnter/Stay/Exit, OnTriggerEnter…
Столкновения (Collisions) играют важную роль в компьютерных играх. Это, пожалуй, не конкретная механика, а объемный пласт взаимодействия между игровыми объектами.
В этой статье (потом, возможно, серии статей) мы разберем, как работать со столкновениями в Unity, как ловить и обрабатывать их в коде, глубже погрузимся в тему и постараемся ответить на часто возникающие вопросы.
Предполагается, что вы уже знаете Unity и С# на базовом уровне: посмотрели один-два туториальчика, почитали парочку статей, успели потыкать в движке что-то самостоятельно и хотите продолжать развиваться
Как работает система столкновений? Что такое коллайдеры?
Система столкновений Unity работает за счет коллайдеров (Colliders).
Коллайдер — это компонент, который представляет собой невидимые «границы» объекта.
Часто они совпадают с формой самого объекта (как в реальном мире), хотя это и не обязательно.
Unity поддерживает разнообразные формы коллайдеров:
BoxCollider — форма прямоугольного параллелепипеда
CapsuleCollider — капсула (математически, сфероид или эллипсоид вращения)
MeshCollider — кастомная форма 3Д-меша, соответствующая форме самого меша.
PolygonCollider2D — кастомная форма 2Д-спрайта, повторяющая форму самого спрайта.
Повторюсь, коллайдеры задают границы объектов, которые используются при расчете физики. Например:
Кубик лежит на столе: и куб, и стол имеют границы, поэтому не проходят сквозь друг друга.
В героя попала шальная пуля: мы зафиксируем это и уменьшим его здоровье.
Герой бежит и упирается в стену: он не может пробежать сквозь стену, потому что они оба имеют границы.
Триггеры
Триггеры — это те же коллайдеры. Серьезно, всего одна галочка в любом компоненте коллайдера превращает его в триггер!
Но триггеры «физически прозрачны». Другими словами, объекты, помеченные как триггеры*, не являются твердыми телами и пропускают любое другое тело сквозь себя.
Триггеры в основном используют как некие зоны, или области, попадание в которые влечет за собой какие-то последствия. Например:
Комната в ядовитым газом — это один большой триггер: герой проходит сквозь него без физического взаимодействия, но все время, пока герой внутри, он получает пассивный урон от яда.
Зона видимости врага — тоже триггер: когда герой находится в этой зоне, враг видит его и стреляет по нему.
Зона открытия двери — тоже может быть триггером: расположим эту зону рядом с дверью. Если игрок нажимает кнопку E находясь внутри этой зоны (т.е. достаточно близко к двери), то она открывается, иначе — нет.
Обработка столкновений
Самое интересное и важное: как правильно из кода узнать, что столкновение произошло и обработать это?
Для этого разработчики Unity подкатили нам целую набор функций. Предлагаю на практике подробно рассмотреть как работает одна из них, а потом на ее примере обсудим другие.
Итак, перед вами сцена с большой платформой, кубиком и шариком (а также небольшим освещением). Давайте сделаем так, чтобы при падении шарика на кубик последний уничтожался.
Давайте повесим коллайдеры на объекты: на шарик — SphereCollider , на кубик — BoxCollider . Помимо этого, обоим объектам добавим компонент Rigidbody .
Скорее всего, вы уже знаете, что Rigidbody — это компонент, который добавляет объектом физику. Именно благодаря ему шарик будет падать, а при соприкосновении с кубиком — отскочит от него.
Создадим скрипт Ball.cs в папке Scripts. Сразу повесим его на шарик, чтобы потом не забыть. В скрипт нужно добавить следующий код:
Функция OnCollisionEnter будет вызвана автоматически, когда шарик соприкоснется с чем-либо. Самим где-либо вызывать ее не надо.
Попробуйте запустить код и убедитесь, что в консоль выводится нужная фраза при столкновении с кубиком.
Единственный аргумент collision хранит информацию о столкновении. В частности он содержит переменную gameObject , в которой хранится объект, с которым произошло столкновение.
Попробуйте заменить print(«Collision detected») на print(collision.gameObject) и увидите, что при столкновении в консоль выводится информация о нашем кубике:
Теперь вместо принта будем удалять этот самый кубик:
Функция Destroy() позволяет уничтожить какой-либо объект. Первым аргументом она принимает сам объект (в нашем случае кубик), а вторым — опционально — через сколько секунд должно произойти уничтожение.
Сохраните скрипт и запустите игру, чтобы увидеть, как шарик уничтожает сначала кубик, а затем — неожиданно — и пол! Да, ведь пол — это такой же объект, который имеет коллайдер (можете проверить:)
Как сделать чтобы пол не удалялся?
Самым правильным будет повесить на пол специальный тег, по которому его можно будет отличить от других объектов. Для этого выберите пол, создайте новый тег в инспекторе, нажав «Add Tag. » и назовите его Floor . После этого вновь выберите пол и прикрепите к нему этот тег (он появится в списке).
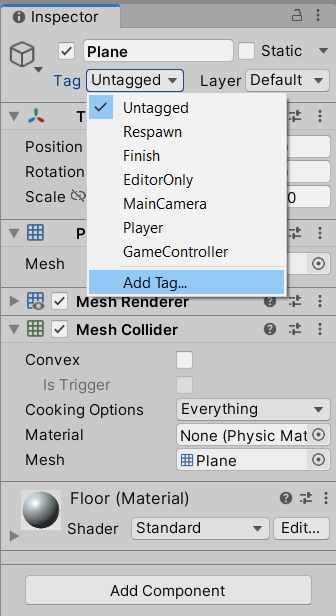
Теперь добавим в код проверку, чтобы уничтожать только те объекты, которые НЕ имеют тега «Floor»:
(Ну, или можно было все оставить как есть и сказать, что это не баг, а фича)
Перейдем к другим функциям
Не закрывайте проект. Замените написанную функцию на такую:
Запустив проект, вы увидите, что строка выводится в консоль каждый божий кадр.
Функция OnCollisionStay срабатывает каждый* кадр, когда объекты соприкасаются хоть чуть-чуть.
А функция OnCollisionExit срабатывает всего один кадр — когда касание прекратилось.
* На самом деле, не совсем: это физическая функция и она срабатывает каждый физический кадр. Детское объяснение в одну строку: Unity обрабатывает физику отдельно от не-физики: физика обрабатывается только в «физических кадрах», коими являются не все.
Опять к триггерам
Обсудим теперь триггеры. Вы можете попробовать отметить галочку «Is Trigger» в компоненте SphereCollider у шара. Запустив игру вы моментально поймете, что такое триггеры, если у вас пока не сложилось представление:)
Перейдите теперь на другую сцену, TriggersLesson, в папке «Scenes». Запустив игру вы увидите, что играете за капсулу, превращать которую в нормального героя мне было лень:)
Давайте сделаем так, чтобы при входе в горящую зону наш герой увеличивался, при нахождении в ней — мигал, а при выходе — вновь уменьшался.
Помним, что эта зона — триггер (можете в этом убедиться, в компоненте коллайдере отмечена галочка IsTrigger), а потому будем использовать триггерные функции. Найдем в папке Scripts файл Player.cs . Он уже содержит некоторые функции, отвечающие за перемещение игрока. Добавьте в конце еще несколько функций:
Обратите внимание, что триггерные функции НЕ принимают в качестве аргумента объект типа Collision, т.е. информацию о столкновении, так как самого столкновения не было. Вместо этого они просто хранят ссылку на компонент-коллайдер того объекта, с которым столкнулись. В нашем случае, так как скрипт висит на герое, переменная other ссылаться на саму зону.
Мы проверяем, является ли она нашим триггером и увеличиваем объект.
Если оставить все как есть, то в круг можно несколько раз входить-выходить и достигнуть гигантских размеров. Давайте это исправим:)
Похожая функция: проверяем, вошли ли мы действительно в зону и уменьшаем игрока.
Эта функция создаст разноцветное случайное мерцание. Мы просто меняем цвет материала, примененного к мешу. Для этого мы обращаемся к компоненту MeshRenderer.
Кстати, каждый кадр использовать GetComponent() — плохая практика. Это сильно бьет по производительности. Поэтому компоненты стоит кэшировать. Я уже сделал это в 9-й и 14-й строках: объявил переменную и инициализировал ее в функции Awake. Теперь просто замените вызов GetComponent<MeshRenderer>() на переменную _mesh .
Кстати, закэшировал я и компонент Rigidbody , который мне тоже нужен каждый кадр для перемещения персонажа.
Мне кажется, эта статья итак уже выходит довольно длинной, поэтому я опишу как использовать 2Д-версии функций столкновения в следующей статье (если она будет. )
В качестве практики предлагаю вам поработать с обеими сценами. Например, можно сделать следующее:
На первой сцене вместо скрипта для шарика напишите скрипт для кубика, который будет изменять цвет шарика на, скажем, зеленый, когда коснется его. Возьмите код изменения цвета из конца урока и убедитесь, что кубик случайно не красит еще и пол!
На второй сцене выньте камеру из персонажа в иерархии, размножьте их на сцене и полностью перепишите их скрипт, чтобы они бегали в случайные стороны. А потом создайте скрипт для огненной зоны, в котором реализуйте все, что мы делали в этом уроке.
Теперь у вас по карте бегает куча недоделанных миньонов, каждый из которых вырастает и мелькает, когда попадает в огненную зону!
Unity collision detection 2D everything you need to know + examples

Here we are, I can feel another mystery, Unity collision detection 2D.
What? It’s too difficult this time!?
I don’t think so.
It’s a big case, I know, but if we want to create video games we need to face the truth:
Manage collisions.
Don’t worry we will find all the necessary information and this time we will have another partner to help for our investigation: Unity.
Yes, Unity will help us, then we just need to start analyzing the clues.
Step by step we will understand how to manage the collisions in our game and this monstrous case will become a lovely little kitten.
Unity Collisions Vocabulary

Hey partner, here is what I already discovered, there are some important notions to know before proceeding and understanding Unity collision detection 2D:
Physics Engine 2D
To detect collisions and simulate the real world physics system Unity provides a built-in physics engine, so all the maths behind acceleration, forces, gravity, collision detection etc… it’s already there.
Fewww! It seems other brave detectives already solved the case of physics! Thank you whoever you are!
Collision Detection
It’s the detection of an intersection between two or multiple objects. Often it’s related to simulate the physical world in our game.
Let me list for you some detections we would like to handle:
- One object (or multiple objects) touches or hits another object (or multiple objects)

- One object (or multiple objects) overlaps another object (or multiple objects)

The detection means that in some way we need to be warned when a collision happens!
Please have a look at wikipedia for a large definition about collision detections in video games.
Collider 2D
It’s a component to define the shape of a Gameobject for physical purposes.
If the Gameobject sprite is a complex drawing, just an approximation of its shape will be necessary to work, because the Collider 2D is invisible and not distinguishable during the gameplay!
So the sprite is the drawing, the collider is the shape, what does it mean?
The sprite is what the user sees, the collider is what the engine considers for collisions.
Trigger 2D
It’s a particular behavior of a Collider 2D, when we simply want to detect when one collider overlaps another one without creating a collision.
So the object with this behavior stops being a solid object and allows other colliders to pass through.
RigidBody 2D
It’s a component that allows the physics engine to control the object, it means it will be affected by gravity, forces and collisions too!
Are you ready to play with Vectors?
Right, to move our objects in different directions we need to manage vectors too! Why don’t you have a look at this article for a good refresh: Vector In Game Development: Understand The Basics Of Vector Math
While the physics engine 2D moves colliders and makes them interact with each other, the Rigidbody 2D component is in charge of the communication of these movements with the Transform components.
In this way the Gameobject will change according to the collider!
How to…

How can we add a Collider 2D or Rigidbody 2D to a Gameobject?
1- Select a Gameobject in the scene and click on add component.

2- Type “collider 2D” or “rigidbody 2D” in the search box and select the component (for Collider 2D we will see different types, we’re just going to talk about it).

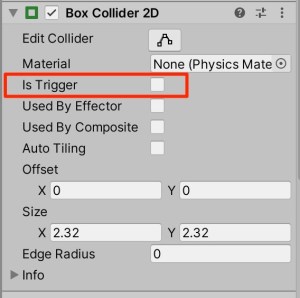
How can we set a collider as a trigger?
Just enabling the right checkbox property in the Collider 2D component.
Which Collider 2D should we use?

Have you noticed there is more than one Collider 2D to choose from?
Yes, Unity provides us a list of different already pre-set Collider 2Ds.
Unity has an explanation for each one, we just need to enrich it with some helpful examples.
Let’s line up all the suspects then and have a look at each one of them (On the left is the sprite, on the right its collider)
Box Collider 2D
Box collider 2D is for square and rectangle collision areas.

Circle Collider 2D
Circle collider 2D is for circular collision areas.

Capsule Collider 2D
Capsule collider 2D is for circular or lozenge-shaped collision areas.

Polygon Collider 2D
Polygon collider 2D is for freeform collision areas.

Edge Collider 2D
Edge collider 2D is for freeform collision areas and areas which aren’t completely enclosed (such as rounded convex corners).

Composite Collider 2D
Composite collider 2D is for merging Box Collider 2Ds and Polygon Collider 2Ds.

Tilemap Collider 2D
Tilemap Collider 2D is for each Tile set in the corresponding Tilemap component of a Tilemap Gameobject. We’ll talk about it in the Tilemap investigation!
Rigidbody 2D Types

More than one Rigidbody 2D type? Are you sure? I knew it! Some witnesses saw something!
Let’s try to find out the version of the story of each Rigidbody 2D.
Dynamic Rigidbody 2D
It’s the most common and most performance-expensive type, because it interacts with everything and it’s designed to move under simulation. It interacts with all the body types.
If we want a normal object affected by physics, this is our body!
The ball in this example has a dynamic Rigidbody 2D and it can be moved by applying forces and it’s affected by gravity!
Static Rigidbody 2D
Opposite to dynamic, it’s designed to not move under simulation, Indeed it has infinite mass, heavy right? It only collides with dynamic Rigidbody 2D.
It is also the least resource-intensive body type to use.
You don’t really need to set the Rigidbody 2D for static objects, just the collider 2D is necessary to detect collisions, but if a static object needs to be moved or reconfigured at run time, it is faster to do so when it has its own Rigidbody 2D and this will be our body!
Let’s add a box with static Rigidbody2D, it will be an obstacle to overcome!
Kinematic Rigidbody 2D
Like the dynamic is designed to move under simulation, but only controlling it, it’s not affected by gravity and forces. It’s faster in terms of performance-expensive. It interacts only with dynamic body types.
If we want to move something not influenced by forces and gravity, remember it’s nature of interaction only with dynamic body types, this is our body!
What if we add a kinematic Rigidbody 2D instead of the static one to the box? In this way we can control its movement without the influence of gravity. It will become a perfect movement trap for a platform video game!
Collision Detection 2D in scripts

Well! Now we know many things about Unity collision detection 2D, we are ready to understand what we can do when a collision happens.
Unity, our partner provides us two different ways to handle the collisions depending if a collider is a trigger or not.
We just need to add the snippets below to the script of our Gameobject with a collider to handle the collisions and do what we want after the detection.
Just keep in mind if the trigger checkbox is unchecked we need the “Collision 2D” snippets, otherwise if not “Trigger 2D” .
Collision 2D
Trigger 2D
Keep in mind… Mind the gap!

Hey partner! Unity collision detection 2D is not a secret anymore for us, but we can’t solve this case without considering these clues:
Colliders 2D Properties
Each collider type has properties over the trigger one, please check the documentation for each type to understand what these properties do (in the section “Which Collider 2D should we use” you can find a link for each collider type to its documentation).
Rigidbody 2D properties
There are some properties like mass and gravity we will need to know, I suggest having a look at the official documentation for an explanation of all of them.
Static collider 2D
It was “static Rigidbody 2D” wasn’t it? You’re right, but if we need just the collision detection without any reconfiguration or movement to place the object somewhere else, we can avoid adding the Rigidbody 2D component.
Put something below or set the gravity value to 0 to avoid falling objects.
It’s a common mistake, when we add a dynamic or static Rigidbody 2D to an object, if we start the game the object will fall out of the screen. To avoid this we can either place a floor underneath with a collider, or set the gravity value attribute in the rigidbody component to 0.
2D is NOT 3D
As you already noticed Unity provides many of these components in 2 versions, for instance Box Collider 2D and Box Collider, well the difference is the second one is for 3D. So keep in mind to use only 2D components in 2D games, first for performances and second to avoid mixing things that won’t work like 3D components and 2D methods in scripts (OnCollisionEnter2D is NOT OnCollisionEnter).
OnCollisionEnter2D won’t work if the trigger is enabled and vice versa.
Remember my friend, for collisions “OnCollisionEnter2D, OnCollisionStay2D, OnCollisionExit2D”, but if we enable the trigger behaviour in a collider they will stop working and we should use “OnTriggerEnter2D, OnTriggerStay2D, OnTriggerExit2D”.
Simple collisions 2D game
Hey! Look what I found in the secret files of the blog, An old record! Someone already tried to solve this case.
Here is my reconstruction of the record:

Whoever will be able to reproduce it will help to solve the lost case of collision 2D game.
Besides this they will win the best detective of the month prize!
Do you think you will be able to figure it out?
If not, don’t worry, you can find the complete project on GitHub, but promise me to look at it only as the last resort! ��
Conclusion
It was a hard job, we needed a lot of research, so let’s do a final recap:
- To detect collisions in a Gameobject we need a Collider2D, with the right type according to our needs.
- To allow physics 2D to affect a Gameobject we need a RigidBody2D.
- Keep in mind all the rules we discussed before configuring the game properly and you will avoid unwanted behaviors.
No collision fear anymore, we solved the case and acquired the knowledge required to create a wonderful video game with collision detection.
Функции событий столкновений: OnCollisionEnter, OnCollisionEnter2D, OnCollisionStay, OnTriggerEnter
Этот пост содержит в себе ответы на такие частые вопросы, как:
- Для чего предназначены и как работают функции: OnCollisionEnter, OnTriggerEnter, OnCollisionEnter2D, OnTriggerStay, OnCollisionExit и подобные;
- Как их правильно вызывать / почему они не срабатывают;
- Что они принимают и возвращают;
- Почему функции OnCollisionStay/OnTriggerStay/. перестают работать спустя несколько кадров, если изначально работали, а объект даже не двигался.
ВАЖНО: здесь также описано, что такое триггер, что он делает и чем отличается от обычного коллайдера.

Список функций:
В первую очередь перечислим все подобные функции. Всего их 12:
| События | Collider | Trigger |
|---|---|---|
| Enter | OnCollisionEnter(Collision) | OnTriggerEnter(Collider) |
| Stay | OnCollisionStay(Collision) | OnTriggerStay(Collider) |
| Exit | OnCollisionExit(Collision) | OnTriggerExit(Collider) |
Те же функции, но для 2D объектов:
| События | Collider | Trigger |
|---|---|---|
| Enter | OnCollisionEnter2D(Collision) | OnTriggerEnter2D(Collider) |
| Stay | OnCollisionStay2D(Collision) | OnTriggerStay2D(Collider) |
| Exit | OnCollisionExit2D(Collision) | OnTriggerExit2D(Collider) |
! Все ссылки рабочие и направляют на страницу своей функции
О функциях OnCollision. и их 2D версиях
Из документации:
- OnCollisionEnter вызывается, когда этот Collider 1 /Rigidbody начал соприкосновение с другим Rigidbody/Collider.
- OnCollisionStay вызывается один раз в кадр для каждого Collider/Rigidbody, который касается другого Rigidbody/Collider.
- OnCollisionExit вызывается, когда Collider/Rigidbody прекращает контакт с другим Rigidbody/Collider.
Все вышеперечисленные тезисы верны в том числе и для 2D версий функций.
Аргументы:
Все они принимают в качестве первого и единственного аргумента — Collision (не путать с Collider ). Класс Collision содержит информацию о точках соприкосновения, скорости воздействия и т.д.
Требования:
- Оба объекта должны иметь на себе компонент Collider.
- У обоих объектов в компоненте Collider должно быть ОТКЛЮЧЕНО свойство isTrigger .
- Хотя бы один из двух объектов должен иметь компонент Rigidbody.
- У объекта(-ов) с компонентом Rigidbody должно быть ОТКЛЮЧЕНО свойство isKinematic .
Важно:
- События столкновений отправляются даже на неактивные компоненты.
- События столкновений НЕ отправляются на объекты с отключенным или временно неактивным компонентом Rigidbody.
О функциях-триггерах OnTrigger. и их 2D версиях
англ. trigger [ˈtrɪgə] — спусковой крючок, пусковой сигнал, триггер
Collider с свойством триггера не является телесным и ни с кем не сталкивается (физически), а используется как зона, которая способна реагировать на события входа/выхода/нахождения в ней чего-либо и запуска неких сценариев.
Любой объект будет проходить сквозь триггер, не оказывая физического воздействия.
Из документации:
- OnTriggerEnter вызывается, когда Collider other входит в триггер.
- OnTriggerStay вызывается практически 2 каждый кадр для каждого Collider other, которые соприкасаются с триггером.
- OnTriggerExit вызывается, когда Collider other перестает соприкасаться с триггером.
Все вышеперечисленные тезисы верны в том числе и для 2D версий функций.
Аргумент:
Все они принимают в качестве первого и единственного аргумента — Collider (не путать с Collision ), то есть ссылку на компонент объекта, с которым произошло триггерное столкновение.
Требования:
- Оба объекта должны иметь на себе компонент Collider.
- РОВНО один объект (НЕ два) должен быть помечен как триггер (то есть свойство isTrigger должно быть равно true) в компоненте Collider.
- Хотя бы один из двух объектов должен иметь компонент Rigidbody.
Важно:
- Функции-триггеры вызываются в FixedUpdate после непосредственного входа в триггер/выхода из триггера и т.д., поэтому объекты, участвующие в столкновении, в момент вызова функции-триггера могут уже находиться не той позиции, где были в момент столкновения.
- Функции-триггеры не являются непосредственной частью столкновений, а лишь функцией MonoBehaviour’a.
- Функция OnTriggerStay зависит от физического таймера, поэтому нет необходимости вызывать ее каждый кадр — она может вызываться НЕ в каждом кадре.
Помните также о том, что если вы не используете аргументы, указываемые в функциях (Collision other, Collider collider. ), вам следует их опустить: в таком случае ненужные расчеты не будут производиться. Например:
О переводе в "спящее" состояние
Многие могли сталкиваться с такой ситуацией: на объекте висит Collider, Rigidbody, всё настроено как надо, на объект повешен скрипт с функцией OnCollisionStay, OnTriggerStay или их 2D версиями. Однако при нахождении объекта в коллайдере, эти функции вдруг перестают работать! А если в них поместить Debug.Log для дебага, оказывается, что спустя несколько десятков кадров, объект просто перестает выполнять свою функцию, выводы в консоль прекращаются, и объект, который даже не двигался, будто засыпает! Почему такое происходит?
Дело в том, что Rigidbody действительно может засыпать!
Когда Rigidbody двигается медленнее определенной скорости, считается, что он остановился. После этого объект будет переведен в "спящий" режим. Это сделано для оптимизации: ресурсы процессора не будут расходоваться на обновление Rigidbody, пока он не "проснется" (т.е. снова придет в движение)
В некоторых случаях (например, когда передвижение физического объекта производится через т.н. "телепортацию"), объект может не проснуться, хотя должен. В таком случае его можно принудительно разбудить функцией WakeUp.
Сноски:
1 Здесь и далее под компонентом Collider понимается любой тип коллайдера, любой его наследник. То есть вы можете использовать BoxCollider, SphereCollider, CapsuleCollider, любые 2D коллайдеры: BoxCollider2D, CircleCollider2D — или любой другой коллайдер, соответствующий вашим нуждам.
2 OnTriggerStay вызывается практически каждый кадр, потому что она зависит от физического таймера, и нет необходимости вызывать ее каждый кадр.