A beginner’s guide to Linux command-line

Systems administration and ops are one of my biggest areas of technical weakness.
I used GUI applications almost exclusively during the entirety of my education and first years working professionally. It didn’t help that the IDEs I used for Java, Eclipse and Netbeans, were absolutely amazing tools: I felt I had no reason to switch to what I perceived was a more time consuming way of doing things. In fact, the only command-line tool I used extensively was git .
When I finally started using Ruby on Rails and other scripting languages (and eventually got a Mac), I was at first flabbergasted by the lack of robust GUI tooling available. It was like I had reverted back to using notepad to code. It forced me to start using the terminal and command-line more often.
After a while I realized the power of the command-line. These commands were the APIs to the programs I used and I could use them however I wanted! Better yet, by changing commands together, you could do far more things than you could using a UI.
The journey has been tough. It’s hard to learn all this stuff without a guide. There’s just so much out there, and day-to-day you’ll only end up using a handful of commands.
I’ve written this document to hopefully help others focus their initial search on some common things they’ll end up using on a regular basis. A lot of it has been simplified and it glosses over some important concepts that will come in handy later. However, this should be useful for beginners.
First, some important concepts…
You’ll see these terms referenced throughout the post.
Current Directory
This is the current directory / folder, and is the default context your command will be run in. You can always find your Current Directory by typing pwd .
Arguments
Many of these commands take multiple arguments. In a lot of cases, the required argument is the file the command is being run on. When you see a command like more file.txt , the file.txt is the argument and the file the command is being run on. Every program has different arguments — check the documentation!
Flags
Flags are a way to set options and pass in arguments to the commands you run. Commands you run will change their behavior based on what flags are set. You should read the documentation of each command to know what flags are available.
For example, running ls with the -l flag ( ls -l ) will include more information in the result and change the format of what is returned.
Relative Path
Relative Paths are the names / paths to folders and files relative to your current directory. A relative path of myfolder/myimage.png , will mean the myfolder/myimage.png in the current directory, not anywhere else. If I was in another folder, that relative path would not point to the same myfolder/myimage.png .
Absolute Path
Absolute Paths are the names / paths to folders and files that your current directory. An absolute path is valid regardless of your current directory. /myfolder/myimage.png , will mean the same /myfolder/myimage.png regardless of what your current directory is. Note the / in front of the name.
Navigation 101
The first thing to learn is how to move around the directory structure and various folders.
Show your current directory with: pwd
pwd will Print your current Working Directory. It’s great to figure out where you are.
List files in a directory with: ls
ls lists files and folders in the current directory.
There’s a few flags you can use to make the listing easier to read or more informative:
- ls -l list all the files in a single column, along with their permissions, sizes and timestamps.
- ls -a lists all files, including hidden files.
You can combine flags:
- ls -la for example, will list all files in a single column, including hidden files.
You can also pass in the name of a folder to view the contents of that folder:
- ls myfolder will list the contents of the folder myfolder in your current directory.
Change directory with: cd
cd changes the directory. By default, the path is relative to the current directory. That means if I type cd myfolder , it will only work if the current directory I am in has a folder called myfolder . You can specify an absolute path by entering / in front of the folder path. cd /myfolder will work only if the root level / has a folder called myfolder .
Manipulation 101
Now that you know how to move around the directory structure, you’ll probably want to start making changes to it.
Create a directory with: mkdir
mkdir will make a directory with the name you pass it. To create a new directory called myfolder in the current directory, you would type in mkdir myfolder .
Create a file with: touch
touch will create an empty file with the name you provide.
Move a file with:mv
mv will move a file from the source to the destination. You can actually use mv to rename a file.
mv file_to_move folder_name_here will move the file into the folder. However, if the second argument turns out to be a file, it will overwrite the file.
Copy a file with: cp
cp will copy a file. It takes two arguments — the name of the file you want to copy, and the new path to the copy (including the file name).
You can use the -r flag to copy a directory.
Delete a file with: rm
rm will remove a file from your system. If you want to delete a directory, you would use the -r flag (recursive).
Note that this is a rather dangerous command, so be careful with it — there are many horror stories of accidentally deleting important things with a single command (often in conjunction with -r and * wildcards).
Editing 101
Now that you know how to move around, you’ll probably want to learn how to read, edit, and change files.
Read file contents with: more and tail
more and tail are two commands you can use to read file contents.
more filename.txt will open a reader where you can navigate through the file. When in more , you’ll be able to use some additional commands:
- You can use space to scroll down a full screen.
- The up and down arrow keys will scroll up and down a line.
- Pressing g will enter the goto mode. You can then enter a line number to go directly to that line.
- Pressing / will enter search mode — type in text to find and it’ll scroll to wherever that text is found. Pressing n will go to the next instance of that found text.
tail filename.txt will print the last 10 lines of a text file. You can use the -f flag (eg. tail -f filename.txt ) to follow the file in realtime. Whenever the file changes, it will print the last lines. This is useful if you are watching a log file for an application, for example.
Search through contents for a specific word with: grep
grep lets you search through text, returning the full line for any matches.
grep "text to find" filename.txt will search for text to find in filename.txt .
Change the contents of a file with: vi or vim
vi / vim is a ridiculously complicated text-editor that’s often your only option if you are manipulating files on a server. I’ve only learned enough of the basic commands to make small changes, but that should serve you well enough for now.
vi filename will open the file you want to edit.
Note that the editor opens in a mode ( normal mode ) that doesn’t let you type anything. You’ll need to press the i key to go into insert mode .
After you are done making your changes changes, you’ll want to go back into the normal mode by pressing escape .
- To make changes to a file, enter insert mode with i and type away.
- To save your changes, you enter normal mode with escape and press :w to write your changes.
- To quit, you enter normal mode with escape and type in :q to quit. If you made changes, you’ll need to type :q! to force it to quit.
That’s about all I know about this editor.
Practicals 101
Now that you know the basics, you’ll want to have this additional information so you can start actually making use of all of this in a real environment.
Get help on a command or find out more about it with: man
man is a command that displays a help manual for the command you pass in as an argument. Not all commands have manuals, and sometimes the manuals are confusing.
For example, man ls will show the manual for the ls command.
If there isn’t a man ual for it, you can also try passing in a -help or —help flag. Some programs have a built-in help that will tell you how to use it.
Referencing the Current Directory with: .
. is a way to explicitly reference the current directory. You’ll often see commands like mv ./file.txt ./potato.txt . The first . in ./ is the current directory.
Specify a wildcard with: *
* often represents a wildcard in commands. This means that the command will be run on any file that matches. You can use it to perform actions in bulk, such as running a mv of all files of a specific type:
For example, mv *.png images will move all .png files into the images directory.
It’s very easy to accidentally perform commands on files you don’t want using wildcards, so be careful!
Redirect output to another program with: |
| , known as pipes, are a way to unlock the power of Linux by chaining commands together. It routes the output of the command on the left of the | and passes it to the command on the right of the | .
For example, suppose I want to find all of the running instances of a program called zsh . I could use ps to find the list of all of my processes. However, this list could be massive, and scrolling through it all would be a pain. I could combine it with grep to search through the results of ps and display only what I am looking for: ps | grep zsh .
Save the results of a command to a file with: > and >>
> and >> will let you run a command and save the results to a file. > will overwrite the file with the results of the command, while >> will append or add the results to the end of the file.
What does 'ls -la' do?
When I entered the -al attribute with the ls command, I got the following:
What does each column mean, and what does the total 76 signify here?


2 Answers 2
The ls -al command is a combination of ls -l (use a long listing format) and ls -a (do not ignore entries starting with .)
The result is a long list (the ls -l part) with (from left to right):
- filetype
- file permissions
- number of links
- owner name
- owner group
- file size
- time of last modification
- the name of the file or directory
while the ls -a means that hidden files are listed as well.
see also man ls (as always man is the first source of information), and this link.
A little more explanation on what you see
The output starts with the number of disc blocks, used by the directory (in your case 76). From the GNU docs:
For each directory that is listed, preface the files with a line ‘total blocks’, where blocks is the total disk allocation for all files in that directory. The block size currently defaults to 1024 bytes, but this can be overridden.
Understanding ‘ls -la’: A Guide to the Command-Line Listing Command
 By Brent Cohen July 18, 2023 July 18, 2023

In the world of Linux and Unix-like operating systems, the command-line interface (CLI) is a powerful tool that provides a direct way to interact with the system. One of the most frequently used commands is ls , which stands for list. In this article, we will delve deeper into a specific variant of the ls command, ls -la .
The ls -la command is used to list all the contents of a directory, including hidden files, in a long listing format.
What is ‘ls -la’?
The ls -la command is used to list all the contents of a directory, including hidden files, in a long listing format. This command is a combination of two options -l and -a with the ls command.
- ls : The list command used to list directory contents.
- -l : This option displays the directory contents in a long listing format.
- -a : This option shows all the files in the directory, including hidden files (those whose names start with . ).
Understanding the Output of ‘ls -la’
When you run the ls -la command, it produces several columns of information. Let’s break down what each column represents:
- File Type and Permissions: The first column indicates the file type and the permissions for the owner, group, and others. The first character represents the file type ( d for directory, — for regular files). The next nine characters show the permissions in sets of three (read r , write w , execute x ) for the owner, group, and others respectively.
- Number of Links: The second column shows the number of hard links to the file or directory.
- Owner: The third column displays the name of the file or directory’s owner.
- Group: The fourth column shows the name of the group that owns the file or directory.
- Size: The fifth column indicates the file size in bytes.
- Last Modification Time: The sixth column displays the date and time of the last modification.
- File or Directory Name: The seventh column shows the name of the file or directory.
Practical Examples
Let’s consider an example. When you run ls -la in your home directory, you might see something like this:
In the output above, the first line represents the current directory (denoted by . ), the second line represents the parent directory (denoted by .. ), and the rest of the lines represent files and directories in the current directory.
Conclusion
The ls -la command is a powerful tool for viewing detailed information about files and directories in a Linux or Unix-like system. Understanding how to read its output can greatly enhance your proficiency in system administration tasks. For more information about the ls command and its options, you can refer to the man ls command or the ls man page.
No, the ls -la command is specific to Linux and Unix-like operating systems. On Windows, you can use the dir /a command to achieve a similar result.
To sort the output by file size, you can use the -S option with the ls -la command. So the command would be ls -laS .
To list only directories, you can use the -d option with the ls -la command. So the command would be ls -lad .
To display file sizes in human-readable format (e.g., in kilobytes, megabytes, etc.), you can use the -h option with the ls -la command. So the command would be ls -lah .
Yes, you can use wildcards with the ls -la command. For example, ls -la *.txt will list all files with a .txt extension in the current directory.
To list files and directories in a specific directory, you can provide the directory path as an argument to the ls -la command. For example, ls -la /path/to/directory .
To view hidden files and directories separately, you can use the -A option with the ls -la command. This option excludes the . and .. entries. So the command would be ls -laA .
Владельцы файлов и папок в Linux
Данная статья посвящена, наверное, самой сложной части начальной части изучения Linux — правам доступа. В данной статье будет рассказано о правах доступа, владельцах файлов, папок.
- Просматривать и изменять владельцев объектов.
- Устанавливать правила доступа к объектам.
- Понимать право “Execute”
Основные команды для работы с правами доступа:
- chown – установка владельца
- chgrp – установка группы владельца
- chmod – установка прав доступа
В Windows у нас есть только один владелец файла или папки. Это можно посмотреть в свойствах объекта на вкладке безопасность, дополнительно и там же мы можем сменить владельца. Владелец в Windows по умолчанию обладает полными правами на объект. В Linux все происходит немного по-другому: Любой объект моет иметь своего владельца и группу владельцев, и кроме этого для объекта существуют все остальные пользователи в системе. Это самое существенное различие, что может быть владелец и группа владельцев.
И так у меня есть пользователь petya и пользователь siadmin . Теперь посмотрим информацию по этим двум пользователям. Чтобы посмотреть воспользуемся командой id siadmin и id petya .

У моего пользователя есть uid, который говорит, что я siadmin и вхожу в группу siadmin . Когда мы создаем нового пользователя группа по умолчанию совпадает с именем пользователя. Т.е каждый пользователь по умолчанию входит в свою собственную группу. Для пользователя petya я создал группу не по его имени. Я создал группу testusers и включил данного пользователя в данную группу и установил данную группу по умолчанию для данного пользователя.
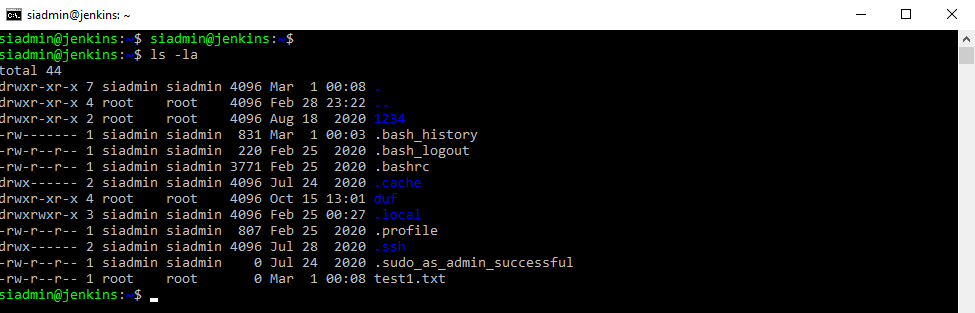
Я нахожусь в домашней папке. Набрав команду ls –l мы можем посмотреть список каталогов и файлов, у каждого из них есть владелец и группа владельцев. Эти данные указаны в колонках. Для файла test1.txt владельцем является root и группа владельцев root .
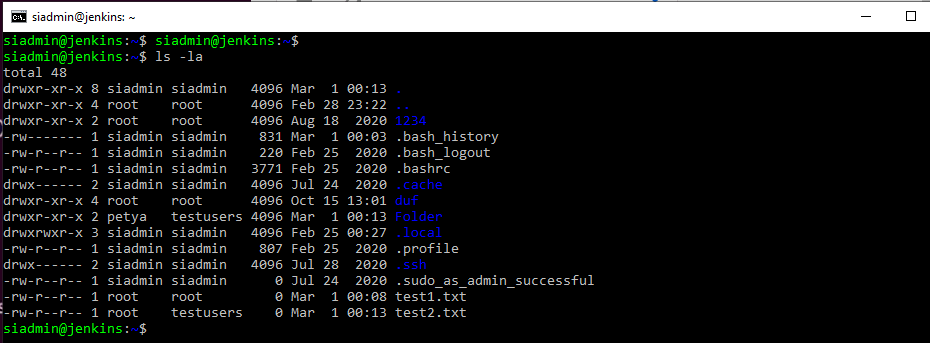
Я создал папку Folder и файл test2.txt и назначил владельца и группу владельцев, согласно картинке. Для изменения данных параметров используется команда chown . Данную команду необходимо применять с повышением в привилегиях, через команду sudo . Например, изменим владельца для файла test1.txt . команда будет выглядеть так sudo chown petya test1.txt . Пароль не запросило, т.к я уже его вводил.
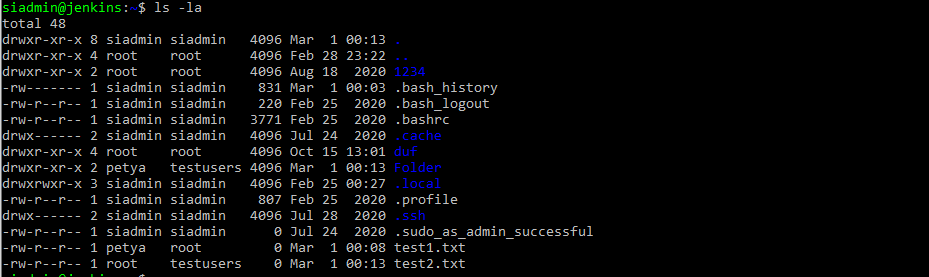
Как мы видим все успешно отработало. Если раньше был владелец root , то теперь мы видим petya . Для изменения группы мы так же можем воспользоваться командой sudo chgrp testusers test1.txt .
Данная команда chgrp используется редко, т.к вполне достаточно знать команду chown . Данная команда умеет менять в том числе и группу. Простой пример изменим группу используя команду chown :testusers file.txt . Просто перед группой ставим знак : который и говорит, что надо заменить группу на указанную. А можно сделать сразу 2 действия chown petya:testusers file1.txt
Немного сумбура вносит, что у пользователя группа по умолчанию совпадает с именем пользователя. Но это стандартное поведение Linux, который так заводит группу. Даже суперпользователь root имеет свою группу root . При создании пользователя petya был принудительно включен в группу testusers и она была выставлена по умолчанию для данного пользователя.
Еще есть важный момент, который необходимо упомянуть. Это рекурсивное выставление владельцем или группы владельцев на папки или файлы. Т.е если у нас есть папка родительская и в ней дочерние папки и файлы, а то и несколько вложений, а мы хотим изменить владельца или группу владельцев рекурсивно вниз, то команду chown необходимо использовать с ключем –R .
Пример: sudo chown –R siadmin:testusers Folder
Права доступа
Далее вернемся к самой первой картинке. На картинке добавлены подписи на английском языке. Это сделано, для большей наглядности. Потому, что сейчас будем раздавать права на объекты файловой системы файлы, папки и другие объект. Следовательно, права будут присваиваться владельцам, группе владельцев и все остальные. Права для владельцев – это user — (u), права для группы владельцев group — (g), Права для всех остальных other — (o).
Для того, чтобы далее разбираться с темой прав, надо запомнить вот такую табличку.
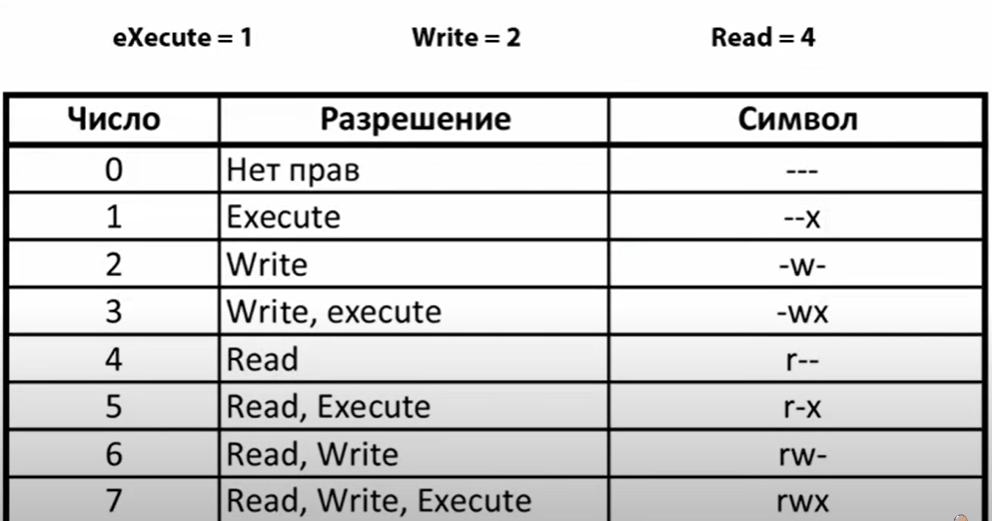
В классическом Linux, есть 3 вида доступа к объекту, это право на чтение, право на запись и право на выполнение и различные комбинации из этих прав. Заглавные буквы на верху таблицы отвечают за какое-либо право. Цифрами обозначены значения данных прав. Если мы даем право на чтение, то оно обозначается r— , если чтение и запись то rw- , если даем все права то rwx . Мы можем объединять данные права, как видите в табличке различные комбинации указаны. Всего 8 комбинаций от «нет прав», до «полных прав». Так же данная комбинация может назначаться в виде цифр. Т.е на какой то файл у такого товарища доступ 5 , это значить что данный товарищ имеет право читать файл и запускать на выполнение. Посчитать очень просто чтение это — 4 , а выполнение – это 1 , а в сумме будет 5 или по другому r-x . Следовательно мы можем назначать, как в цифровом, так и в символьном варианте права.
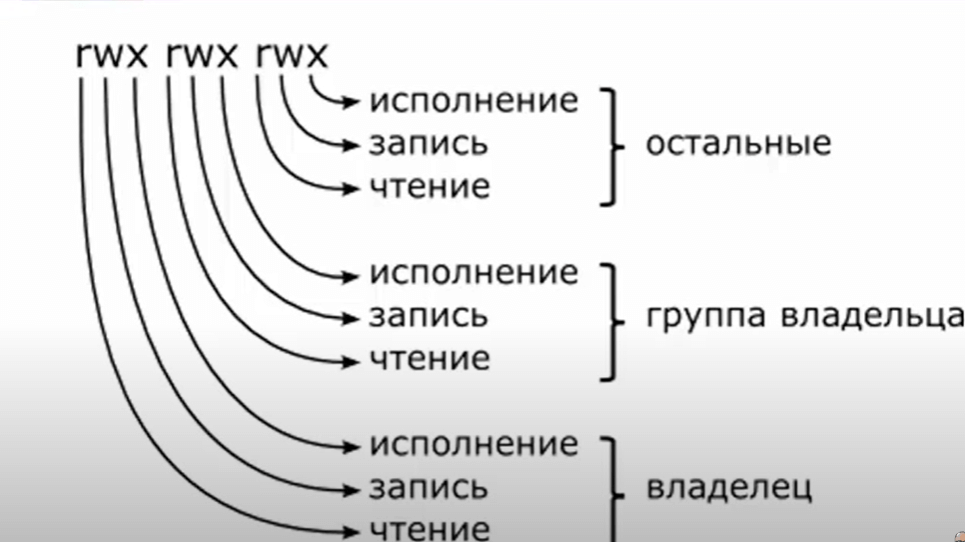
Еще один не маловажный момент мы назначаем права на файл, сразу для всех видов пользователей. Следовательно, указывая права, мы их сразу задаем для владельца, для группы владельца и всех остальных. Права мы можем назначать. Точно так же как на картинке символами rwx или цифрами, согласно табличке. Для лучшего понимания пример:
Chmod 750 script — полные права владельцу, чтение и выполнение группе владельца и ничего всем остальным.
Когда мы просматриваем права на объекты мы видим символьные обозначения, а там, где нет символа ставится прочерк, который означает, что данное право отсутствует.
Право <<rwx rw- r—>> script — полные права владельцу, чтение и запись группе владельца, чтение остальным.
Чтобы легче было определять права на объект надо мысленно разделить на блоки по 3 символа. Первый блок — это Владелец, 2-й Блок — это группа владельца и 3-й блок — это другие пользователи.
Сhmod u+w script — дать право записи владельцу.
Chmod ugo-x script — отобрать у всех право исполнения файла.
Посмотреть, какие объекты находятся в директории и их права можно командой ls –la . Так же мы видим владельца и группу владельца. Теперь мы можем понимать первую строчку.
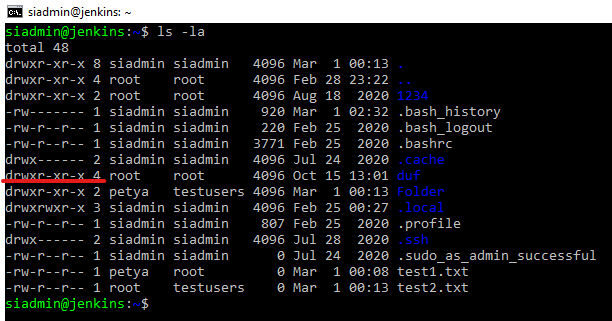
Вывод из всего этого, напрашивается следующий. Владелец у объекта файловой системы может быть только один. В группу testusers или другую мы можем добавить кого угодно и они будут следовательно иметь права, как группа владельцев. И, следовательно, все остальные пользователи, т.е не владелец и не входящие в группу, будут относится к категории всех остальных пользователей. Получается Linux нам дает разбить всех на три группы и в соответствии с этим назначить различные права, а Windows ведет себя по-другому и там можно более гибко задавать права. Мы можем создать 100 пользователей и каждому из них дать какие-то свои уникальные права. В Linux тоже это возможно с помощью разных ACL (Access Control List — лист доступа), но это не входит в базовые понятия, которые мы разбираем в рамках данной статьи.
Можно заметить ,что для папки спереди появляется символ d . Это d – directory каталог. Может появляться l – link – ссылка и.т.д.
Следовательно, можно убирать права указывая у кого, например, забрать выполнение chmod ugo-x test1.txt или мы можем добавить владельцу chmod u+x test1.txt . И третий вариант изменения прав на файл — это полностью перезаписать права на объект chmod 640 test1.txt .
Разберемся с правом на execute – выполнение.
Понятно становится это права, когда мы имеет дело с каким-то скриптом или бинарником или программой исполняемой. Так же у нас данное право может назначаться на каталог, а каталог мы исполнить не можем. Но тут есть интересный момент, если у вас будет на папку разрешение только на чтение и запись, прочитать папку, переименовать ее т.е поработать с наименованием папки, но в глубь папки вы не сможете зайти. Чтобы зайти во внутрь папки необходимо право execute – т.е выполнение ее.
Маска создания файлов и папок
В данной части статьи рассмотрим следующий вопрос:
Понимание принципов работы и управления масками создания файлов и папок.
- umask – маска создания файлов и папок
- suid – бит запуска от имени владельца
- sgid – бит запуска от имени группы владельцев
- sticky – бит защиты содержимого
Первое понятие umask — user creation mask — т.е маска с которой создается новая папка или файл, это то с какими правами по умолчанию будут создаваться папки и файлы для данного пользователя. В том случае если не создано каких-то особенных настроек наследования папки.
suid – set user id, который позволяет, если установлен на исполняемый файл, то любой пользователь, который запускает, получает права определенные для владельца данного файла. По-другому, позволяет использовать права владельца данного файла, происходит некая подмена вас на владельца этого файла.
sgid – set user id, который позволяет, если установлен на исполняемый файл, то любой пользователь, который запускает, получает права определенные для группы владельца данного файла. По-другому, позволяет использовать права группы владельца данного файла, происходит некая подмена вас на пользователя входящего в группу владельца этого файла.
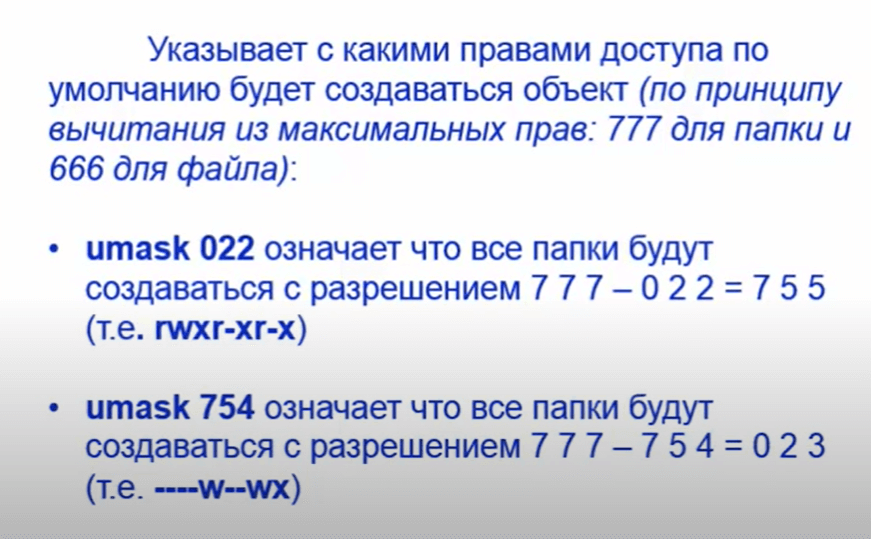
Маска это такая интересная штука, которая указывает права по–умолчанию. Она рассчитывается с помощью вычитания из максимальных прав. Примеры вычисления показаны на картинке.
Посмотрим, как выглядит это в консоли.
Создадим текстовый файл от имени стандартного пользователя touch test10.txt .

Мы видим права, которые были выданы по умолчанию 664 , соответственно я являюсь владельцем и моя группа.
Создадим папку mkdir TestFolder .

Выданы права по умолчанию 775 . Теперь посмотрим правило действующее. Почему создаются объекты именно с такими правами. Этот параметр находится в профиле в старых версиях, сейчас он перенесен и за данный параметр отвечает утилита pam_umask . Если мы откроем мануал по данной утилите, то мы увидим, что данный параметр находится в /etc/login.defs

Видим, что значение umask = 022 . – это значение, которое идет по умолчанию во всех дебиан подобных операционных системах.
Введем новое значение umask 075 . Создадим новый файл touch test20.txt .
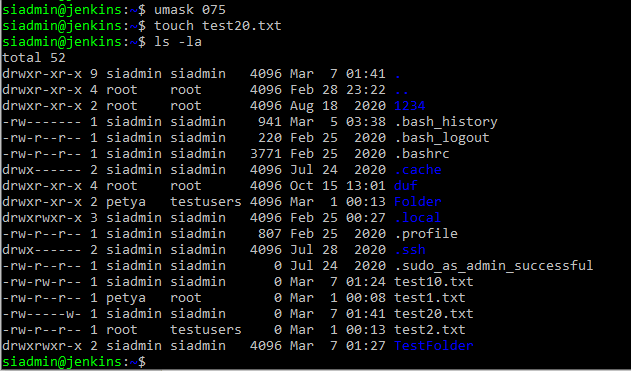
Получаем права 602 .
После перезагрузки маска изменится на маску по умолчанию, чтобы маску нужную зафиксировать, необходимо отредактировать файл /etc/login.defs . Следовательно, для нашего пользователя значить маска изменится с 022 на ту маску, которую там пропишем.
Нужно обратить внимание, что при создании папки права на выполнение по умолчанию выдаются, а на файл нет. Это связанно с тем, что без данных прав в данную папку невозможно будет зайти, а с файла убираются в целях защиты. Например, если вдруг окажется, что файл – это вредоносный код.
Suid, sgid, sticky
Рассмотрим оставшийся вопрос. Зачем нужны suid , sgid и sticky , биты и их установка.
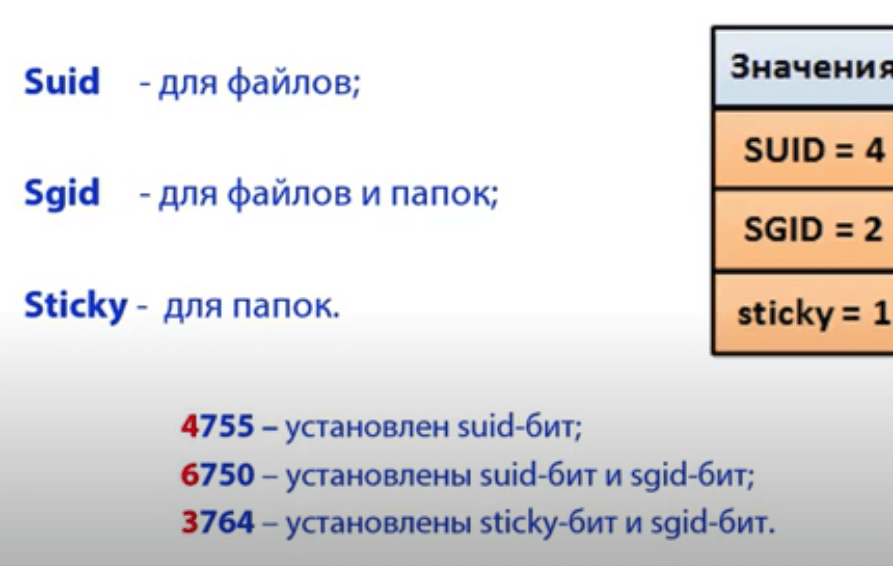
- Suid – устанавливается для файлов.
- Sgid – устанавливается для файлов и для папок
- Sticky – устанавливается для папок.
У них у всех есть цифровые значения. Их можно назначать точно так же, как и права, можно назначать через rwx или цифирные сочетания, а также т.к есть цифирные обозначения их можно комбинировать. Если мы установили 6 то мы установили suid и sgid . Этот бит через цифры ставится, точно так же, как и права, только ставим дополнительную цифру перед цифрами, означающими права.
Так же эти биты можно ставить, через буквы:
- Chmod u+s script — установка suid
- Chmod g+s script — установка sgid
- Chmod o+t script — установка sticky
Как мы видим suid добавляется к правам владельца, sguid прибавляется к правам группы владельца. Sticky добавляется к правам всем остальным.
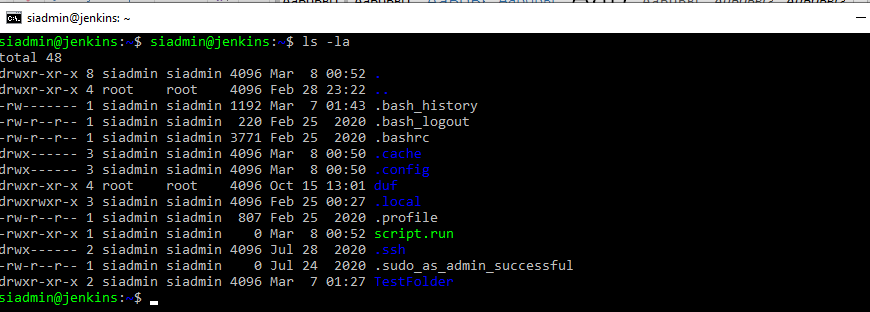
Как мы видим создан файл script.run с правами 755 и папка TestFolder 755 . Установим suid бит на файл script.run . В настоящее время данный файл может выполнить любой человек. Изменим права на 770 — sudo chmod 770 script.run . Переключимся под пользователя, который не входит в группу siadmin . Например, пользователь su petya . Можно конечно добавить права пользователю petya , но иногда нужно, чтобы файлик запустился из-под Владельца файла. Даже если будут стоять разрешение на запуск данного файла и будет стоять suid , то файл запуститься из под Владельца.
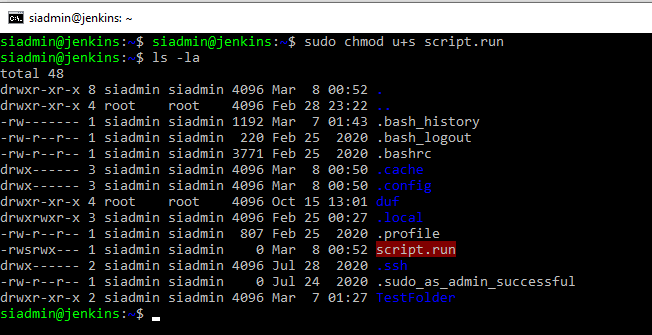
Устанавливаем sudo chmod u+s script.run и видим, во-первых, теперь у нас файлик подкрашен красным, данное выделение делает оболочка. Во-вторых, когда мы смотрим права, то видим x заменился на s . И теперь, кто бы не запускал файл, он всегда будет запускать от имени Владельца.
Можно подробнее посмотреть через команду stat script.run , которая показывает полную статистику по файлу.
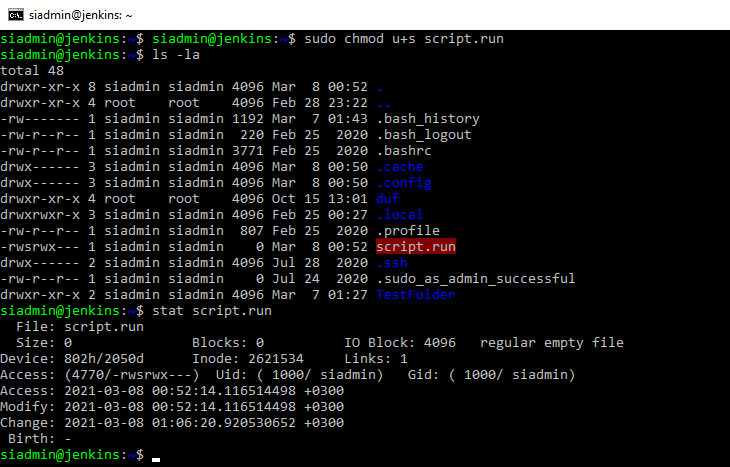
Мы можем увидеть, что права стали теперь 4770 . Вот эта самая цифра 4 впереди и говорит, что установлен suid бит. Мы аналогично можем убрать suid бит sudo chmod u-s script.run . Все вернулось на свои места.
Для чего это нужно, есть некоторые программы которым необходим доступ к аппаратной части. Например ping , который проверяет связь, ему нужен доступ к сетевой карте. По умолчанию права на ping есть только у root , но если мы хотим чтобы все пользователи могли использовать данную утилиту, то мы должны разрешить ее запуск от имени root . Фактически та же самая функция, как и в операционной системе Windows запустить от пользователя. Аналогичным образом работает и sgid , если нам необходимо запускать от группы владельца, то устанавливаем этот бит и можем пользоваться — sudo chmod g+s script.run .

Результат наших действий подсвечен желтым.
Можно одновременно оба бита установить, следовательно, при выполнении будет и владелец заменен и группа заменена. Это имеет смысл делать, только для исполняемых файлов. Устанавливать на обычный текстовый файл данные биты, смысла конечно же нет.
Очень редко, когда применяю оба бита сразу, такое сочетание необходимо если уж сильно кто-то заморачивается с безопасностью или требуется ювелирная настройка прав доступа и запуска.
Теперь посмотрим, что с папкой происходит. На папку можно устанавливать sgid и sticky биты. Если мы устанавливаем групповой бит, то он для папок будет менять владельцев всех вложенных файлов на группу владельцев этой папки, т.е это один из вариантов наследования.
Создадим файл от пользователя siadmin . Touch file.txt в текущей папки он создается со стандартными правами. Установим sgid на папку TestFolder — Sudo chmod g+s TestFolder .
Создадим в ней такой же файл sudo touch TestFolder/file.txt
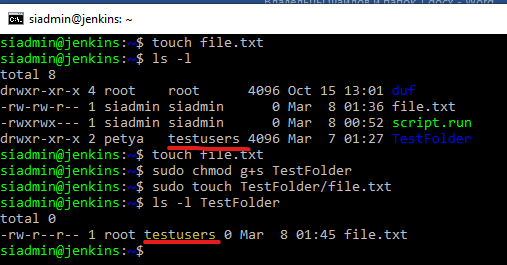
Как мы видим группа осталась прежней. Если пользователю root сказать создать файл в текущем каталоге, то владелец и группа будут root .
Теперь про sticky бит. Если установлен sticky бит на папку, то только Владелец данной папки или суперпользователь может удалить из нее файлы.
Создадим папку Folder , поставим на нее максимальные права 777 . И внутри создадим файл file.txt .
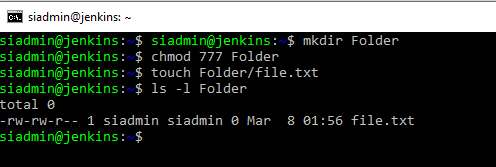
Файлик с правами по умолчанию. Поменяем права на данный фал 666 . Права на чтение и запись появились теперь у всех. Переключимся на другого пользователя, например, petya . Перейдем в домашний каталог пользователя siadmin — cd /home/siadmin/Folder . Внутри файл txt , который мы создавали. И удаляем rm file.txt . Файл удалился без проблем. Допустим мы хотим защитить от удаления, следовательно, необходимо установить sticky бит — sudo chmod o+t Folder
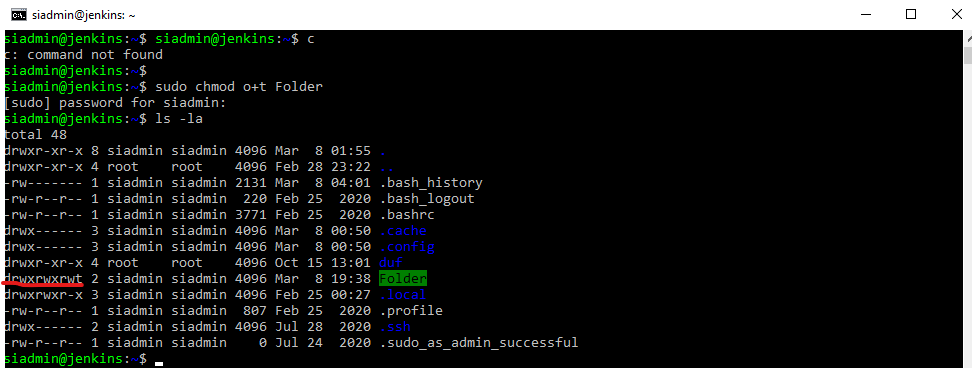
Как видим появилась буква t на месте прав для всех остальных. Создадим еще раз файл touch file1.txt . Даем на данный файл всем права 666 . А далее перелогиниваемся под petya . Заходим в папку /home/siadmin/Folder и командой rm file1.txt пытаемся удалить, на что получаем отказ от системы. Несмотря на права 666 , система не дает удалить файл. Следовательно, удалить все вложенные объекты может либо root или Владелец папки.