How to Use Procreate with Photoshop
Separately, Photoshop and Procreate are powerful tools. but together they become a platform for portable, powerful design creation
Are you looking for a portable design solution? We've been working in Procreate for some time, and it has constantly proven to be a powerful platform for illustration and animation. With a seamless pipeline to Photoshop, we think this might be the killer app you need to take your MoGraph to go.
Today, I’m going to show you just how easy it is to start your process in Procreate, ways Procreate has made designing easier, and the benefits and ways it can sync with Adobe programs. To take full advantage, you’ll need an iPad with the Procreate app, an Apple Pencil, and Adobe Photoshop!
In this video, you’ll learn to:
- Utilize some of Procreate’s Benefits
- Sketch easily and block in color
- Bring photoshop brushes into the Procreate app
- Save your files as psd’s
- and add finishing touches in Photoshop
How to Use Procreate with Photoshop
What exactly is Procreate?
Procreate is a portable design application. It has everything you need to sketch, paint, illustrate, and animate. Procreate is the complete art studio you can take anywhere, packed with unique features and intuitive creative tools.
And it’s super affordable at $9.99
For me, Procreate is a great place to begin my ideas. I can easily sketch using the intuitive interface, build up to a more polished design, and export to Photoshop if I want to apply any finishing touches.
Why Use Procreate as a Motion Designer?
Procreate is perfect for handling quick sketches, but it's robust enough to manage completed style frames. In their new update, the program can even handle light animation. For something that costs as much as a few cups of a coffee or a new skin in Fortnite, I'm able to do 50-60% of the work on my projects.
Nowadays, most of my work starts with a sketch in Procreate. and I'm not the only one. Here are a few examples of other professional artists using procreate to illustrate.
Art by Paulina Klime
Or this great animated jellyfish.
Animation by Alex Kunchevsky
What makes Procreate such a great program is how much it feels like drawing on paper. If you're not ready to splurge on a high-end tablet such as a Cintiq, an iPad and Procreate can accomplish almost everything you'd want to do.
Using the Apple Pencil is incredibly intuitive; it feels just like drawing, but more forgiving! I love that I can take my iPad anywhere: the couch, a coffee shop, a deep sea submersible. It’s super portable.
Now, that I’ve convinced you to give Apple more money, let’s actually get into the program and see how you can aid in your creative process.
Sketching and Illustrating in Procreate
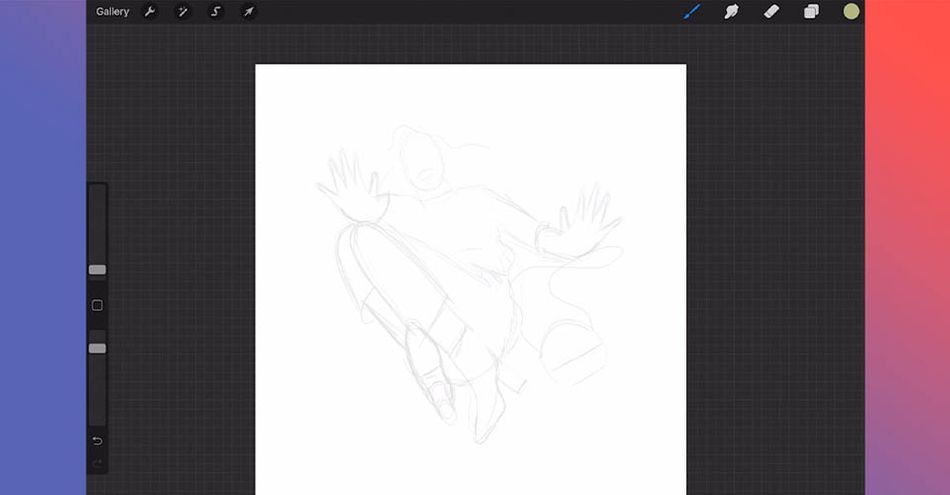
Let's get started so you can see how I use Procreate in my workflow. One of the first things I like to do is set up my brushes. Now, if you're importing brushes or creating your own (more on that later), you might notice that the pressure sensitivity feels off. You have to press REALLY hard to get anything.
Here's how to fix that:
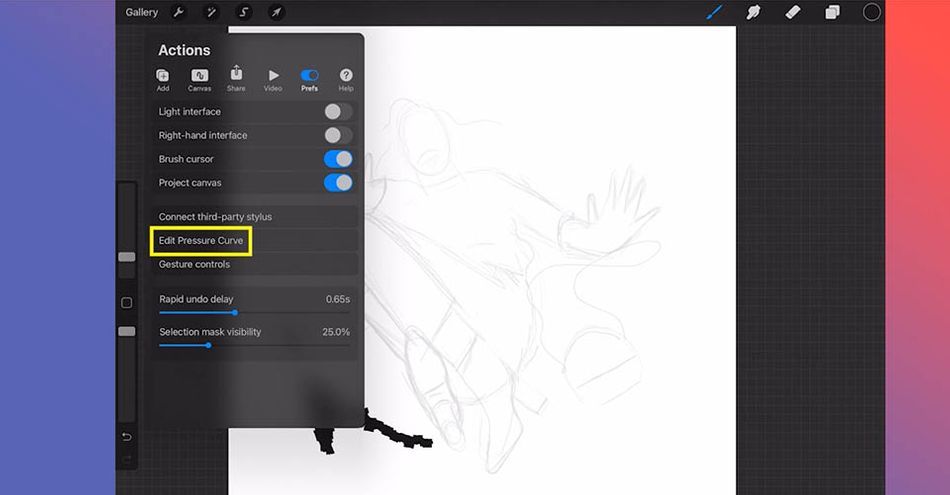
Click on the wrench icon, select preferences (pref) and click Edit Pressure Curve.
Adding Photoshop Brushes to Procreate
Procreate brushes are great, but adding .ABRs brings textures to a new level. If you've already made a pack of your personal favorites, it just makes sense to use them in both programs. This will also help when you're working with a team or preparing files for other clients, especially when you’re working with a team that’s primarily using Photoshop.
Here's how to upload your brushes in Procreate:
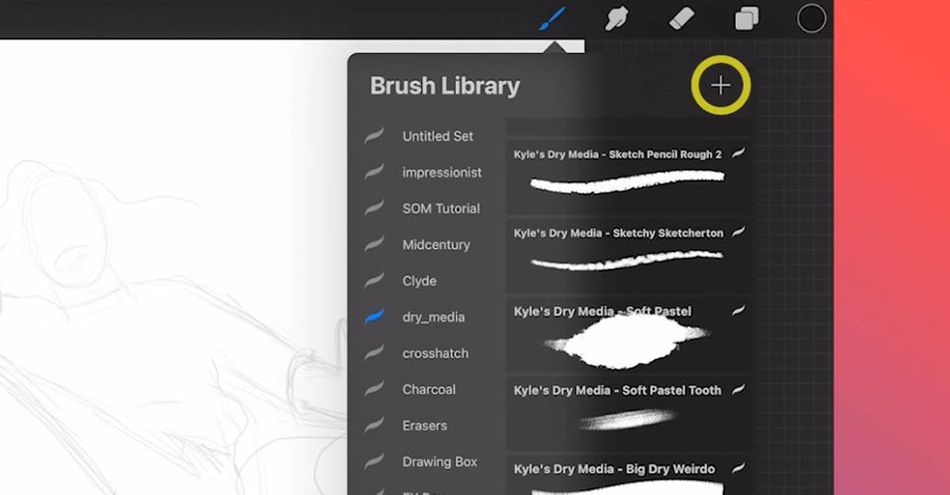
- Load the brush folder onto your iPad
- Open Procreate
- Click the Brush icon, then hit the + button
- Click Import, and upload brushes
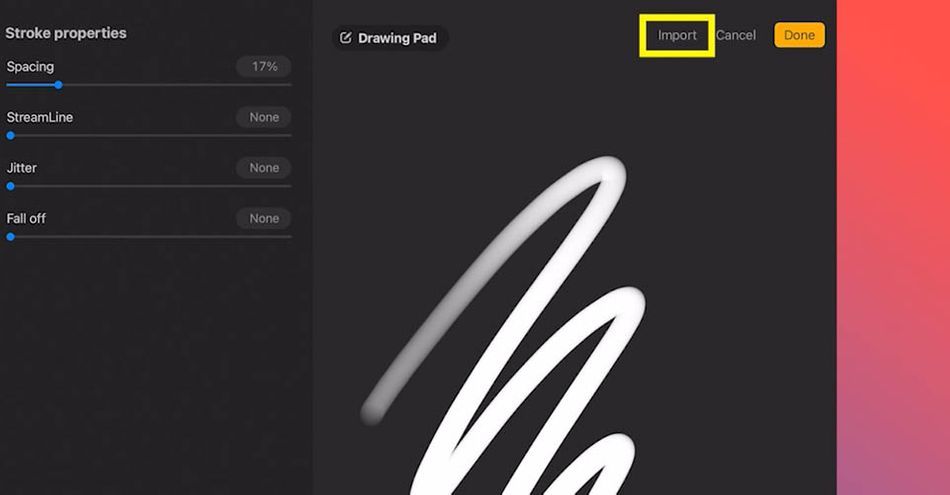
If that seems really easy. it's because it is. Just another great thing about this application. It wants to be easy for you.
Go from Sketch to Illustration in Procreate
Of course, Procreate is a drawing application, so how well can it handle going from a sketch to a functional illustration? Let me show you.
SKETCHING IN PROCREATE
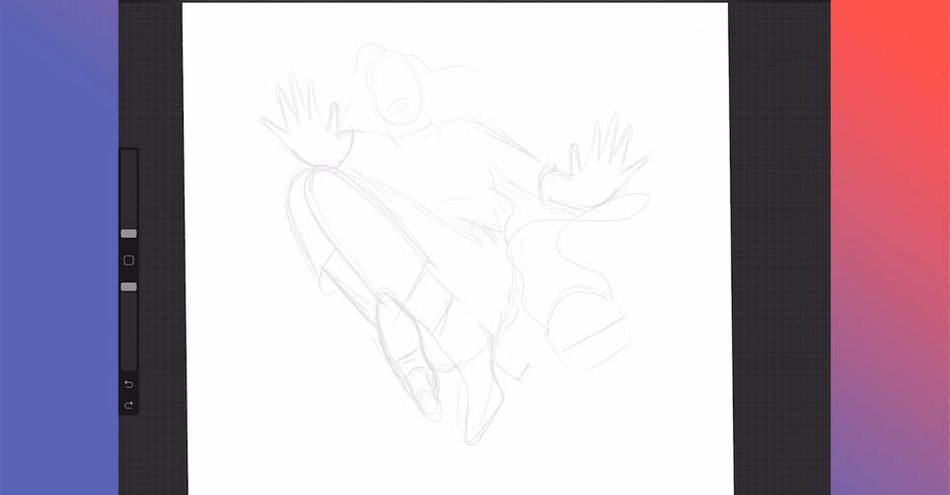
Now that I have my brushes prepped, I quickly sketch out the design until I'm happy with the overall shape.
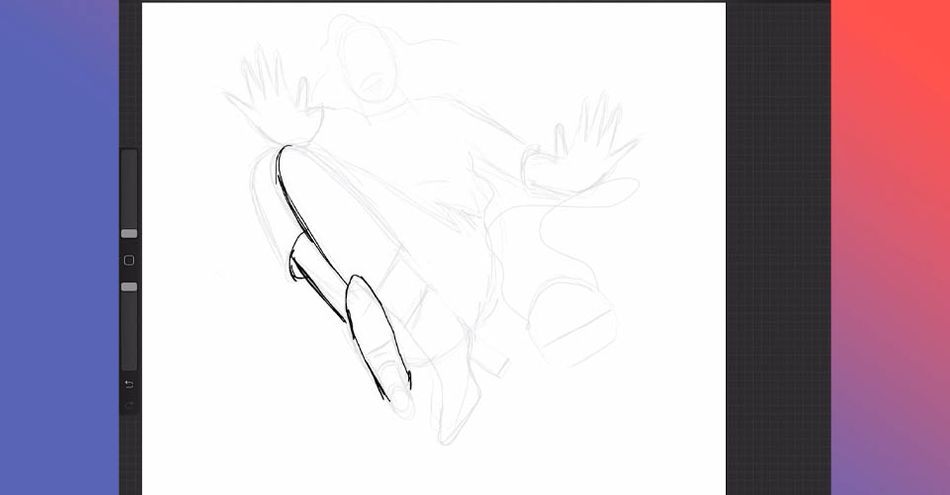
During this part of the process, I'm less concerned about straight lines and jagged edges. Once I've found my shape, then I start redesigning with an eye for composition.
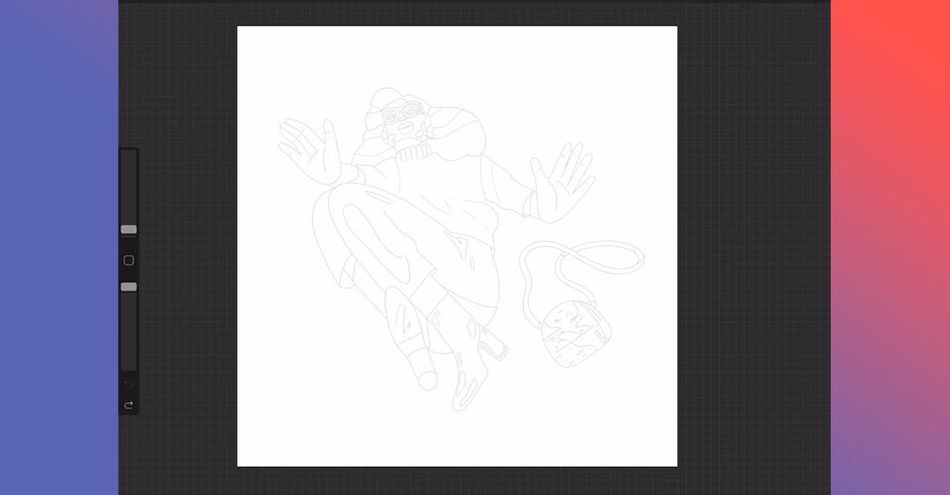
COLOR BLOCKING IN PROCREATE
Now that we're done refining our sketch, we want to do some color blocking. First, draw a circle.
Now drag a color from the Color Circle in the top right into the center of your circle, which will fill your shape. You can make another layer and convert that to a Clipping Mask so you can add texture and color to the circle in a non-destructive way.
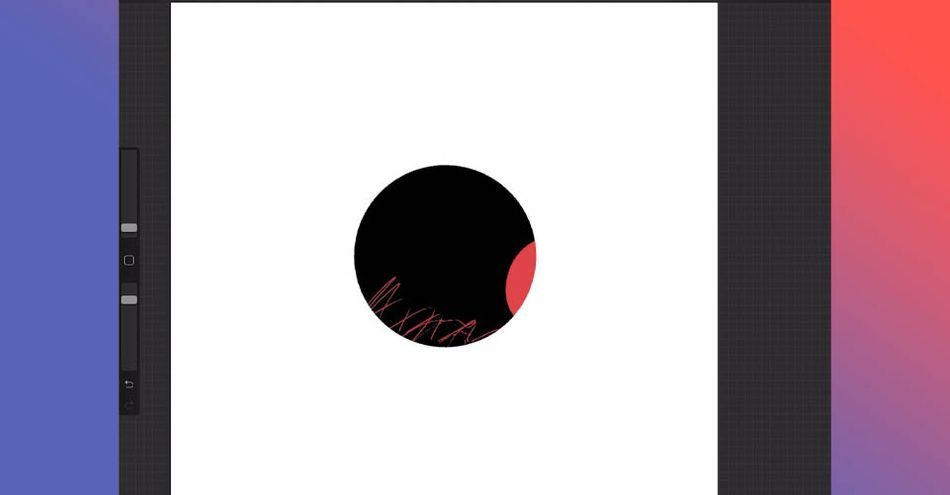
The other option is to click on your original layer and select Alpha Lock, which allows to you color onto the shape without going outside the border, though this will permanently change that layer.
COLORING SKETCHES IN PROCREATE
Before I start adding color, I want to make sure my sketch is detailed and refined. This part of the process can save future you time and stress, since all you'll need to worry about is coloring in the illustration. The more work you put into refining your sketch, the smoother things go in the next few steps.
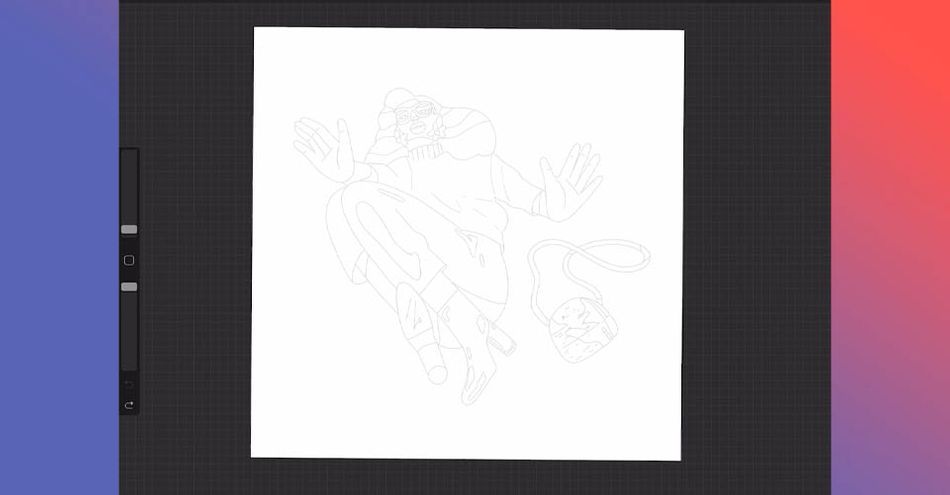
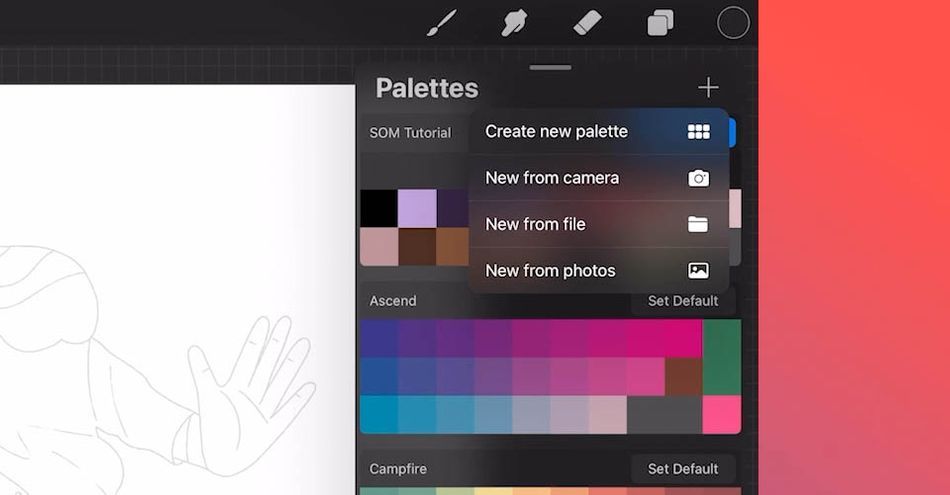
It's important to have your colors in mind before you start adding anything in. I prefer to have a color palette built ahead of time. In Procreate, there are a number of prebuilt palettes available. You can also add in new ones just as you did with brushes, or create a custom palette all your own.
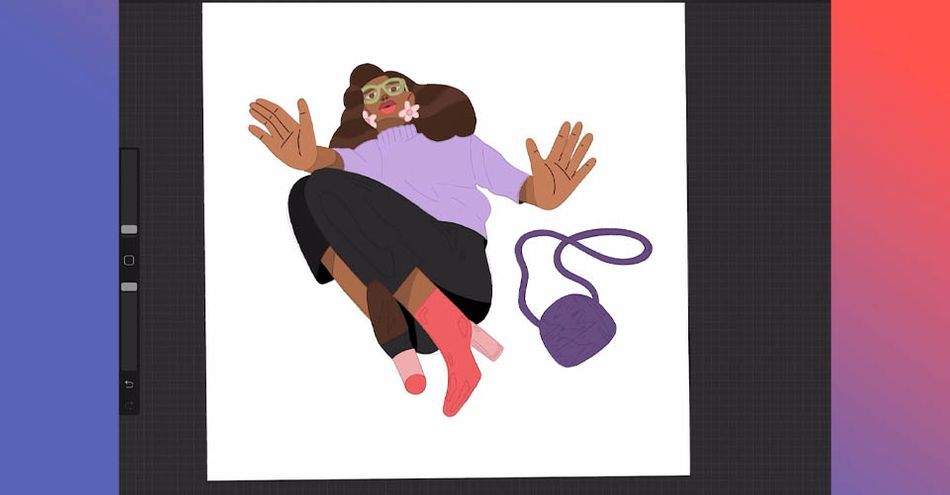
Make sure your sketch or outline is the top layer, otherwise you'll color over the lines and risk getting lost. By tracing your sketch and creating closed shapes, you can easily drag in colors from your palette (as we did with the circle above) and quickly fill in each area.
Moving Your Artwork from Procreate to Adobe
If Procreate is so great, why do you even need to export over to Photoshop? Well, even with all its advanced features, there are still a few tricks that Photoshop has over the mobile app. You also have to factor in your personal preferences for applying polish, and the overall goals of your project.
To transfer, simply go to your settings (the wrench), click on Share, and select your file type.
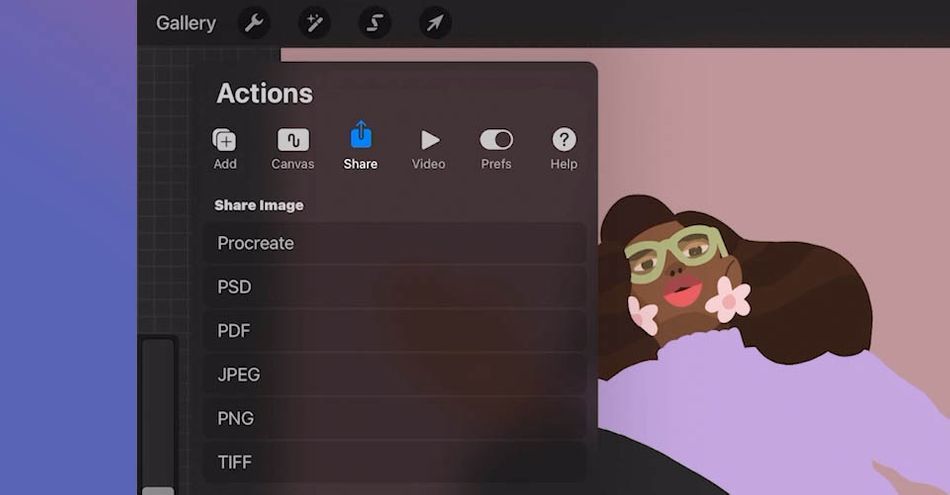
Then select where you would like to save or send this file.
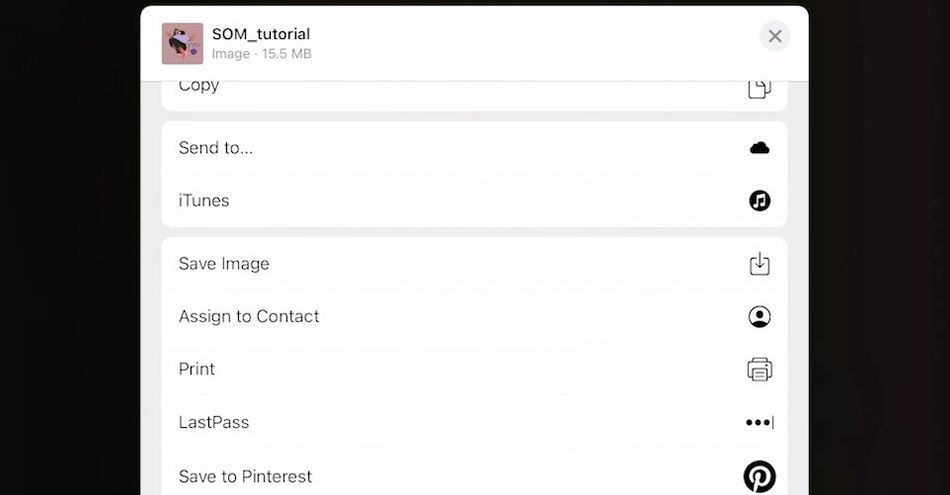
Now I can open the .PSD file in Photoshop and finish with textures and embellishments! If you want to see what I do, click on the video above.
Now you're a pro at creating!
That’s it! Procreate is a pretty simple yet powerful tool! I love that it’s inexpensive, easy to work with, and can scale so quickly for larger projects that may need the classic Adobe programs. If you grabbed a little inspiration and want to try it out, be sure to share your finished products with the hashtag #SOMawesomeProcreations!
If you want to unlock more advanced skills with Adobe’s core programs, check our Photoshop and Illustrator Unleashed! Almost every Motion Graphics project out there passes through these programs in one way or another.
This course makes learning Photoshop and Illustrator easy and fun. Starting on the very first day, you’ll create art based on real world jobs and get tons of experience working with the same tools that professional Motion Designers use everyday.
Tutorial Full Transcript Below ��:
Marco Cheatham (00:00): Separately, Photoshop and Procreate are powerful tools, but together they become a platform for portable, powerful design creation. I'm going to show you how to seamlessly benefit from both in a smooth workflow.
Marco Cheatham (00:21): My name is Marco Cheatham. I'm a freelance art director and illustrator. I've been designing and illustrating for seven years. And one thing that's made being creative easier and increase. My productivity is using procreate to sketch design and illustrate frames. Today, I'm going to show you just how easy it is to start your process and procreate ways that's made designing easier and the benefits and ways it can sync with Adobe programs to take full advantage. You'll need an iPad with the procreate app and apple pencil and Adobe Photoshop. In this video, you'll learn to utilize some appropriates benefits sketch easily in block in color, bring Photoshop brushes into the procreate app. Save your files as PSDs and add finishing touches in Photoshop. Before we begin, make sure you download the project files in the link below so you can follow along
Marco Cheatham (01:11): Now we're inside procreate. So this is an illustration I did a little while ago. We're going to refine it and color, block it in, take it into Photoshop and put any final details on it in there. Let's get started. So I assume you guys are probably a little bit familiar with the program, so I won't go too far in depth with this, but essentially you have your brushes here. The brushes that have the little icons on it on the left are the brushes that come standard inside procreate and the brushes that are up farther that have the little like sketch or whatever you want to call it. Brush stroke. Those are the ones that have been installed or created by me. And they all have their own groups, have many brushes within them. When I get started on a project, I like to create a group and add the brushes in there that I'm working on, on the project.
Marco Cheatham (02:09): So with this one, I made a group, I sculled it SLM tutorial. And I added the brushes that I'm going to use on this project. So there's that? And here's the brush size right here. So you can control the size of your brush. Here is the past city. So that's good. All right. So I have this rough sketch here. You know, I like to try to start really loose. I like to break down my illustrations into progressions that way it's easier to digest and you know, it's less stressful. And I think that that's just a good way of doing things. You know, if you try to design everything at once, it just becomes a little bit more stressful in like convoluted. But as, as long as you like are breaking things down into the little sections, as much as you can, the easier it's going to be on you and your designs.
Marco Cheatham (02:57): Let's talk a little bit about the brush. So when you're first inside, procreate, by default with your brushes, your pressure sensitivity is probably going to be pretty low. So if I pick a brush, let's say that this one's pretty good. You're just going to have to press really hard to have your brush show up thicker, right? So if I'm pressing really light, it doesn't do anything. I have to press pretty hard to have that show up. So to fix that, you just go up to your settings, you go to preferences first, and then you want to go to edit pressure curve. And so you're going to have this curve. It's very linear and you want to add a point somewhere probably in the middle, and you're just gonna use that and make it a curve. I can show you just exaggerate this so you can see it.
Marco Cheatham (03:44): And so now I press lightly and it's really thick from the, from a jump. So that's a good way to not mess up your screen. So make sure that's that set properly. There's plenty of reasons why you might want to use Photoshop and procreate. For whatever reason, you might just be comfortable with Photoshop more or a different reason. There's some reasons why you might want to use procreate as well, as well as Photoshop. So like in my case, all the times I work with motion studios or people that are doing animation. And a lot of times they're using Photoshop to do the animation. If they're doing sale or whatever. And if I'm not using Photoshop brushes, they may not have access to, or be able to get close enough to the style that the brushes that I'm using have. So one way to do that is to import Photoshop brushes directly into procreate, which is really easy to do.
Marco Cheatham (04:39): And I'm going to show you how to do it right now. So if you go up to your brush tool right here, you can see that I already have a lot of brushes installed here, and there's a couple of ways to do this, but one of the easiest ways to do it is hit this plus sign right here, and you want to go to import and I've already saved this in here. So I just saved it into my procreate folder inside my iPad. So all I have to do is click on this and it imports automatically. And you can see that right there and you can see that it's a whole group of brushes. So I could use those instantly.
Marco Cheatham (05:23): Now I want to get more into refining this sketch. And when I'm just working with a rough sketch, I want to be really free with my lines. So I don't want to have any restrictions with them so I can, you know, really get in there and trying to find these shapes and stuff like that. But once I get like the sketches done and I start to refine things, I want to think less about keeping my lines straight and more about the composition and making sure everything looks good. So one thing that aids with that is smoothing. So the smoothing allows you. I think they have it. They have a similar thing in Photoshop. What it does is just allows you to smooth out your lines pretty much so you don't have to. So if you see now, you know, when I'm drawing my lines or, you know, it can get in there and get really rough. But if you navigate to your brush, you click on it and you see the streamline. You just need to pull that up. I usually keep it around 34, 35, but just so you can really see what it does, I'll show you that. So you say done, and now you can see that it really helps you keep those smooth lines.
Marco Cheatham (06:35): Cool. Another thing, when you want to move stuff around, a lot of times people want to NAB, you can't see this, but navigate within the box, but when something's really small and you try to do that, it's really hard. So the easy fix it, that, which is what you should be doing is just have your cursor outside of the box and move it around that way. And then you don't have a problem. It could be as small as you want it. So that was something that I struggle with a while. So hopefully that helps alleviate any problems with that. So, all right, well, let's get started with, actually we turn the smoothing down a little bit. So 35 let's get into actually refining this. So I'm going to go there this and start refining the sketch.
Marco Cheatham (07:38): So now that we're done and refining our sketch, what we want to start doing is doing some color blocking. Let's just make a circle. You know, you press your finger on the screen to create a perfect circle, go up to the color circle and just drag. So that's going to fill in your shape. And if you want to do any masking inside of that, what you're going to do is create a new layer. You're going to click on that and go to the clipping mask. And one that's going to do is allow you to draw HDInsight your layer like? So, and you can just draw on there, right? So that's like the non deconstructive way. If you're just illustrating, you don't need to retain your layers or anything like that. There's another way that you could do it. That is also really cool. I'm going to show you how to do that as well.
Marco Cheatham (08:29): So go to your main layer and you're going to want to click that and you want to hit alpha block, and that's going to allow you to draw with inside your layer. But again, doing this is not going to retain your layers. So anything you do to it is going to be destructive. So if you need layers, do the other method. Okay. So that's pretty much it. So let's get into the actual color blocking. Okay. So now that we have everything refined and everything, it's tying to start the color when I'm refining, I like to add as much detail as possible. That way when I get to the next phase, I have less to worry about. And it's all about that regression of like, try to make sure that your future self, the person that's doing the next step has less to worry about. So, you know, if I added, if I start adding the details, now I don't have to worry about that.
Marco Cheatham (09:24): Then I can focus more on the color and making sure all that stuff's good. So that's what we're going to do now with procreate, if you hit on the colors, the colors are up in this little color circle here. There's a few different ways you can view things, but you also can create color palettes. So in the color palettes, which is to the far right, you have your color palettes here. So these are some that came with the app. So you can delete those or keep those or whatever, and then you can make your own. So this one I've made for this particular illustration. And so how you make a color palette is just hit this plus sign right here and you go to create new palette. So there's a few of these in here where you can upload a photo. You know, you could save a photo to a file and then upload it or take a photo with your camera.
Marco Cheatham (10:11): And then procreate uses, uh, those colors that are from those photos. And it makes a color palette. It's pretty cool. You know, it's like instantly. So yeah, try that out. If you find that useful for this, we're going to create a new palette and all you have to do is find the colors that you want. So like, I'll say, I'll just pick this one and you just tap inside of there and it adds the color. And you could just keep doing that until you come up with the color palettes you want and yeah. Name and everything like that. So that's as easy as it, you know, pretty much get. So let's delete this and let's work with the color palette that I have here. So I'm going to start coloring in, make sure you're on a new layer as I'm coloring. I like to keep my sketch on the top layer because it's really hard to see what's going on.
Marco Cheatham (11:03): Once you start filling in the colors, if the layer is on underneath and you kind of, you want to make sure that you're keeping everything separated, you know, I'm separating this out that way. If you do, if you work with an animation, the animator can separate out your files easily. Um, just makes it a lot easier than doing like a flat illustration. So just make sure you're separating out your layers as you go. And of course, if you don't need to do that, then don't do it. It's not, not necessary. It'll just take up time, but just be aware of the process and what you're doing it for. So, you know, if they're doing like sale or something like that, you probably don't need it as much. Cause they're just gonna redraw your stuff, but never hurts to be safe. So, and I'm going to keep ongoing finishing this up.
Music (12:11): [uptempo music]
Marco Cheatham (12:50): Okay. So now that we have everything blocked in it's time to take this into Photoshop and finish up all the textures that I want to add to it. So it's really easy to do. All you need to do is go to your settings, go to share, and you'll have like a list of different exports. You know, you can export it, a gift. You can export it, animation, PNGs, differently, things like that. But I want to export the PSD. So I'll click that and I'll navigate to where I want to save it. Say file. I've made a folder for this and I'm going to save it in there. And now it's ready to be open in Photoshop.
Marco Cheatham (13:36): So now we are in Photoshop and as you can see, all of our layers are here and named. Yes, it's pretty cool. It's pretty seamless. The only thing you might need to worry about is any colors that you use, just make sure they don't sync like procreate doesn't sync the colors or the brushes. So just make sure you know, what colors you're using and make sure you have the brushes that you're using. Um, so you can use them inside of Photoshop. So now that everything is all here, I'm going to start adding all of my finishing textures in Photoshop here.
Music (14:22): [uptempo music]
Marco Cheatham (14:43): That's it, procreate is a pretty simple, yet powerful tool. I love that it's inexpensive, easy to work with. It can scale. So for large projects that may need that classic Adobe program. If you grab the little inspiration and want to try it out, be sure to share your finished products with the hashtag S O M awesome procreation. If you want to unlock more advanced skills with Adobe core programs, check out Photoshop and illustrator unleashed, almost every motion graphics project out there passes through these programs in one way or another. This course makes learning Photoshop and illustrator easy and fun. Starting on the very first day. You'll create art based on real world jobs and get tons of experience working with the same tools that professional motion designers use every day. Hit that subscribe. If you want more tips like this one and make sure you click that bell icon. So you'll be notified of any future videos. Thanks for watching
Как преобразовать кисти из procreate в Photoshop
Procreate 5, новейшее обновление Savage Interactive для iOS-приложения для рисования и иллюстраций, уже доступно. Бесплатное обновление содержит долгожданные функции, такие как импорт кистей Photoshop (ABR), создание пользовательских кистей, режим CMYK и более надежные функции анимации.
Приложение работает на новом графическом движке Valkyrie, который работает с Apple Metal API для повышения производительности на iPad. Savage Interactive говорит, что с Valkyrie импортированные кисти ABR рисуют быстрее в Procreate 5, чем в Photoshop. Это то, что будет иметь значение для художников, когда они выбирают, какое приложение для рисования использовать на iPad, особенно вслед за Adobe Photoshop для iPad, который получил разочаровывающие отзывы, когда он был выпущен в прошлом месяце. Photoshop для iPad пока не поддерживает импорт кистей. (Fresco, приложение Adobe, ориентированное на иллюстрацию, делает это.) Так что тот факт, что Procreate теперь поддерживает кисти Photoshop, имеет большое значение.
Brush Studio. Изображение: Savage Interactive
Этот движок Valkyrie также поддерживает новую функцию студии «Кисть», которая позволяет художникам комбинировать две кисти, чтобы создать собственную. Пользователи могут продолжать настраивать параметры и управлять внешним видом и поведением кистей.
Procreate 5 добавляет множество новых цветовых функций. Color Dynamics позволяет художникам управлять такими параметрами, как оттенок, насыщенность и яркость, с помощью наклона и давления Apple Pencil. А Color Harmony автоматически выбирает дополнительные, раздельно-дополняющие, аналогичные, триадные и тетрадные цвета на основе выбранного вами цвета. Режим CMYK — еще одно долгожданное дополнение к Procreate, которое даст художникам гибкость при работе с файлами для печати, такими как страницы комиксов.
Цветовая динамика. Изображение: Savage Interactive
Animation Assist – это новый инструмент, который добавляет в приложение временную шкалу для зацикливания файлов GIF и анимационных видео. Procreate добавил функции анимации еще в апреле, но Animation Assist добавляет такие функции, как снятие скинов с лука (включая возможность настраивать количество кадров, которые вы можете видеть одновременно, и контролировать их непрозрачность) и устанавливать количество кадров в секунду. Существует также функция мгновенного воспроизведения, которая является огромным улучшением по сравнению со старым методом, который требовал от пользователей экспорта слоев, чтобы увидеть окончательную анимацию.
В этом обновлении есть и другие дополнения, такие как инструмент клонирования, съемная цветная панель, а также небольшие улучшения пользовательского интерфейса. Но поддержка кистей Photoshop и Animation Assist — важные ключевые функции, которые показывают, как Savage прислушивается к своим пользователям, и причина, по которой Procreate остается лучшим приложением для иллюстраций на iPad.
Procreate доступен в App Store за 10 долларов США, а обновление бесплатно для всех пользователей.
Работа с различным программным обеспечением для создания цифровых иллюстраций может быть очень полезной, поскольку она обеспечивает гораздо более высокий уровень универсальности. Одной из особенно многообещающих комбинаций является Procreate и Photoshop: в Procreate очень много разных кистей, а Photoshop отлично подходит для создания цифровых рисунков с помощью настраиваемых кистей.
Итак, было бы здорово иметь возможность использовать кисти из Procreate при создании иллюстраций в Photoshop? К сожалению, это не самая простая задача, так как нет возможности напрямую перенести файлы кистей Procreate в Photoshop.
Тем не менее, есть способ обойти эту проблему, и, к счастью, это займет всего около десяти минут. Сделав метку кистью в Procreate, сохранив ее в формате JPEG и импортировав в Photoshop, где вы можете использовать ее для определения набора настроек кисти, вы можете преобразовать кисть в кисть, совместимую с Photoshop.
В этой статье мы более подробно рассмотрим эту технику, чтобы помочь вам найти способ обойти эту проблему. Прежде чем мы перейдем к делу, если вы хотите узнать больше о том, как увеличить набор кистей, к которым у вас есть доступ в Photoshop, ознакомьтесь с нашей статьей о том, как установить и использовать кисти Photoshop из внешних источников.
Можно ли использовать кисти Procreate в Photoshop?
Как мы кратко упоминали ранее, краткий ответ на этот вопрос — нет. Формат файла кистей Procreate отличается от формата кистей Photoshop и поэтому несовместим с программой.
Это означает, что вы не можете напрямую использовать кисти Procreate в Photoshop так же, как вы можете использовать кисти из внешних источников, просто загрузив их в программу. Но давайте теперь посмотрим, как вы можете использовать другой метод для имитации кистей Procreate в Photoshop.
Как создать кисть Photoshop из кисти Procreate
Поскольку мы не можем использовать кисти Procreate непосредственно в Photoshop, давайте рассмотрим, как вы можете добиться следующего лучшего результата: создать новую кисть Photoshop из кисти Procreate.
1. Создайте метку на белом с помощью черной версии кисти
Для этой техники вам нужно будет начать в Procreate, установив черный цвет кисти, которую вы хотите использовать в Photoshop. Убедитесь, что Непрозрачность кисти установлена на 100%.
Залейте фон документа чистым белым цветом, затем с помощью черной кисти сделайте одну метку, соответствующую стилю кисти, как можно большего размера в рамках ограничений холста. Убедитесь, что ни один из краев метки не выходит за границы документа.
Позже, когда мы используем этот образец изображения для создания кисти Photoshop, Photoshop автоматически создаст кисть на основе различных оттенков серого в изображении. Это означает, что любые черные области полностью видны в созданной кисти, тогда как белые области в образце изображения будут преобразованы в прозрачные пиксели. Любые тона серого между черным и белым будут иметь различные уровни прозрачности.
Таким образом, используя черный цвет для метки кисти и белый цвет для фона в нашем образце Procreate, мы добились того, что элементы самой кисти будут полностью видны, когда мы создадим версию кисти в Photoshop, в то время как нежелательные фоновые области будут полностью невидимы.
2. Сохраните образец кисти в формате JPEG и откройте его в Photoshop
Теперь, когда вы создали метку с помощью кисти, сохраните документ в подходящем месте в виде изображения JPEG. Затем откройте Photoshop и выберите Файл > Открыть.
В открывшемся окне выберите изображение JPEG из ваших документов, чтобы открыть его в Photoshop.
3: выберите Редактировать > Определить набор настроек кисти, чтобы создать кисть из изображения
Теперь, когда изображение кисти Procreate открыто в Photoshop, вы можете продолжить и выбрать Edit > Define Brush Preset в строке меню в верхней части экрана.
Откроется новое диалоговое окно, в котором можно ввести имя новой кисти. Назовите ее как хотите, затем нажмите ОК, чтобы подтвердить создание кисти!
Теперь вы можете использовать кисть как хотите! Для этого просто активируйте инструмент Кисть, щелкнув значок, изображенный ниже, на панели инструментов в левой части экрана. Кроме того, вы можете использовать сочетание клавиш «B».
При активном инструменте в верхней части экрана появится новая панель параметров, как показано ниже.
На этой панели представлен широкий выбор настроек, которые вы можете изменить, чтобы настроить свойства вашей кисти, такие как размер, твердость, тип и непрозрачность.
Чтобы выбрать только что созданную кисть, все, что вам нужно сделать, это щелкнуть значок Набор кистей, чтобы открыть новое окно, в котором вы можете выбрать стиль кисти, который хотите использовать. . Итак, нажмите на значок, обведенный ниже.
После этого вы увидите, что под значком появилось новое поле. Пролистайте все отображаемые в нем кисти, пока не дойдете до конца списка. Последней кистью в коробке должна быть та, которую вы только что создали на основе кисти Procreate! Нажмите на нее, чтобы активировать.
Выбрав правильную кисть, вы теперь можете рисовать с ее помощью в Photoshop. Помните, что вы можете изменить его размер, жесткость и непрозрачность на панели в верхней части экрана. Чтобы получить доступ к дополнительным параметрам, которые вы можете изменить, чтобы изменить свойства кисти, выберите Окно > Настройки кисти, чтобы открыть новое окно, содержащее множество настроек, которые вы можете изменить.
ВИДЕО-ОБУЧЕНИЕ
Надеюсь, теперь вам удалось создать совместимую с Photoshop версию вашей кисти Procreate, которая выглядит довольно аутентично и максимально похоже на оригинал!
Если вы хотите увидеть метод, который во многом похож, но отличается только в первых нескольких шагах, вы можете посмотреть это видео Шахзада Риаза, в котором также кратко показаны некоторые способы, которыми вы можно настроить свойства кисти.
Photoshop и Procreate — два приложения для цифровой живописи с самым высоким рейтингом среди художников.
Большинство профессионалов предпочитают их, потому что они поставляются с потрясающим набором кистей, и вы можете создавать собственные кисти с нуля.
Многие люди хотят перенести свои любимые кисти из одного приложения в другое при создании сложных рисунков.
Возможно ли это? Читайте дальше, чтобы узнать.
Можно ли использовать кисти Procreate в Photoshop?
Кисти, совместимые с Photoshop, хранятся в файлах «.abr». Существует так много различных кистей, доступных для загрузки в Интернете, но некоторые художники также хотят использовать оригинальные кисти Procreate или собственные, созданные в Photoshop.
К сожалению, кисти Procreate с расширением «.brush» или «.brushset» нельзя импортировать или установить в Photoshop напрямую, ни в версии для iPad, ни в настольной версии.
Однако есть обходной путь:
Как установить кисти Procreate в Photoshop?
Установка здесь не лучший выбор, но вы можете переделать и использовать кисти Procreate одним из следующих способов:
Первый метод:
Шаг 1. Найдите файлы .brush или .brushset и измените расширение файла на .zip.
Шаг 2. Откройте ZIP-файл.
Шаг 3. Извлеките содержащиеся в нем изображения PNG.
Шаг 4. Импортируйте изображение в Photoshop.
Шаг 5. Попробуйте имитировать настройки кисти и переделать ее как собственную кисть.
Второй метод:
Шаг 1. Откройте Procreate и отредактируйте настройки выбранной кисти.
Шаг 2. Установите интервал как можно дальше друг от друга, установите максимальный размер и увеличьте непрозрачность.
Шаг 3. Измените цвет на чистый черный и выберите прозрачный холст.
Шаг 4. Нарисуйте на холсте только один экземпляр кончика кисти, как штамп.
Шаг 5. Получив базовую форму кисти, сохраните ее как изображение.
Шаг 6. Повторите шаги 4 и 5 первого метода, чтобы создать кисть.
Совместим ли Procreate с Photoshop?
Да. Procreate стал совместим с Photoshop в последних обновлениях. Во-первых, вы можете импортировать PSD-файлы Photoshop и сохранить слои, то есть все ваши PSD-слои останутся отдельными в Procreate, чтобы вы могли продолжить свою работу.
Для этого вам нужно будет открыть PSD-файл из источника, которым может быть приложение «Фотографии» или приложение «Файлы». Нажмите «Поделиться», а затем импортируйте в Procreate.
В Procreate 5 можно использовать кисти Photoshop с расширением .abr. Вы должны сохранить файлы на своем iPad или в облачном хранилище, открыть их, нажать «Поделиться» и импортировать их в Procreate для установки.
Кроме того, вы можете импортировать их через Procreate. Откройте любой документ, коснитесь значка кисти, а затем маленького знака «плюс», чтобы открыть настройки кисти. Нажмите «Импорт», найдите файл кисти .abr и нажмите на него, чтобы установить.
Некоторые люди говорят, что более сложные кисти не будут работать в Procreate так же безупречно, как в Photoshop, поэтому вам, возможно, придется настроить некоторые детали, чтобы получить наилучшие результаты.
Как импортировать кисти в Photoshop на iPad?
К сожалению, Photoshop не поддерживает импорт кистей на iPad. Photoshop для iPad был выпущен в 2019 году и обладает только основными функциями и качествами.
С тех пор прошло много времени, но в отличие от подобных приложений, таких как Adobe Fresco, вы не можете сохранять и импортировать кисти в Photoshop через iPad.
Разработчики говорят, что «очень скоро» в приложении появится больше функций.
Еще одна функция, которую они планируют добавить в Photoshop для iPad, — это «синхронизация кистей». Вам потребуется войти в Photoshop с помощью одной и той же учетной записи на iPad и ПК.
Добавьте кисти .abr в Photoshop на своем ноутбуке, компьютере или другом устройстве. Затем откройте Photoshop на iPad, коснитесь «Кисти», коснитесь трех точек в правом верхнем углу окна и включите синхронизацию кистей. Сохраненные кисти будут перенесены на ваш iPad и готовы к использованию.
Пока Photoshop не разработает эти функции, вы можете использовать кисти в Procreate на iPad. Как уже упоминалось, последняя версия Procreate поддерживает кисти .abr.
Можете ли вы добавить кисти в Photoshop в избранное?
Вы не можете добавить свои кисти в избранное в Photoshop, то есть вы не нажмете на маленькую звездочку или сердечко, поэтому кисть станет одной из ваших любимых. Однако есть способы сгруппировать ваши любимые или наиболее часто используемые кисти.
Поскольку вы проводите больше времени в Photoshop, вы столкнетесь с несколькими кистями, которые захотите использовать чаще. Чем больше кистей вы загрузите, тем сложнее будет отслеживать их и легко находить нужную.
Поэтому лучше всего расположить кисти одной темы или стиля в отдельных папках.
- Откройте панель кистей и нажмите значок шестеренки в правом верхнем углу.
- Когда откроется меню, нажмите «Новая группа кистей».
- Введите имя для этой конкретной группы и нажмите OK. Папка появится внизу списка на панели кистей.
- Нажмите на любую из кистей и перетащите их в новую папку.
- Добавьте столько, сколько хотите!
Таким образом, вы также можете создать папку избранного. Если вы хотите скопировать кисти, а не перемещать их из одной папки в другую, нажмите на кисть и коснитесь маленького плюсика в правом верхнем углу. Это дублирует вашу кисть.
Вы можете переименовать его или оставить исходное имя. Затем перетащите вторую версию в любую из созданных вами папок.
Procreate проще, чем Photoshop?
Профессиональным специалистам в определенных областях может быть проще работать с Photoshop. Например, редактирование в Photoshop может быть более простым из-за множества полезных инструментов и дополнительных функций. Procreate может редактировать фотографии в определенной степени. Но вам придется узнать, где найти все инструменты и раскрыть их потенциал.
С другой стороны, если подумать об основной цели Procreate — создании иллюстраций и рисунков, можно сказать, что это проще, чем Photoshop.
Procreate сохраняет свою платформу очень простой и минималистичной, поэтому вы можете сразу перейти к работе с кистью. Кривая обучения более проста, особенно для начинающих цифровых художников.
Procreate так же хорош, как Photoshop?
Если сравнивать Procreate с версией Photoshop для iPad, ответом на этот вопрос будет однозначное «да».
На данный момент Photoshop в магазине Apple должен пройти множество обновлений, чтобы раскрыть потенциал настольной модели.
- Иллюстрация: оба приложения могут создавать красивые иллюстрации и рисунки, но Procreate в основном создан для этой цели. Его платформа, инструменты и функции позволяют художнику чувствовать себя как дома. Вот почему это популярное приложение для многих профессиональных цифровых художников. Кроме того, с iPad и Apple Pencil вы почувствуете, что рисуете настоящими кистями на настоящей бумаге.
- Редактирование фотографий: Procreate предоставляет базовые и простые инструменты для редактирования фотографий, в основном для того, чтобы упростить создание более качественных рисунков. Но Photoshop — это совершенная платформа для редактирования фотографий, которая дает вам полный контроль над каждой мелочью.
- Кисти. Поскольку Photoshop существует уже очень давно, в Интернете доступно множество различных совместимых кистей. Procreate имеет множество отличных встроенных кистей и позволяет вам изменять их по своему вкусу или создавать свои собственные с нуля.
- Индивидуальные настройки. Они более универсальны, чем в Photoshop. Кроме того, вы можете использовать кисти Photoshop в Procreate последней версии. Хотя некоторые говорят, что более сложные кисти работают по-разному, Procreate по-прежнему является абсолютным победителем в этой категории.
- Слои. Хотя Procreate позволяет создавать до 90 слоев для ваших рисунков, это все же ограниченное количество. Photoshop позволяет добавлять сотни слоев, что может понадобиться для создания более сложных и детализированных рисунков.
- Простота. Многие новички, открыв Photoshop, перегружены панелями инструментов и сложными меню. С другой стороны, простая платформа Procreate позволяет легко выбрать кисть и сразу начать рисовать. Оба приложения имеют некоторую кривую обучения; просто с Procreate все проще.
- Совместимость: Procreate создан для устройств iOS и пользователей Apple, особенно для тех, у кого есть iPad и карандаш Apple. Однако Photoshop совместим с системами Windows, macOS и iOS. Эта функция предназначена для многих цифровых художников, особенно для тех, кто предпочитает большой экран.
- Цена: вы должны заплатить 9,99 долларов США один раз, чтобы приобрести Procreate без каких-либо дополнительных затрат и ежемесячных платежей. С другой стороны, для покупки Photoshop необходима подписка через Adobe Creative Cloud, которая стоит 20,99 долларов в месяц. Итак, Procreate — более дешевый вариант, если, конечно, вы не хотите инвестировать в iPad и Apple Pencil.
- Запись с интервальной съемкой. В отличие от Photoshop, Procreate может записывать процесс рисования со всеми деталями и мазками и ускорять его в виде видео с интервальной съемкой. Эта функция отлично подходит для тех, кто хочет поделиться своей работой в социальных сетях.
Заключительные мысли
Procreate и Photoshop во многом похожи и удовлетворяют потребности многих профессиональных художников. Тем не менее, у них обоих есть свои сильные и слабые стороны в разных областях.
В зависимости от того, что вы хотите от платформы цифрового искусства, вы можете выбрать предпочитаемое приложение с подробным сравнением, которое вы только что прочитали.
Если вы новичок в Procreate, вам также следует прочитать о его возможностях редактирования видео.
Возможно, вы думаете о замене Photoshop на Procreate для создания цифровых рисунков. Но вам может быть интересно, будут ли ваши кисти работать в Procreate. Хорошая новость заключается в том, что вы можете взять все свои кисти Photoshop .abr и переместить их в Procreate. Потрясающе, верно? В этом уроке мы будем импортировать кисти Photoshop в Procreate.
Этот метод аналогичен импорту кистей Procreate. Прежде чем мы начнем, нам нужно убедиться, что кисти являются файлами .abr. У нас есть куча отличных кистей Photoshop в формате .abr, так что ознакомьтесь с ними. Мы будем использовать эти дымовые кисти Photoshop, чтобы показать вам шаги.
Обратите внимание: мы используем последнюю версию Procreate 5X. Эта функция доступна только в Procreate 5, а не в более ранних версиях. Прежде чем продолжить, убедитесь, что ваш Procreate обновлен.
Шаг 1. Загрузите кисти на свой iPad
Мы познакомим вас с процессом загрузки кистей Photoshop из пакетов Design Bundles. Купив кисть, перейдите на страницу «Покупки» в своем аккаунте Design Bundles.
Мы найдем кисти Cloudy Smoke Photoshop с зеленой кнопкой «Загрузить файлы».При нажатии на кнопку отображается раскрывающаяся вкладка со всеми файлами, которые мы можем загрузить. Мы собираемся нажать на ZIP-файл, чтобы начать его загрузку.

На вашем iPad может быть установлена программа для распаковки файлов. Если нет, вы можете использовать программное обеспечение для обмена файлами в Интернете, такое как iCloud, Drive, OneDrive и многие другие. Используйте любой удобный для вас способ доступа к файлам .abr на iPad.
Шаг 2 — Общий доступ и импорт в Procreate
Далее мы собираемся перенести кисти Photoshop в Procreate, используя два метода. Вы можете поделиться файлом .abr с Procreate или импортировать его из Procreate. Каждый метод довольно прост, и вы можете использовать тот, который вам больше подходит.
Поделиться кистями из файла
Метод «Поделиться кистями из файла» может быть самым быстрым способом импорта кистей Photoshop в Procreate. Первое, что мы сделаем, это перейдем к нашим файлам и найдем, где была сохранена загрузка.
Поскольку загружаемый файл представлял собой файл .zip, нам нужно сначала извлечь его содержимое. Для этого просто нажмите на ZIP-файл. Теперь вы увидите файл Photoshop .abr. Нажмите на этот файл.

Далее нажмите значок «Поделиться» в правом верхнем углу. В раскрывающемся списке выберите «Создать».

Вы автоматически перейдете в Procreate и отобразите экран «Импорт». После этого ваши кисти будут добавлены в вашу библиотеку кистей.

Импорт из Procreate
Второй метод заключается в импорте из Procreate. Для начала откройте Procreate и создайте собственный холст или откройте существующий. Перейдите в «Библиотеку кистей» (значок «Кисть») и нажмите на символ (+), чтобы создать новую кисть.

Вы увидите открытую студию кистей. Просто нажмите «Импорт» и выберите файл .abr. Кисти .abr будут импортированы автоматически.

Шаг 3. Просмотр и использование кистей
Теперь самое интересное — просмотр и использование импортированных кистей Photoshop в Procreate. Файл .abr должен быть импортирован как коллекция кистей, поэтому их будет легко найти в библиотеке кистей.
Найти новые кисти
Нажмите на библиотеку кистей, чтобы открыть ее. Коллекции кистей расположены с левой стороны. Прокрутите вверх, чтобы увидеть недавно импортированную коллекцию кистей. Нажмите на нее, чтобы просмотреть отдельные кисти.

Протестируйте свои новые кисти
Перейдите и выберите кисть, которую хотите протестировать. Теперь начните использовать кисти Photoshop так же, как вы обычно используете кисти Procreate.

Теперь вы знаете, что можете легко импортировать кисти Photoshop в Procreate. Это особенно здорово, если у вас есть большой выбор кистей Photoshop, которые вы хотели бы использовать.
Надеемся, вам понравился этот урок. Ознакомьтесь с другими нашими руководствами по Procreate, например, как сделать радужную кисть и как сделать стикеры для планировщика в Procreate.
Procreate Brushes in Photoshop (Guide and Workaround)
Photoshop and Procreate are two of the highest-rated digital painting apps among artists.
Most professionals favor them because they come with amazing brush selections, and you can build custom brushes from scratch.
Many people want to transfer their favorite brushes from one app to another when creating complex art.
Is that possible? Read on to find out.
Can Procreate Brushes Be Used in Photoshop?
Photoshop-compatible brushes are stored in “.abr” files. There are so many different ones available for download online, but some artists want to use the original Procreate brushes or the custom ones they made inside Photoshop, as well.
Unfortunately, Procreate brushes with the extension “.brush” or “.brushset” can’t be imported or installed in Photoshop directly, neither the iPad nor the desktop version.
However, there’s a workaround:
How to Install Procreate Brushes in Photoshop?
Installing isn’t a good word choice here, but you can remake and use the Procreate brushes with one of the following methods:
First Method:
Step 1—Find the .brush or .brushset files and change the file extension to .zip.
Step 2—Open the .zip file.
Step 3—Extract the PNG images contained within it.
Step 4—Import the image into Photoshop.
Step 5—Try to mimic the brush settings and remake it as a custom brush there.
Second Method:
Step 1—Open Procreate and edit the settings on your selected brush.
Step 2—Set the spacing as far apart as possible, the size to the largest, and turn up the opacity.
Step 3—Change the color to pure black, and choose a transparent canvas.
Step 4—Draw on the canvas in a way that you get only one instance of the brush tip, much like a stamp.
Step 5—Once you get the base shape of your brush, save it as an image.
Step 6—Repeat steps 4 and 5 in the first method to create the brush.
Is Procreate Compatible with Photoshop?
Yes. Procreate has become compatible with Photoshop in its latest updates. Firstly, you can import the Photoshop PSD files and preserve the layers, meaning all your PSD layers will stay separate in Procreate so that you can continue your work.
To do so, you’ll have to open the PSD file from the source, which could be the Photos app or Files app. Tap Share and then import to Procreate.
In Procreate 5, you can use Photoshop brushes with the .abr extension. You should save the files on your iPad or cloud storage, open them, click share, and import them to Procreate for installation.
Alternatively, you can import them through Procreate itself. Open any document, tap on the Brush icon, and then on the little Plus Sign to open up the Brush Settings. Tap on Import, find the .abr file of the brush, and tap on it to install.
Some people say that more complicated brushes won’t work in Procreate as flawlessly as in Photoshop, so you may have to tweak a few details to get the best results.
How Do I Import Brushes into Photoshop on iPad?
Unfortunately, Photoshop doesn’t support importing brushes on the iPad. iPad Photoshop was released in 2019, with just the basic features and qualities.
It has come a long way since then, but unlike similar apps such as Adobe Fresco, you can’t save and import brushes to Photoshop through your iPad.
The developers say that the app will have more features “very soon.”
Another feature they intend to add to iPad Photoshop is “brush syncing.” You’ll have to sign in to Photoshop with the same account on your iPad and PC.
Add your .abr brushes to Photoshop on your laptop, computer, or other devices. Then open Photoshop on iPad, tap on Brushes, tap on the three dots at the top right corner of the window, and turn on Brush Syncing. Your saved brushes will transfer to your iPad, ready for use.
Until Photoshop develops these features, you can use the brushes in Procreate on your iPad. As mentioned, the latest version of Procreate supports .abr brushes.
Can You Favorite Brushes in Photoshop?
You can’t “favorite” your brushes in Photoshop, meaning there isn’t a little star or heart you tap, so the brush becomes one of your favorites. However, there are ways to group your favorite or most-used brushes.
As you spend more time working with Photoshop, you’ll run into several brushes you want to use more frequently. The more brushes you download, the harder it’ll get to keep track of them and find one easily.
So, it’s best to organize the brushes with the same theme or style into separate folders.
- Open the Brush Panel and click on the Gear icon on the top right corner.
- Once the menu pops open, click on New Brush Group.
- Type in a name for this specific group, and click OK. The folder will appear at the bottom of the list in the brush panel.
- Click on any of the brushes and drag them into the new folder.
- Add as many as you want!
This way, you can create a favorites folder, as well. If you want to copy brushes and not move them from one folder to another, click on the brush and tap the little Plus Sign at the top right corner. That will duplicate your brush.
You can rename it or keep the original name. Then drag the second version and drop it into any of the folders you’ve created.
Is Procreate Easier Than Photoshop?
Photoshop might be easier to work with for professionals in certain areas. For example, Photoshop’s editing might be more straightforward because of all the useful tools and additional features. Procreate can edit photos to an extent. But you’ll have to learn where to find all the tools and discover their potential.
On the other hand, when you think about the primary purpose of Procreate, which is creating illustrations and drawings, you could say it’s easier than Photoshop.
Procreate keeps its platform very minimal and simple, so you can jump right in with a brush. The learning curve is more straightforward, especially for beginner digital artists.
Is Procreate as Good as Photoshop?
The answer to this question would be a definite yes if we’re comparing Procreate with the iPad version of Photoshop.
As of this moment, Apple store Photoshop has to go through many updates to reach the potential of the desktop model.
- Illustration: Both apps can create beautiful illustrations and drawings, but Procreate is mainly built for this purpose. Its platform, tools, and features make an artist feel more at home. That’s why it’s the go-to app for many professional digital artists. Plus, the iPad and Apple Pencil combo make you feel like you’re drawing with real brushes on real paper.
- Photo Editing: Procreate provides you with basic and simple photo editing tools, mainly to make it easy for you to create better drawings. But Photoshop is the ultimate photo editing platform that gives you lots of control down to every little detail.
- Brushes: Since Photoshop has been around for a very long time, many different compatible brushes are available for download online. Procreate has lots of great built-in brushes and allows you to change them to your liking or build your own from scratch.
- Customization settings: These are more versatile than Photoshop’s. Plus, you can use Photoshop brushes in Procreate with the latest version. Although some say the more complicated brushes don’t work the same, Procreate is still the overall winner in this category.
- Layers: Although Procreate lets you create up to 90 layers for your drawings, that’s still a limited number. Photoshop allows you to add hundreds of layers, which can be a necessity for creating more complicated and detailed drawings.
- Simplicity: Many first-timers become overwhelmed with the toolbars and complicated menus when they open Photoshop. On the other hand, Procreate’s simple platform makes it easy to pick a brush and start drawing right away. Both apps have a bit of a learning curve; it’s just more straightforward with Procreate.
- Compatibility: Procreate is made for iOS devices and Apple users, most specifically those with an iPad and Apple pencil. However, Photoshop is compatible with Windows, macOS, as well as iOS systems. This feature targets many more digital artists, especially those who prefer a bigger screen.
- Price: You should pay $9.99 once to purchase Procreate without any additional costs and monthly fees. On the other hand, a subscription through Adobe Creative Cloud is necessary for buying Photoshop, and it costs $20.99 per month. So, Procreate is the cheaper option, unless, of course, you want to invest in an iPad and Apple Pencil.
- Time-lapse Recording: As opposed to Photoshop, Procreate can record your drawing process with all the details and brushstrokes and speed it up in the form of a time-lapse video. This feature is excellent for those who want to share their work on social media.
Final Thoughts
Procreate, and Photoshop are similar in many ways and satisfy the needs of many pro artists. Even so, they both have their strengths and flaws in different areas.
Depending on what you want from a digital art platform, you can choose your preferred app with the tight comparison you just read.
If you’re new to Procreate, you should also read about its video editing capabilities.
How to Use Procreate Brushes in Photoshop
Procreate is a reference in digital drawing application and everyone is looking for a way to use Procreate’s brush in Photoshop.
Indeed working across various different pieces of software to produce digital artwork can be really useful since it can offer you a much higher level of versatility. One particularly promising combination is Procreate and Photoshop: Procreate is home to such a wide variety of brushes and Photoshop can be great at producing digital drawings with customisable brushes.
So, wouldn’t it be great to be able to use brushes from Procreate whilst creating artwork in Photoshop? Unfortunately, it isn’t the easiest thing to do as there is no way to directly bring Procreate’s brush files into Photoshop.
Yet, there is a technique you can use to get around this issue, and luckily it will only take around ten minutes. By making a mark with the brush in Procreate, saving it as a JPEG, and importing it into Photoshop where you can use it to define a brush preset, you can essentially convert the brush into one that is compatible with Photoshop.
In this article, we will explore this technique in more depth to help you find a way to work around the issue. Before we jump in, if you would like to learn more about how you can increase the range of brushes you have access to in Photoshop, then check out our article about how to install and use Photoshop brushes from external sources.
Table of Contents
Can You Use Procreate Brushes in Photoshop?
Procreate uses its own proprietary file type .BRUSH that you can’t directly use in Photoshop because it’s not compatible.
This means that you cannot directly use Procreate brushes in Photoshop by simply importing them into the program.
However, there’s an easy work around.
Let’s take a look now at how you can use Procreate brushes in Photoshop.
One method will require you to have access to the application Procreate and the other one will let simply let you convert .brush files to get a png.
How to Create a Photoshop Brush From a Procreate Brush
Procreate app is required
Since we can’t use Procreate brushes directly in Photoshop, let’s explore how you can achieve the next best thing: producing a new Photoshop brush from the Procreate one.
1: Create a Mark on White with a Black Version of the Brush
For this technique, you will need to begin in Procreate by setting the color of the brush you would like to use in Photoshop to black. Make sure that the Opacity of the brush is set to 100%.
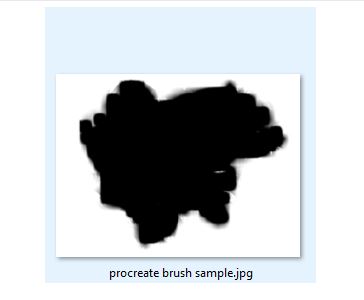
Fill the background of the document with pure white, then use the black brush to make a single mark that is representative of the brush’s style as big as possible within the constraints of the canvas. Make sure that none of the edges of the mark leave the borders of the document.
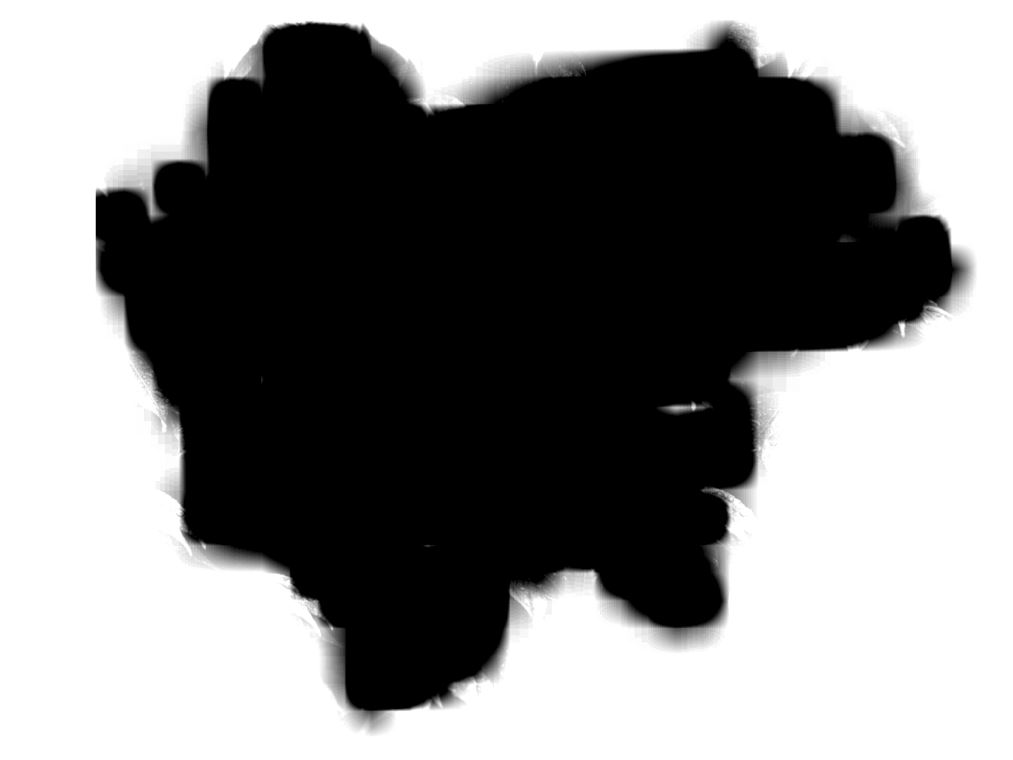
Later, when we use this sample image to create a Photoshop brush, Photoshop will automatically create a brush based on the varying tones of gray within the image. This means that any black areas are completely visible in the created brush, whereas the white areas in the sample image will be translated into transparent pixels. Any tones of gray between black and white will adopt varying levels of transparency.
Thus, by using black for the brush mark and white for the background in our Procreate sample image, we have ensured that the elements of the brush itself will be rendered completely visible when we create the Photoshop version of the brush whilst the unwanted background areas will be made completely invisible.
2: Save the Brush Sample as a JPEG and Open it in Photoshop
Now that you have created a mark with the brush, save the document to a suitable file location as a JPEG image. Then, open up Photoshop and head to File > Open.
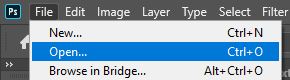
In the window that opens, select the JPEG image from your documents to open it in Photoshop.
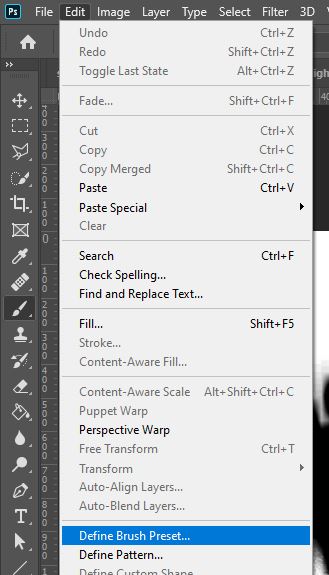
3: Select Edit > Define Brush Preset to Create a Brush from the Image
Now that the image of the Procreate brush has been opened in Photoshop, you can go ahead and select Edit > Define Brush Preset from the menu bar along the top of the screen.
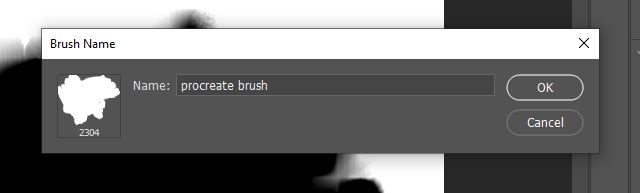
Doing so will open a new dialog box where you can type in a name for the new brush. Name it whatever you wish to, then hit OK to confirm the creation of the brush!
You can now use the brush in whatever way you want! To do so, simply activate the Brush Tool by clicking on the icon depicted below, found in the toolbar down the left side of the screen. Alternatively, you can use the keyboard shortcut ‘B’.

With the tool active, a new options bar will appear near the top of the screen, as shown below.

Within this bar is a wide selection of settings that you can alter in order to customise the properties of your brush, such as the size, hardness, type, and opacity.
To select the brush that we just created, all you will need to do is click on the Brush Preset icon to open a new window where you can select the style of brush you would like to use. So, click on the icon circled below.
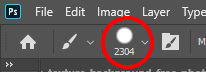
After doing so, you should see that a new box appears below the icon. Scroll through all the brushes displayed in it until you get to the bottom of the list. The last brush in the box should be the one you just created based on the Procreate brush! Click on it to activate it.
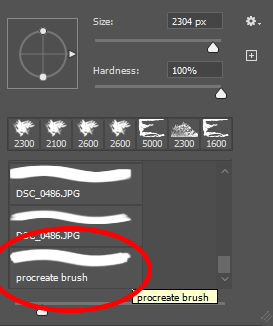
With the right brush selected, you can now paint with it in Photoshop. Remember that you can alter the size, hardness and opacity of it in the bar near the top of the screen. To access more settings that you can edit to alter the properties of the brush, choose Window > Brush Settings to open a new box containing a wide variety of settings that you can change.