Как настроить ESLint и Prettier в VS Code и Create React App и подключить Airbnb стайлгайд
Настраиваем автоматическое форматирование кода и проверку на ошибки при помощи Prettier и ESLint согласно стайлгайду Airbnb.
Во время работы над последним проектом я опробовал в деле два прекрасных иструмента, ESLint и Prettier. Захотелось написать о том, что это такое, чем полезен линтер и prettier, как их настроить, и как использовать.
Что такое Lint?
Lint, или линтер — это инструмент для поиска ошибок в коде. Пример работы линтера в проекте Create React App, ниже:

Клавиатура моего ноутбука иногда срабатывает неправильно, и делает двойное нажатие клавиши, вместо однократного. В 8 и в 25 строке опечатка, вместо logo — logoo а вместо App — Appp
Линтер нашел эти ошибки и сообщил о них в терминал. Прекрасно!
Теперь можно их исправить, и все заработает как надо:

ESLint в Create React App и расширение для VS Code
В Create React App линтер уже установлен, он называется ESLint. Именно его сообщения об ошибках мы видим в терминале.
Существует так же ESLint расширение для VS Code:

Установив это расширение в VS Code, получим сообщения ESLint и подсветку ошибок в редакторе кода:

Настройка ESLint
У ESLint есть конфиг, в котором находятся правила, согласно которым он выполняет проверку кода. Как я говорил ранее, ESLint уже встроен в Create React App, и использует конфиг который называется eslint-config-react-app
В Create React App этот конфиг подключается к ESLint в package.json, 22 строка:

Eslint сейчас настроен так, как решили создатели CRA. Давайте инициализируем ESLint и заново сами все настроим, так, как нам необходимо. Для этого выполним команду:
Exit fullscreen mode
Запустится мастер настройки ESLint.
Пройдем настройку согласно предложенным вариантам:
В конце мастер создаст файл настроек линтера, .eslintrc.json:

На этом базовая настройка линтера закончена, теперь было бы неплохо расширить его конфигурацию и подключить несколько дополнительных плагинов с правилами.
Установка и подключение дополнительных плагинов ESLint
Exit fullscreen mode
Если вы используете версию React старше 17, и не импортируете React from ‘react’ можно после установки этого плагина, добавить в конфиг .eslintrc.json строку «plugin:react/jsx-runtime», тогда ESLint не будет ругаться, что ‘React’ must be in scope when using JSX
В этом случае конфиг будет выглядеть так:

Exit fullscreen mode
подключим их, добавив строку «plugin:react-hooks/recommended» в .eslintrc.json:
Установим правила доступности для людей с ограниченными возможностями eslint-plugin-jsx-a11y
Exit fullscreen mode
добавляем «plugin:jsx-a11y/recommended» в .eslintrc.json:

установим правила, которые будут отвечать за синтаксис импортов и экспортов eslint-plugin-import
Exit fullscreen mode
добавим «plugin:import/recommended» в .eslintrc.json:

С ESLint мы пока что закончили, переходим к Prettier
Prettier
Prettier. Что это такое и зачем вообще нужно?
Prettier — это инструмент для автоматического форматирования кода.
Форматирование кода — это процесс придания коду определенного вида.
Prettier берет код, который вы ему дали, и преобразует этот код к единому стилю.
Вот простой пример:
Здесь у нас стандартный файл App.js из Create React App проекта, у которого я где то убрал, а где то добавил отступы и точки с запятыми в конце строк, в некоторых местах использовал длинные, плохо читаемые строки.
Prettier автоматически исправил мой код при сохранении файла, добавил нужные отступы, точки с запятыми, а длинные линии кода разбил на более короткие и лучше читаемые блоки. Теперь все выглядит лучше и опрятнее.
Установка Prettier в проект
Установка хорошо описана в официальной документации, пройдем ее вместе, по шагам.
Первым делом устанавливаем Prettier в наш Create React App проект, локально:
Exit fullscreen mode
Создаем пустой конфигурационный файл, .prettierrc.json в корне проекта:
Exit fullscreen mode

Отключаем конфликтующие правила ESLint
Теперь нужно сделать так, чтобы Prettier не конфликтовал с линтером. Дело в том, что когда ESLint ищет ошибки в коде, он руководствуется определенными правилами, которые хранятся в его конфиге. Эти правила отвечают как за качество кода, так и за стиль кода. Так вот, у Prettier есть свои собственные правила, которые тоже отвечают за стиль кода. Чтобы у линтера и Prettier не было конфликтов по части оформления кода, нужно отключить кофликтующие правила у линтера, чтобы за стиль кода отвечал только Prettier.
Сделать это можно очень просто, установив eslint-config-prettier
Exit fullscreen mode
Далее открываем конфиг нашего линтера, (файл .eslintrc.json), и добавляем «prettier» в конец массива:

Cтрока «prettier» в конфиге .eslintrc.json отключает конфликтующие с Prettier правила ESLint.
Теперь Prettier и линтер будут корректно работать вместе.
Мы установили Prettier в наш проект. Давайте теперь добавим поддержку Prettier в VS Code.
Интеграция Prettier в VS Code
Установим расширение Prettier для VS Code:

После того как мы установили расширение Prettier в VS Code, можно сделать так, чтобы Prettier автоматически форматировал наш код, когда мы сохраняем файл. Для этого нужно добавить два значения в JSON конфиг VS Code, (файл settings.json).
Чтобы открыть settings.json нужно, находясь в VS Code, нажать Ctrl + Shift + P , ввести в поиск «settings» и выбрать пункт Open Settings (JSON). Откроется файл settings.json.
Добавим в него следующие строки:
Exit fullscreen mode
Первая строка устанавливает Prettier как инструмент форматирования кода по-умолчанию.
Вторая строка включает форматирование кода при сохранении файла.
.prettierrc.json и .prettierignore
Пара слов об этих двух файлах.
Для чего нужен .prettierrc.json?
Перечислю базовые настройки, которые в него можно добавить:
Exit fullscreen mode
«trailingComma» — отвечает за висящие, (или «последние») запятые. Можно разрешить Prettier ставить их там, где это возможно, или отключить эту функцию
«tabWidth» — ширина отступа, в пробелах
«semi» — отвечает за добавление точек с запятыми в конце инструкций. Можно добавлять, можно не добавлять
«singleQuote» — отвечает за использование одинарных или двойные кавычек
Мой конфиг .prettierrc.json сейчас выглядит так:

В нем я запретил использование точек с запятыми в конце строк. Такое вот личное предпочтение, при работе над персональными проектами.
В итоге, когда мы сохраняем файл, Prettier будет удалять точки с запятыми в конце строк, если они были, и менять одинарные кавычки на двойные. (замена кавычек на двойные производится по умолчанию, этим поведением можно управлять при помощи параметра «singleQuote»)
вот как это выглядит:
Сохранили файл — произошло форматирование кода.
.prettierignore
Файл .prettierignore существует для того, чтобы запретить Prettier форматировать определенные файлы. Какие файлы запретить форматировать, решаете вы. Я добавил туда файл .eslintrc.json, потому что не хочу, чтобы Prettier его трогал:

Установка правил Airbnb для ESLint
Теперь, когда мы настроили ESLint и Prettier в нашем проекте, давайте установим популярный конфиг eslint-config-airbnb, который настроен с учетом стайлгайда по JavaScript от Airbnb
для этого выполним команду:
Exit fullscreen mode
и добавим «airbnb» в .eslintrc.json.
Финальный конфиг ESLint с учетом правил Airbnb будет выглядеть вот так:

Чтобы ESLint не ругался на то, что у нас JSX присутствует в файлах с расширением ‘.js’, можно добавить правило
How To Auto-Format Code in VS Code

By Lee Stanton Lee Stanton Author Lee Stanton is a versatile writer with a concentration on the software landscape, covering both mobile and desktop applications as well as online technologies. Read more • Edited by Evan Gower  Evan Gower Editor With over a decade of experience in digital publishing. Evan leads our team with a keen eye for emerging tech trends. Read more June 8, 2022
If you’re thinking about learning to code or already write it every day, a reliable code editor, like Visual Studio Code, is a must-have. As you write code, you have to think about formatting, as it makes it easier for human beings to read it.

All those specific rules about indents and line spacing are essential but also easy to forget about as you focus on your work.
That’s why VS Code allows you to utilize auto-formatting extensions that can help you along the way. Some auto-formatting extensions can format more than one programming language, while you’ll need to integrate specialized extensions for others.
How To Auto Format HTML
Hyper Text Markup Language or HTML is a coding language used to build and display web pages. Web developers and software engineers use HTML every day and can benefit from an auto-formatting tool.
If your code editor of choice is VS Code, here’s how you can find Prettier, a popular code formatter, and turn on the auto-format feature.
- Open Visual Studio Code on your computer.

- Navigate to the extension tab on the left side of the screen. It’s represented as four blocks.

- In the search bar field, enter “Prettier code formatter.”

- You will get multiple search results, but select the one that was made by Prettier, not another person or company.

- Click the “Install” button, and the extension will download within seconds.

Once you’ve installed the Prettier formatter, you can turn on the auto-format feature and ensure a consistent styling as you write code.
- Open or create a new HTML file in VS Code.

- Go to “Settings,” located in the bottom-left corner of the screen.

- Enter “Format” in the search box and switch to the “User” tab.
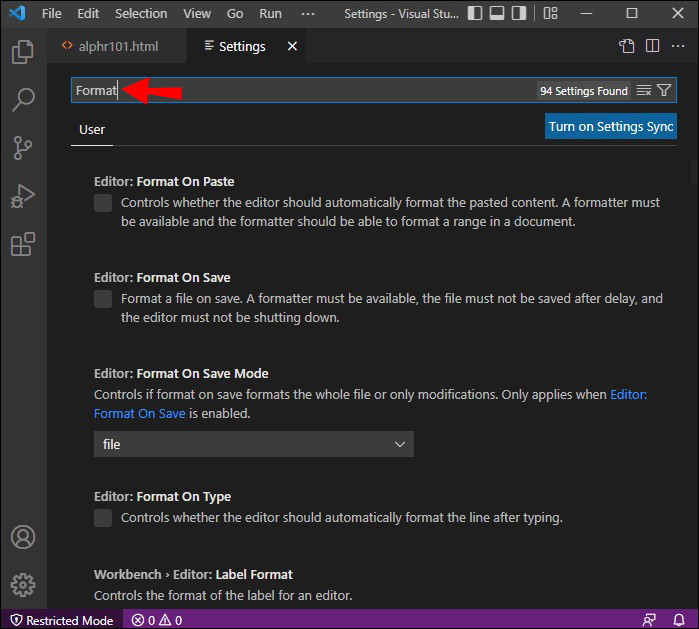
- Click the “Default Formatter” option and select “Prettier” from the list.

- Scroll down a bit until you see the “Editor: Format On Save” option.

- Check the box next to this option.

- Go back to your file and check if the setting works.
Prettier should automatically format your HTML files as you save them.
Auto Format JSON
The JavaScript Object Notation or JSON is classified as a language-independent data interchange format. Mobile apps and computer programs use JSON files to read data from the servers and display them on the screen.
When you create a JSON file in the Visual Studio Code editor, you also need to mind the formatting. The good news is that you can use the Prettier formatter extensions in the VS Code to enforce a consistent style on your JSON files.
Here’s everything you need to do to turn on the auto-formatting feature for JSON files.
- Launch VS Code and go to the designated extensions tab on the left side of the window.
- Search for “Prettier code formatter” in the search field.
- The first result is usually the one you want to click. However, to be sure, select the one that has “Prettier” listed as a developer.
- Click “Install” and wait a few seconds for the formatter to download.
When the Prettier formatter is installed, ensure the auto-format feature is on by following these steps.
- Create a new JSON file or open one that hasn’t been formatted yet.
- Click “Settings” in the bottom-left corner.
- Search for “Format.”
- Click the “Default Formatter” section. from the drop-down list, select “Prettier.”
- Scroll down and stop when you see the “Editor: Format On Save” option.
- Click the checkbox next to this option.
- Verify that the auto-format feature works.
That’s all there is to it. The Prettier extension in the VS Code editor makes the auto-formatting effortless.
Auto Format Python
These days, Python is one of the most popular programming languages and is widely used by web developers and coding enthusiasts. It is used to design and build software and websites, analyze data, automate tasks, and much more.
If you’re using VS Code to edit the Python file, you will need to use the correct formatter. While Prettier works for many different programming languages, it isn’t compatible with Python.
Fortunately, VS Code offers a solution. One of the best Python formatters in VS Code is Black, and it can be used to format code whenever you save a file automatically. However, before using Black, you need to download Microsoft’s Python extension for VS Code:
- Open VS Code and search “Python” in the search box.

- Make sure it’s Microsoft’s extension and click “Install.”

- To install the Phyton formatter, enter the following text in your virtual environment: “$ pip install black”.
- Go to “Settings” in VS Code and search “Phyton formatting provider.”

- From the drop-down menu, select “Black.”

- Scroll down and locate the “Editor: Format On Save” option.
- Check the box next to this option.
Black, the Python formatter will now automatically format code every time you save the file.
VS Code Auto Format On Save
You can turn on the auto-formatting feature regardless of which programming language or code formatter you’re using in VS Code.
Most developers are using multiple code formatting extensions in VS Code, so you can ensure each of them automatically formats the file as you save it.
Here’s how that works.
- Open Visual Studio Code editor.
- Click the “Settings” gear icon in the bottom-left corner.
- Search “Formatter” and click the “Editor: Default Formatter” option.

- From the drop-down menu, select whichever code formatter you want to use.

- Scroll down a bit and check the box next to the “Editor: Format On Save” option.

You can repeat the process for every code formatter you’re using in VS Code.
Why is auto “Format On Save” not working?
If you have the “Format On Save” option in a VS Code formatter, and it’s not working correctly, you’re likely dealing with a glitch.
Perhaps the formatter version you have is experiencing issues, and you need to check if there’s an update available. However, the problem might not be on your end, and the glitch will be cleared by VS Code developers.
How do I turn off auto format in VS Code?
Disabling the auto-formatting feature is a breeze. Follow these steps to turn off auto format.
1. Open VS Code editor and click the “Settings” icon.
2. Search “Formatter” and select the formatter for which you want to disable auto format.
3. Find the “Editor: Format On Save” option and uncheck the box next to it.
Effortless Code Auto Formatting in Visual Studio Code
One of the best aspects of using VS Code is its well-designed interface, allowing even beginners to find their way around the editor.
Proper and continuous code formatting is essential for readable code, but these conventions can be cumbersome if you have to do them manually.
But the good news is that VS Code editor has numerous code formatters that can make it easier and faster to write readable code.
Whether it’s Prettier, Black, or any other extension, users always have the option to auto-format code the moment they save the file.
Which programming language do you use, and which formatter works best? Let us know in the comments section below.
Форматирование кода с помощью Prettier в Visual Studio Code
Последовательное форматирование кода — это боль, особенно при работе в команде. Прелесть современной веб-разработки в том, что инструменты стали намного лучше! В этой статье мы рассмотрим настройку Prettier для автоматического форматирования вашего кода в Visual Studio Code.
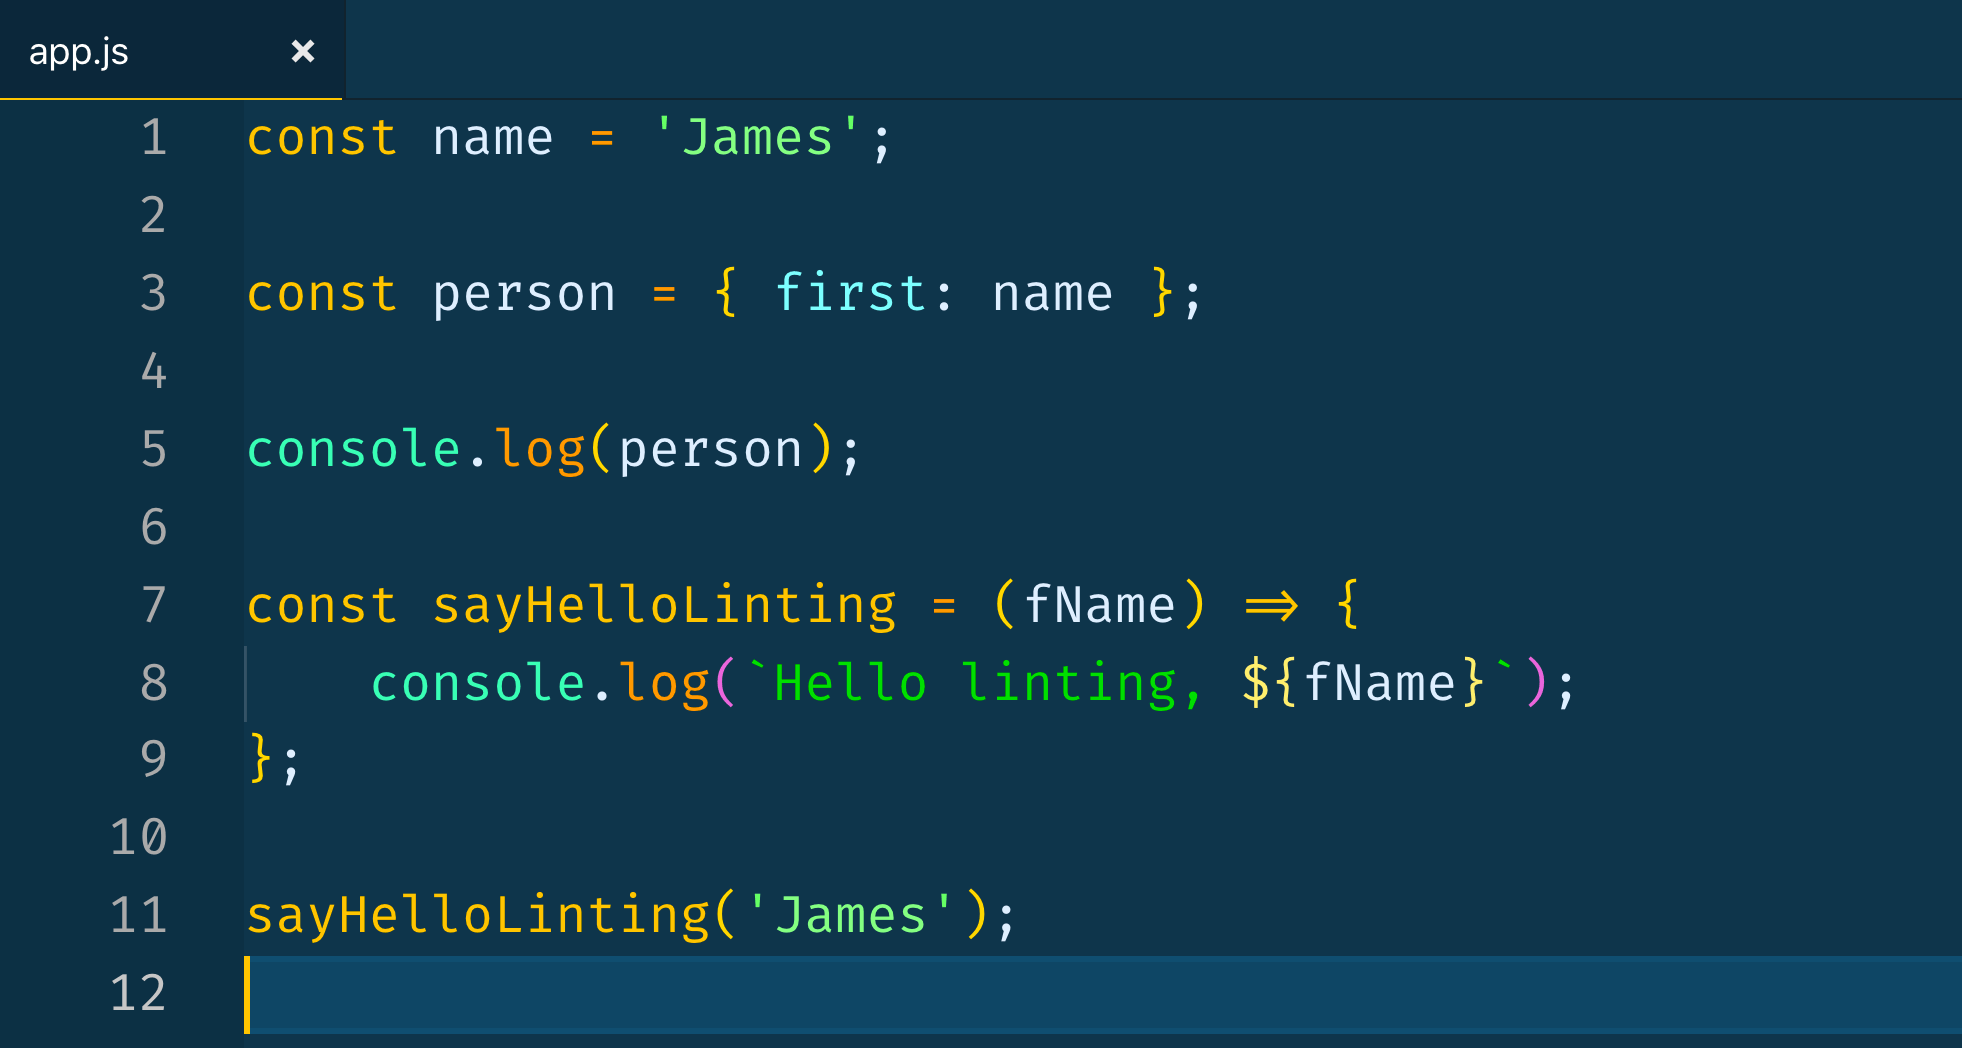
Образец кода
Для демонстрационных целей вот пример кода, который мы будем форматировать. Если вы разборчивы в форматировании кода, вы сразу обнаружите некоторые очевидные ошибки.
- сочетание одинарных и двойных кавычек
- первое свойство объекта person должно быть на отдельной строке
- оператор консоли внутри функции должен иметь отступ
- вам может понравиться или не понравиться необязательная скобка, окружающая параметр функции стрелки

Установка расширения Prettier
Для работы с Prettier в Visual Studio Code вам необходимо установить расширение. Найдите Prettier — Code Formatter. Вы можете увидеть расширение ниже. Если вы устанавливаете его в первый раз, вы увидите кнопку установить вместо кнопки удалить, как у меня.
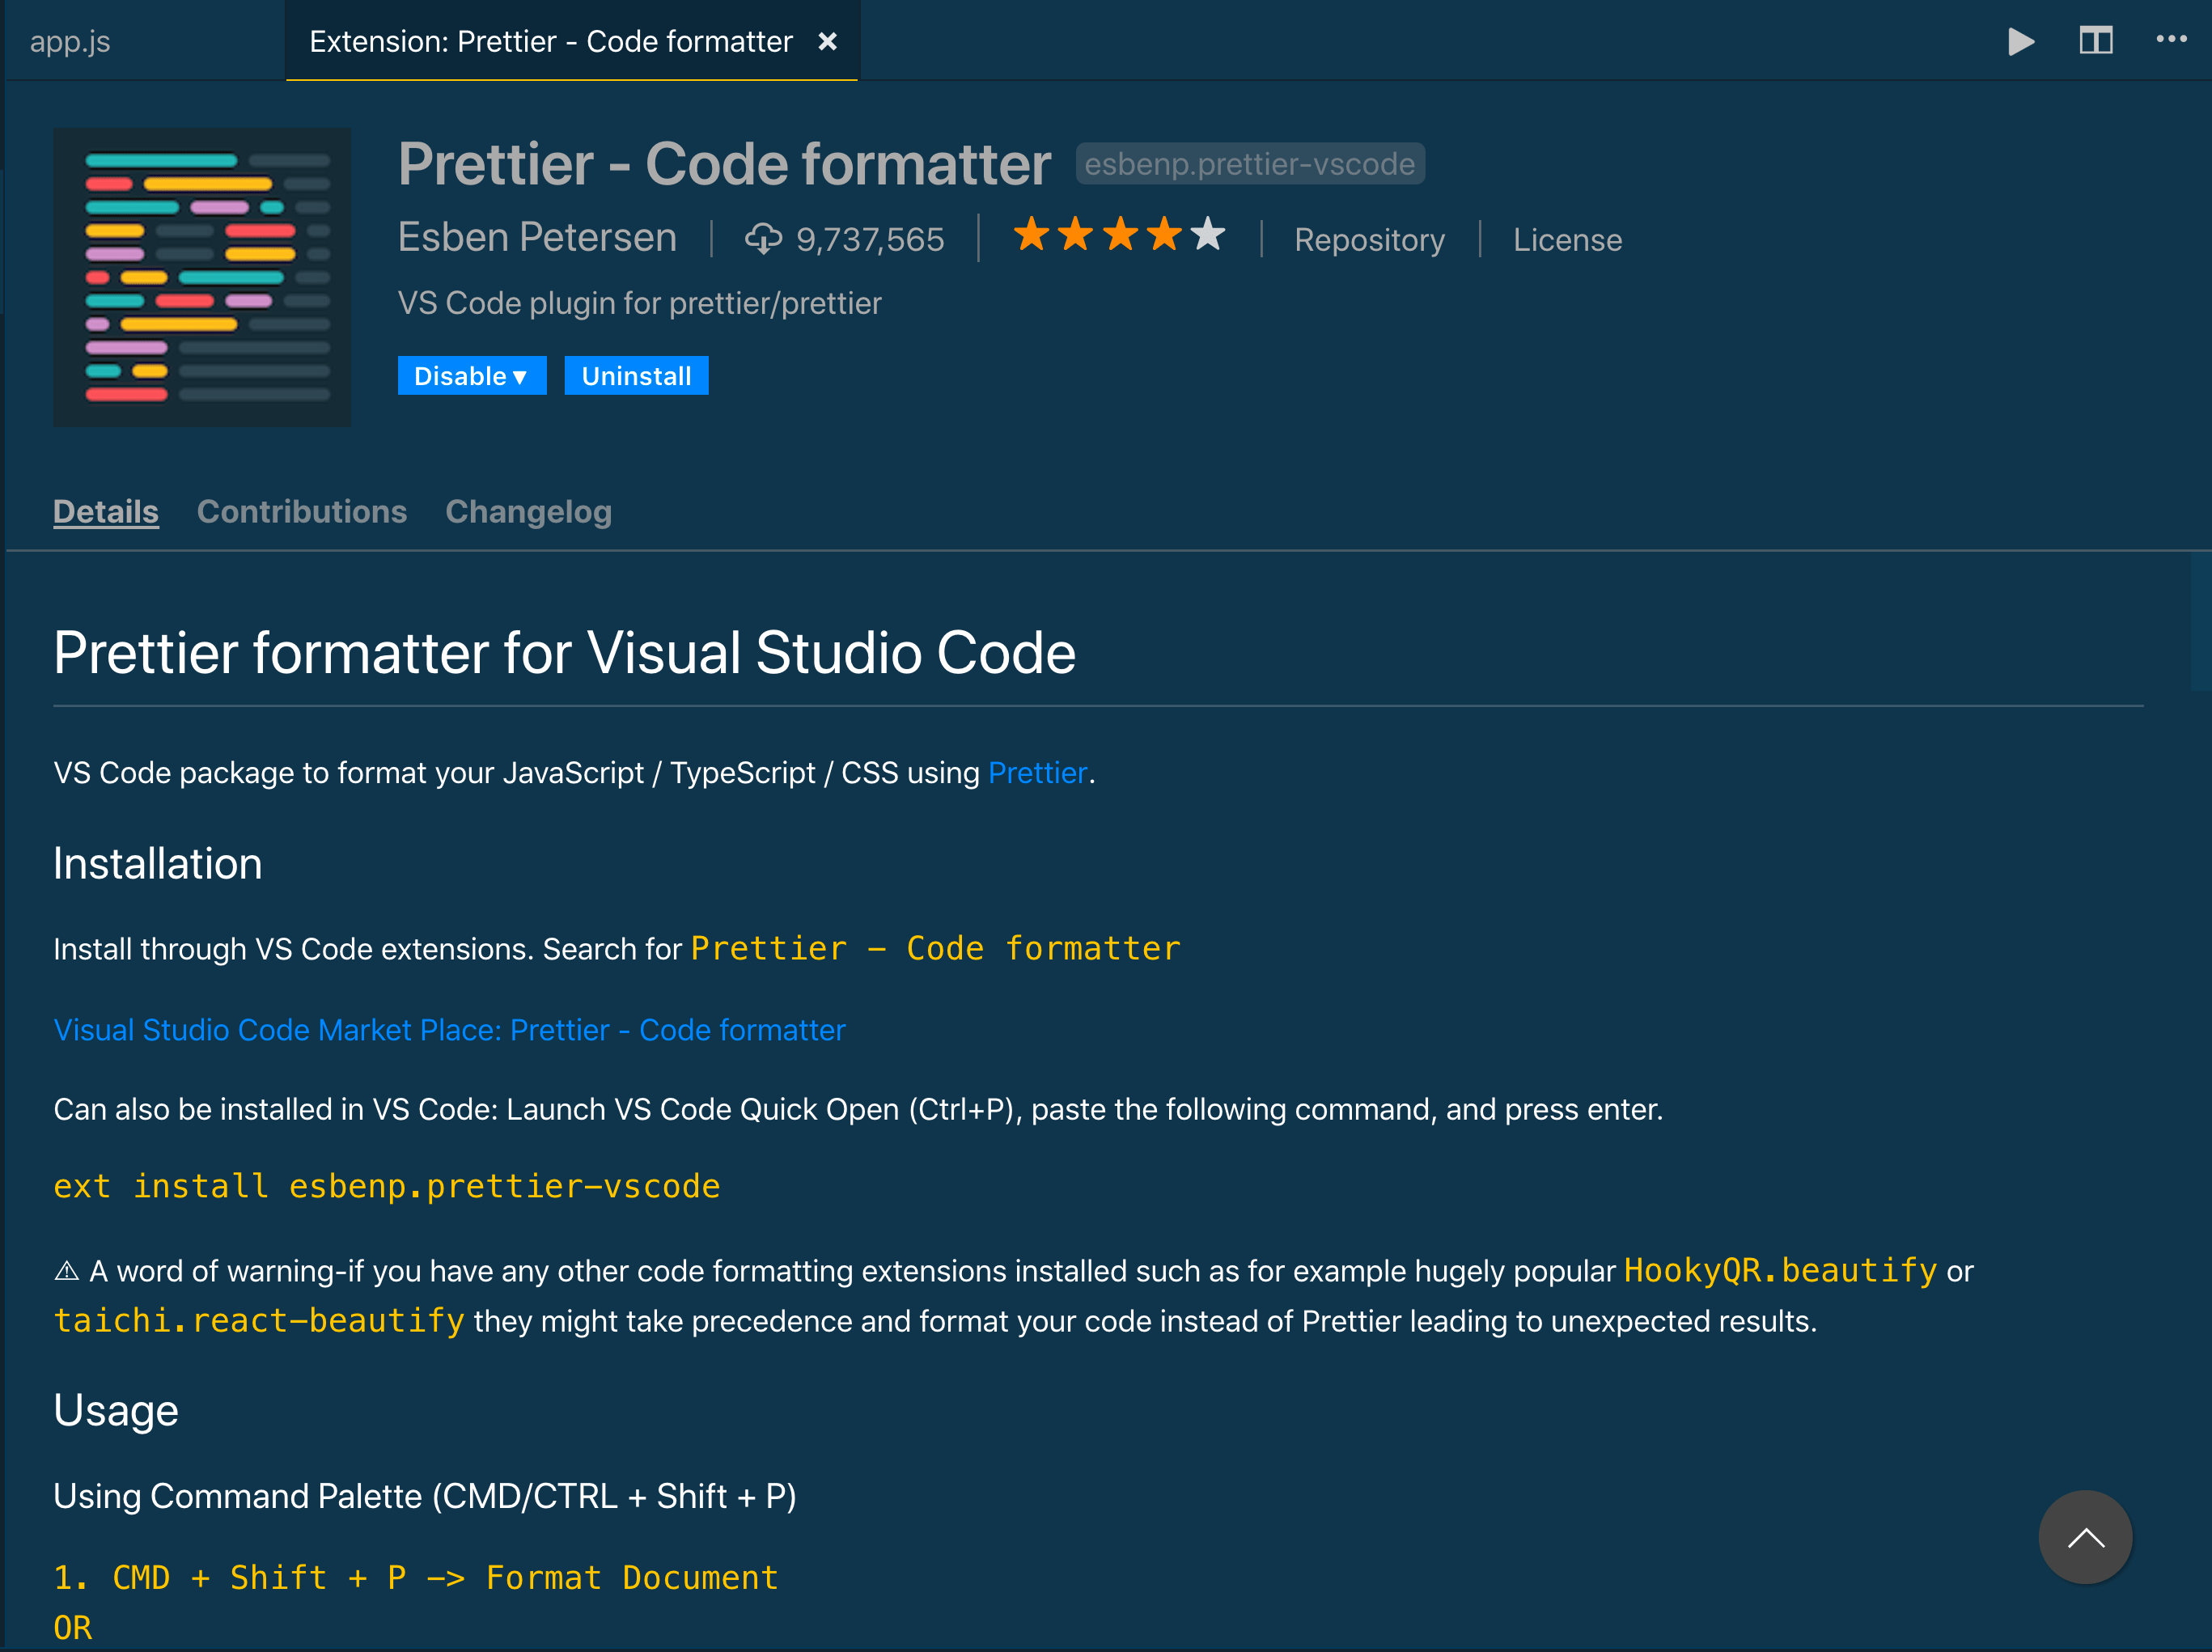
Команда форматирования документа
Установив расширение Prettier, мы теперь можем использовать его для форматирования нашего кода. Мы еще поработаем над этим позже, но для начала мы можем использовать команду Форматировать документ.
Чтобы открыть палитру команд, вы можете использовать Command **+ Shift + P** на Mac или Control **+ Shift + P** в Windows. В командной палитре найдите формат, затем выберите** Форматировать документ**.

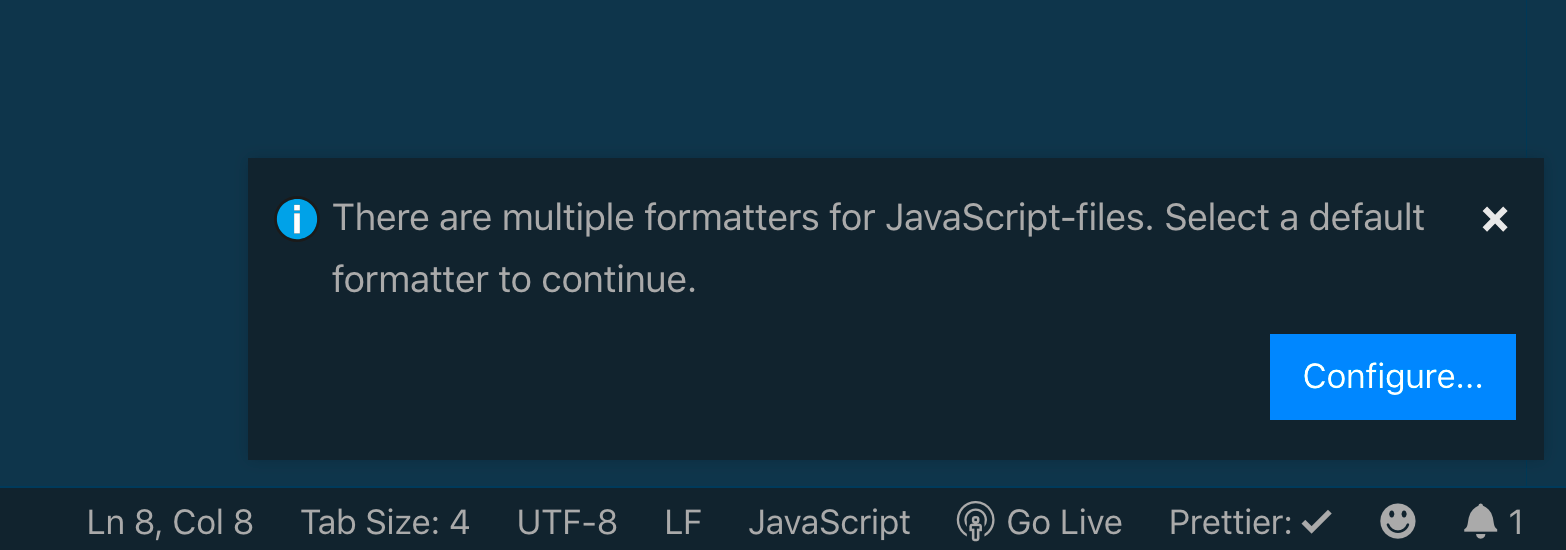
Затем вам может быть предложено выбрать форматтер для использования. Для этого нажмите кнопку Настроить.
Затем выберите Prettier**- Code Formatter**.
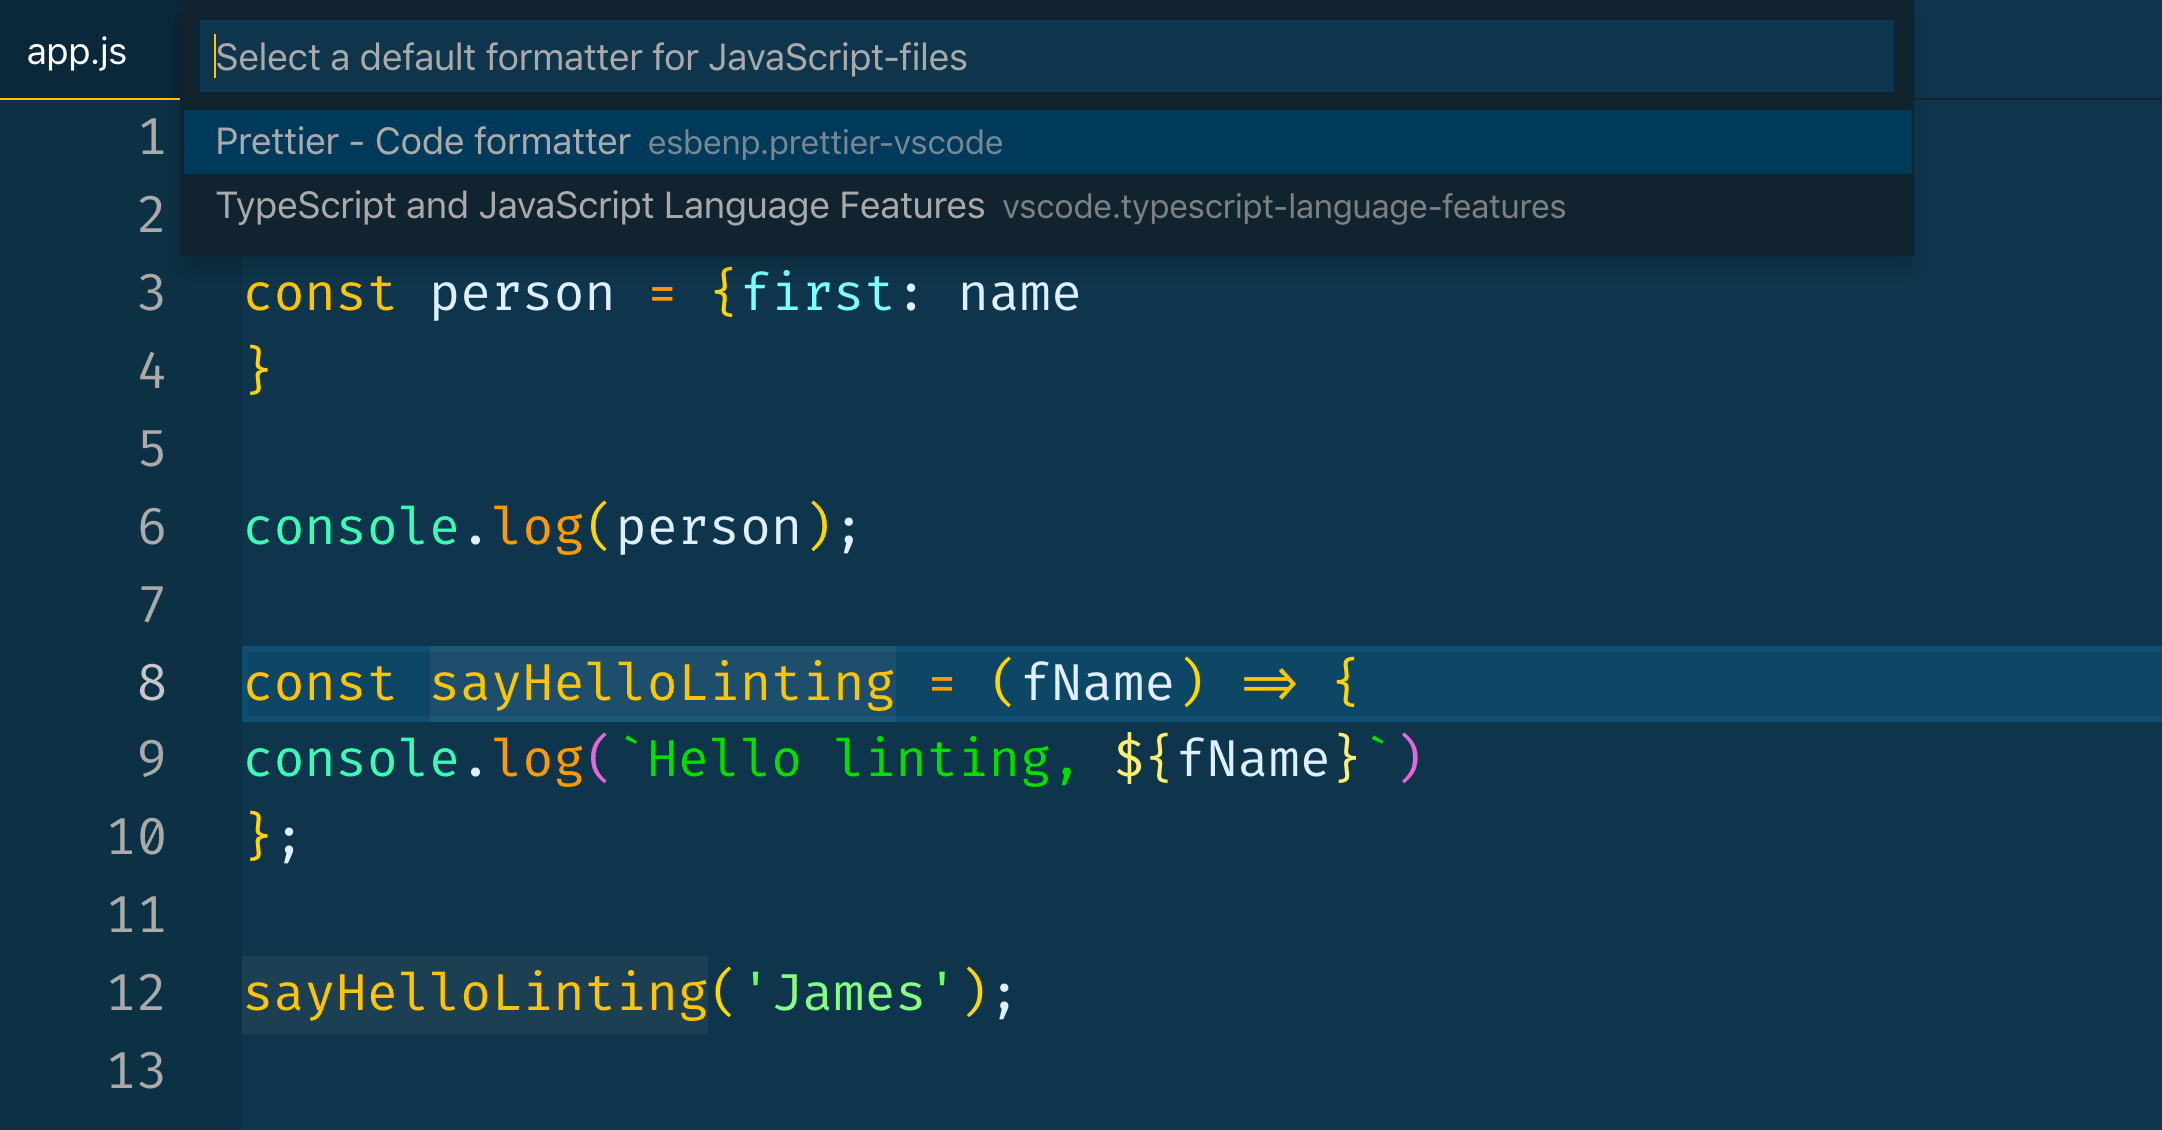
И ВУАЛЯ! Ваш код хорош и отформатирован. Обратите внимание на все модные улучшения!
- интервал
- перенос строки
- последовательные котировки
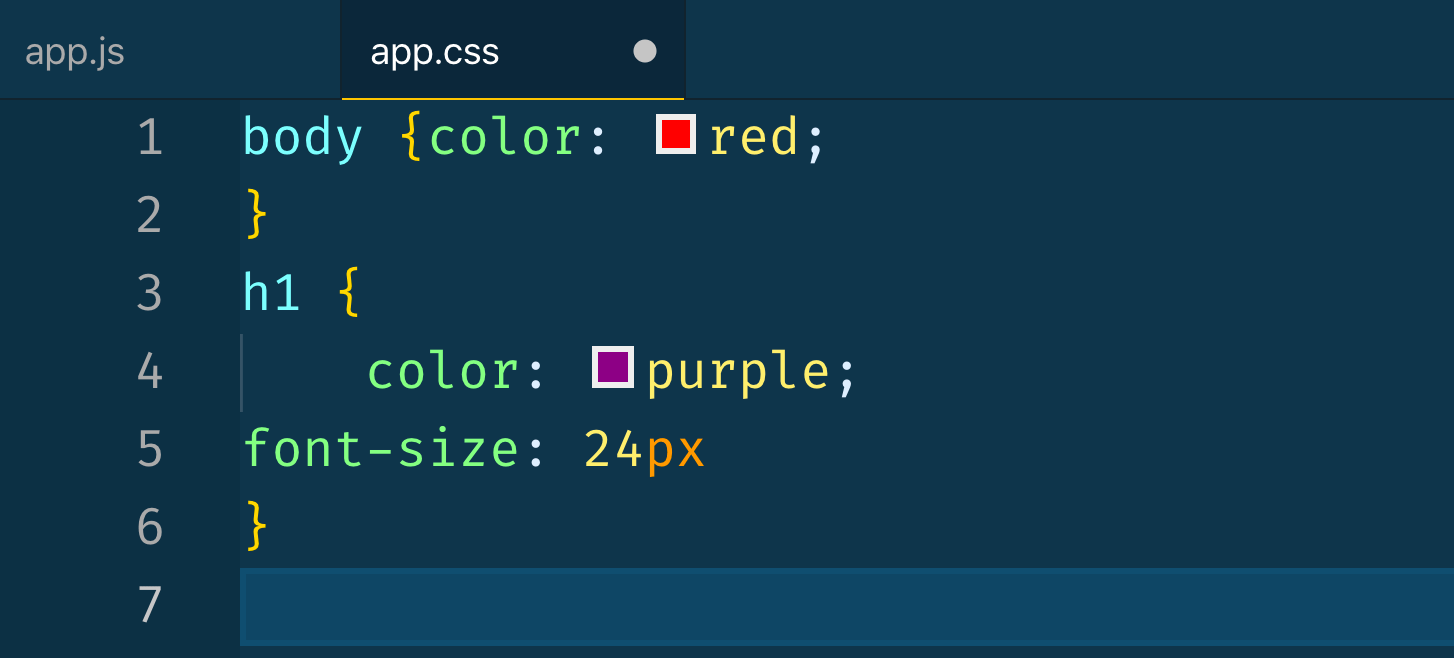
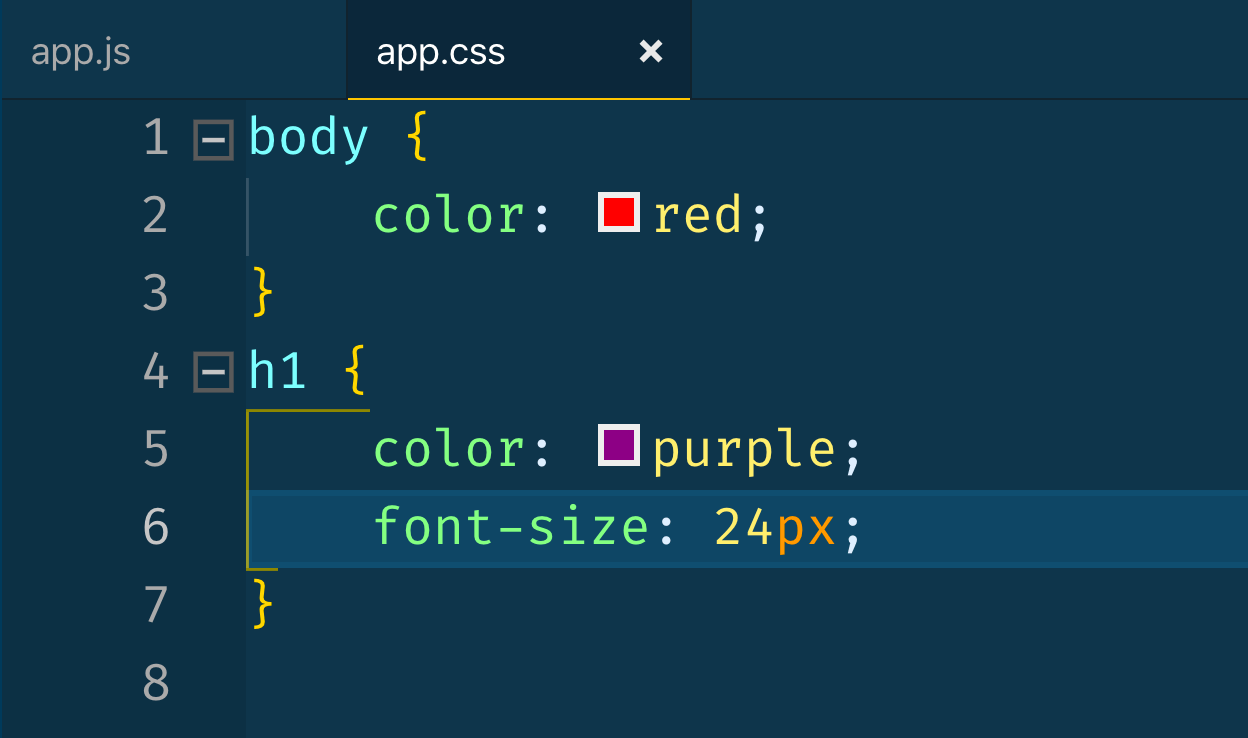
Prettier также работает с файлами CSS!
Удивительно то, что это также работает с файлами CSS!
Автоматически форматировать при сохранении
До сих пор нам приходилось вручную запускать команду для форматирования нашего кода. Вместо этого вы можете выбрать настройку в VS Code для автоматического форматирования файлов при сохранении. Это имеет некоторые большие преимущества.
Вам больше никогда не придется вручную форматировать код!
- убедитесь, что код отформатирован, не задумываясь об этом
- код не проверяется, если он не отформатирован
Чтобы изменить этот параметр, используйте** Command + , на Mac или Control + , ** в Windows, чтобы открыть меню настроек. Затем найдите Редактор: форматировать при сохранении и убедитесь, что он установлен.

С этой настройкой вы можете заняться своими делами, написав небрежно отформатированный код, как и все мы, зная, что обо всем этом позаботятся автоматически!
Более красивая конфигурация в настройках VS Code
Prettier многое делает за вас по умолчанию, но вы также можете изменить настройки. Вот несколько наиболее распространенных настроек.
- Одинарная кавычка — выбор между одинарными и двойными кавычками
- Полу — выберите, включать ли точку с запятой в конце строк.
- Ширина вкладки — сколько пробелов вы хотите, чтобы вкладка состояла
Откройте меню настроек, как указано выше. Затем найдите Prettier. Это вызовет все настройки, которые вы можете изменить прямо в вашем редакторе.
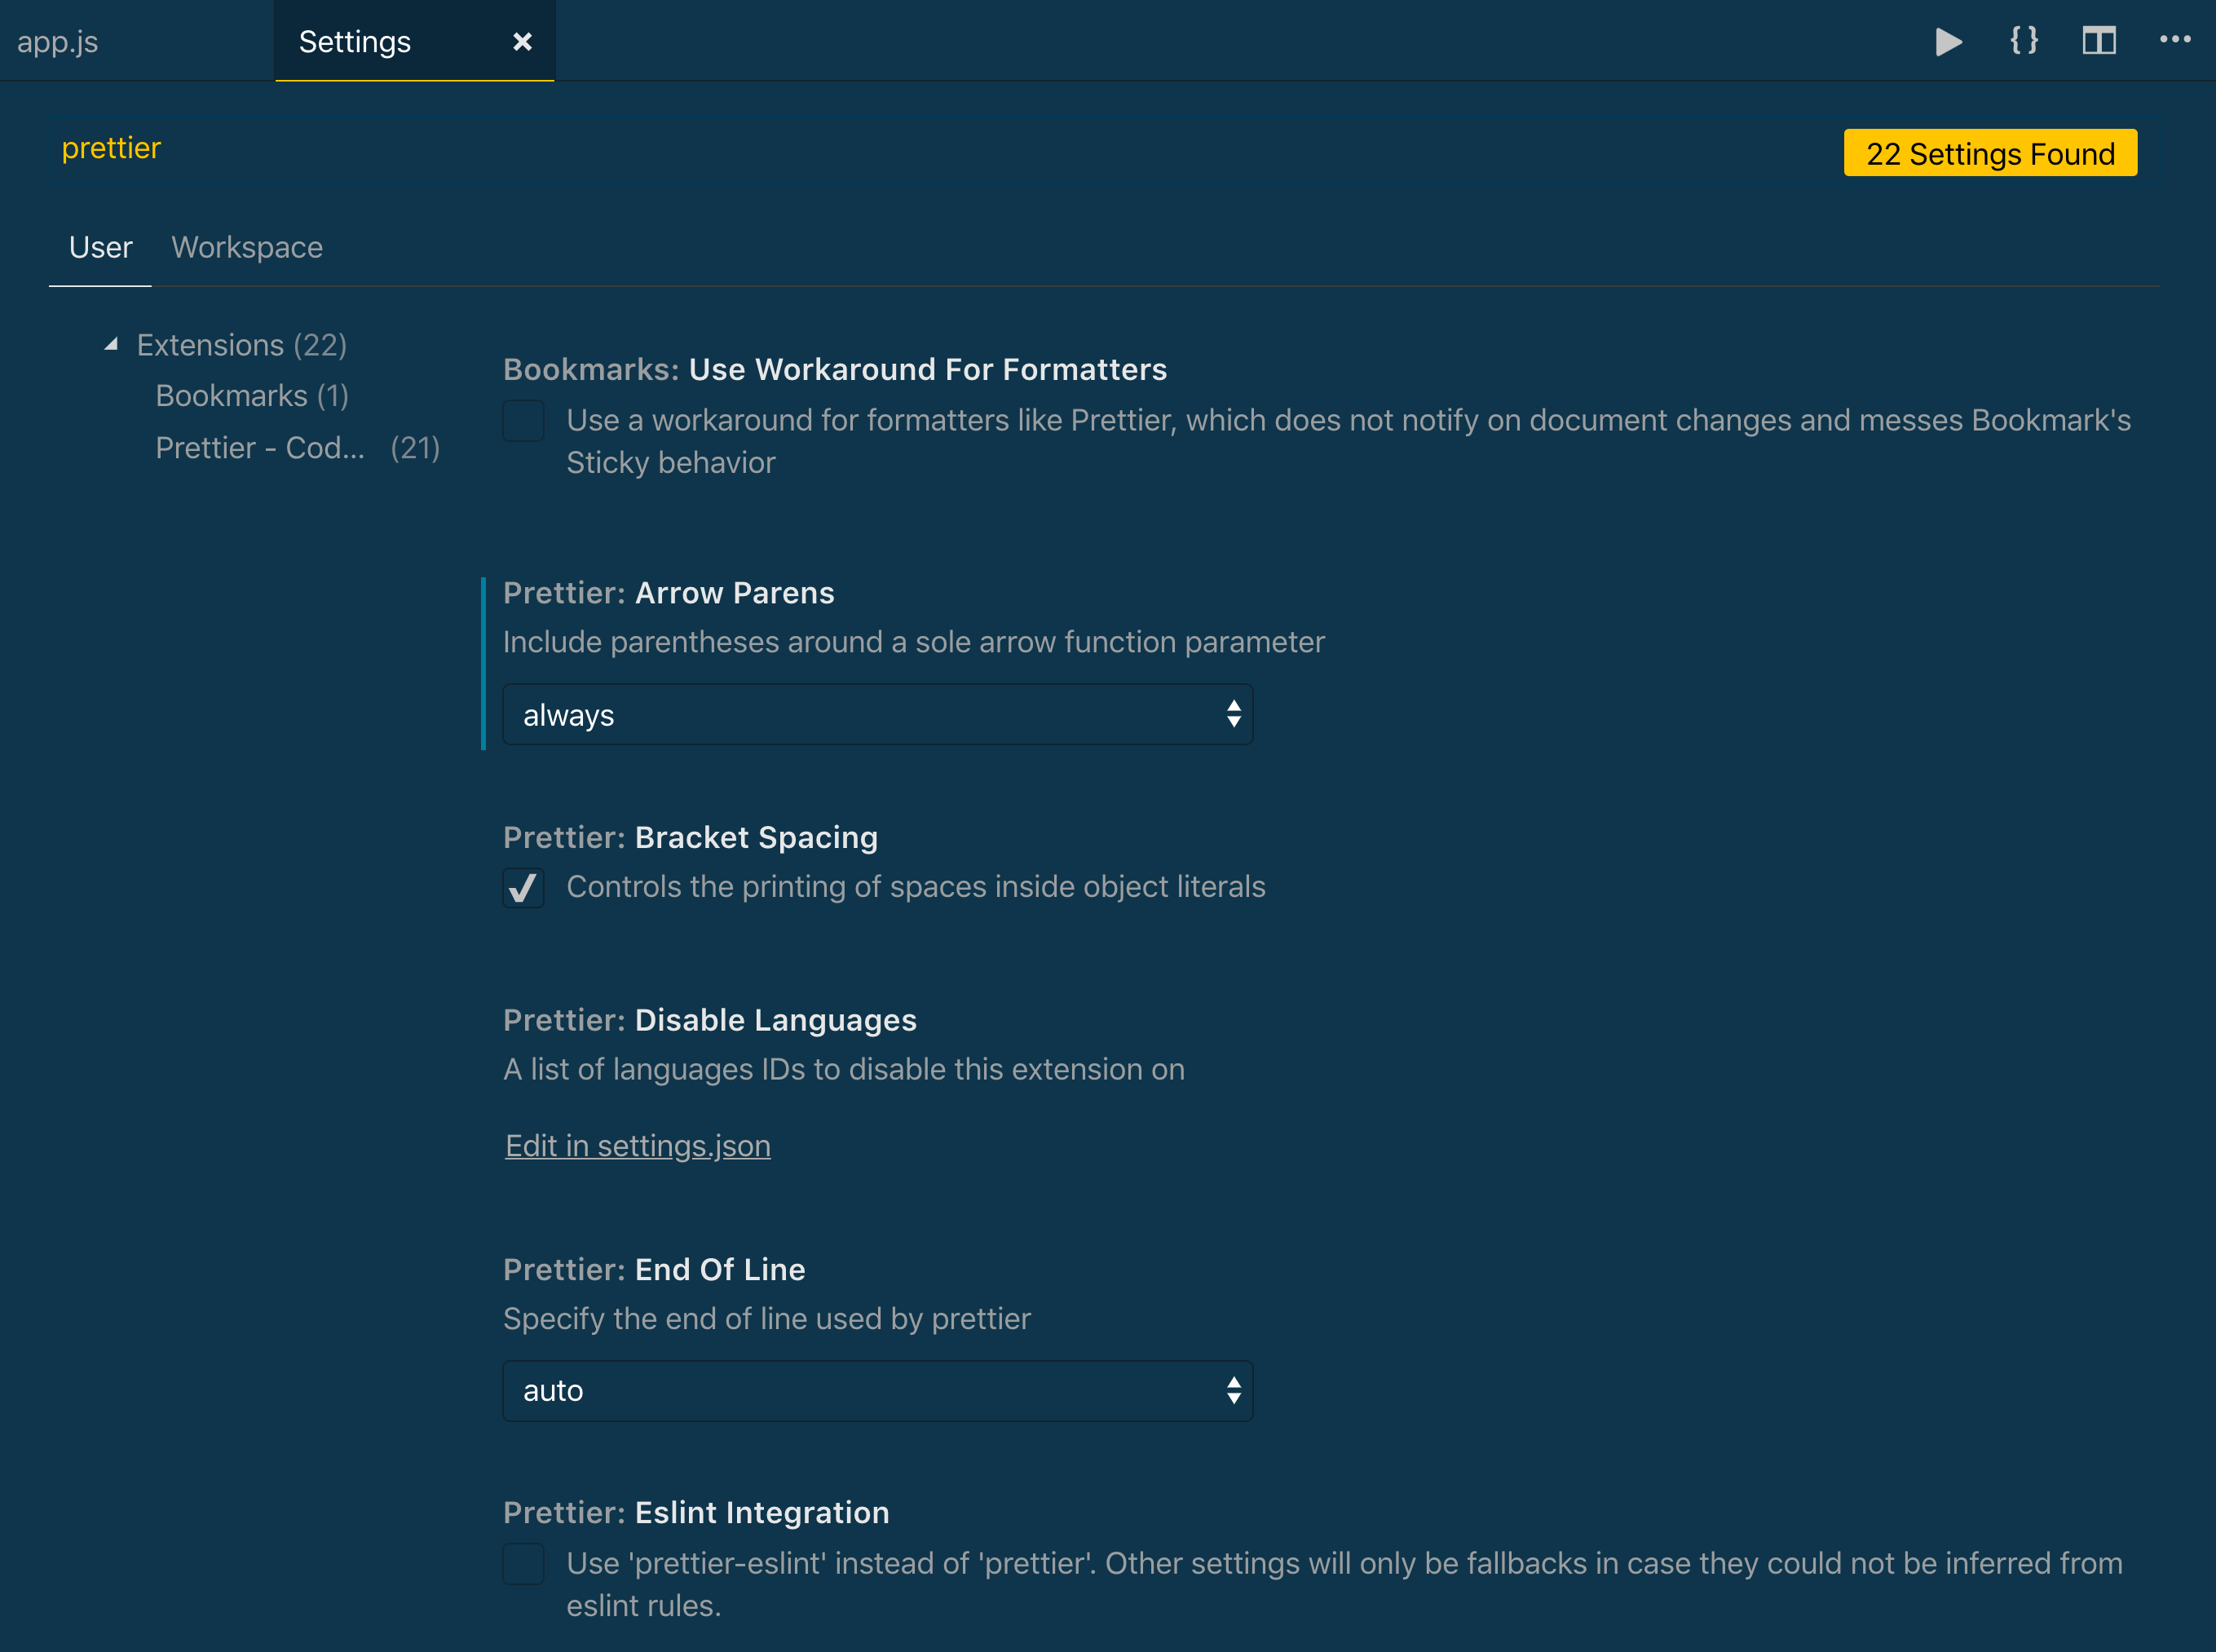
Например, что, если я изменю ширину вкладки на 10.
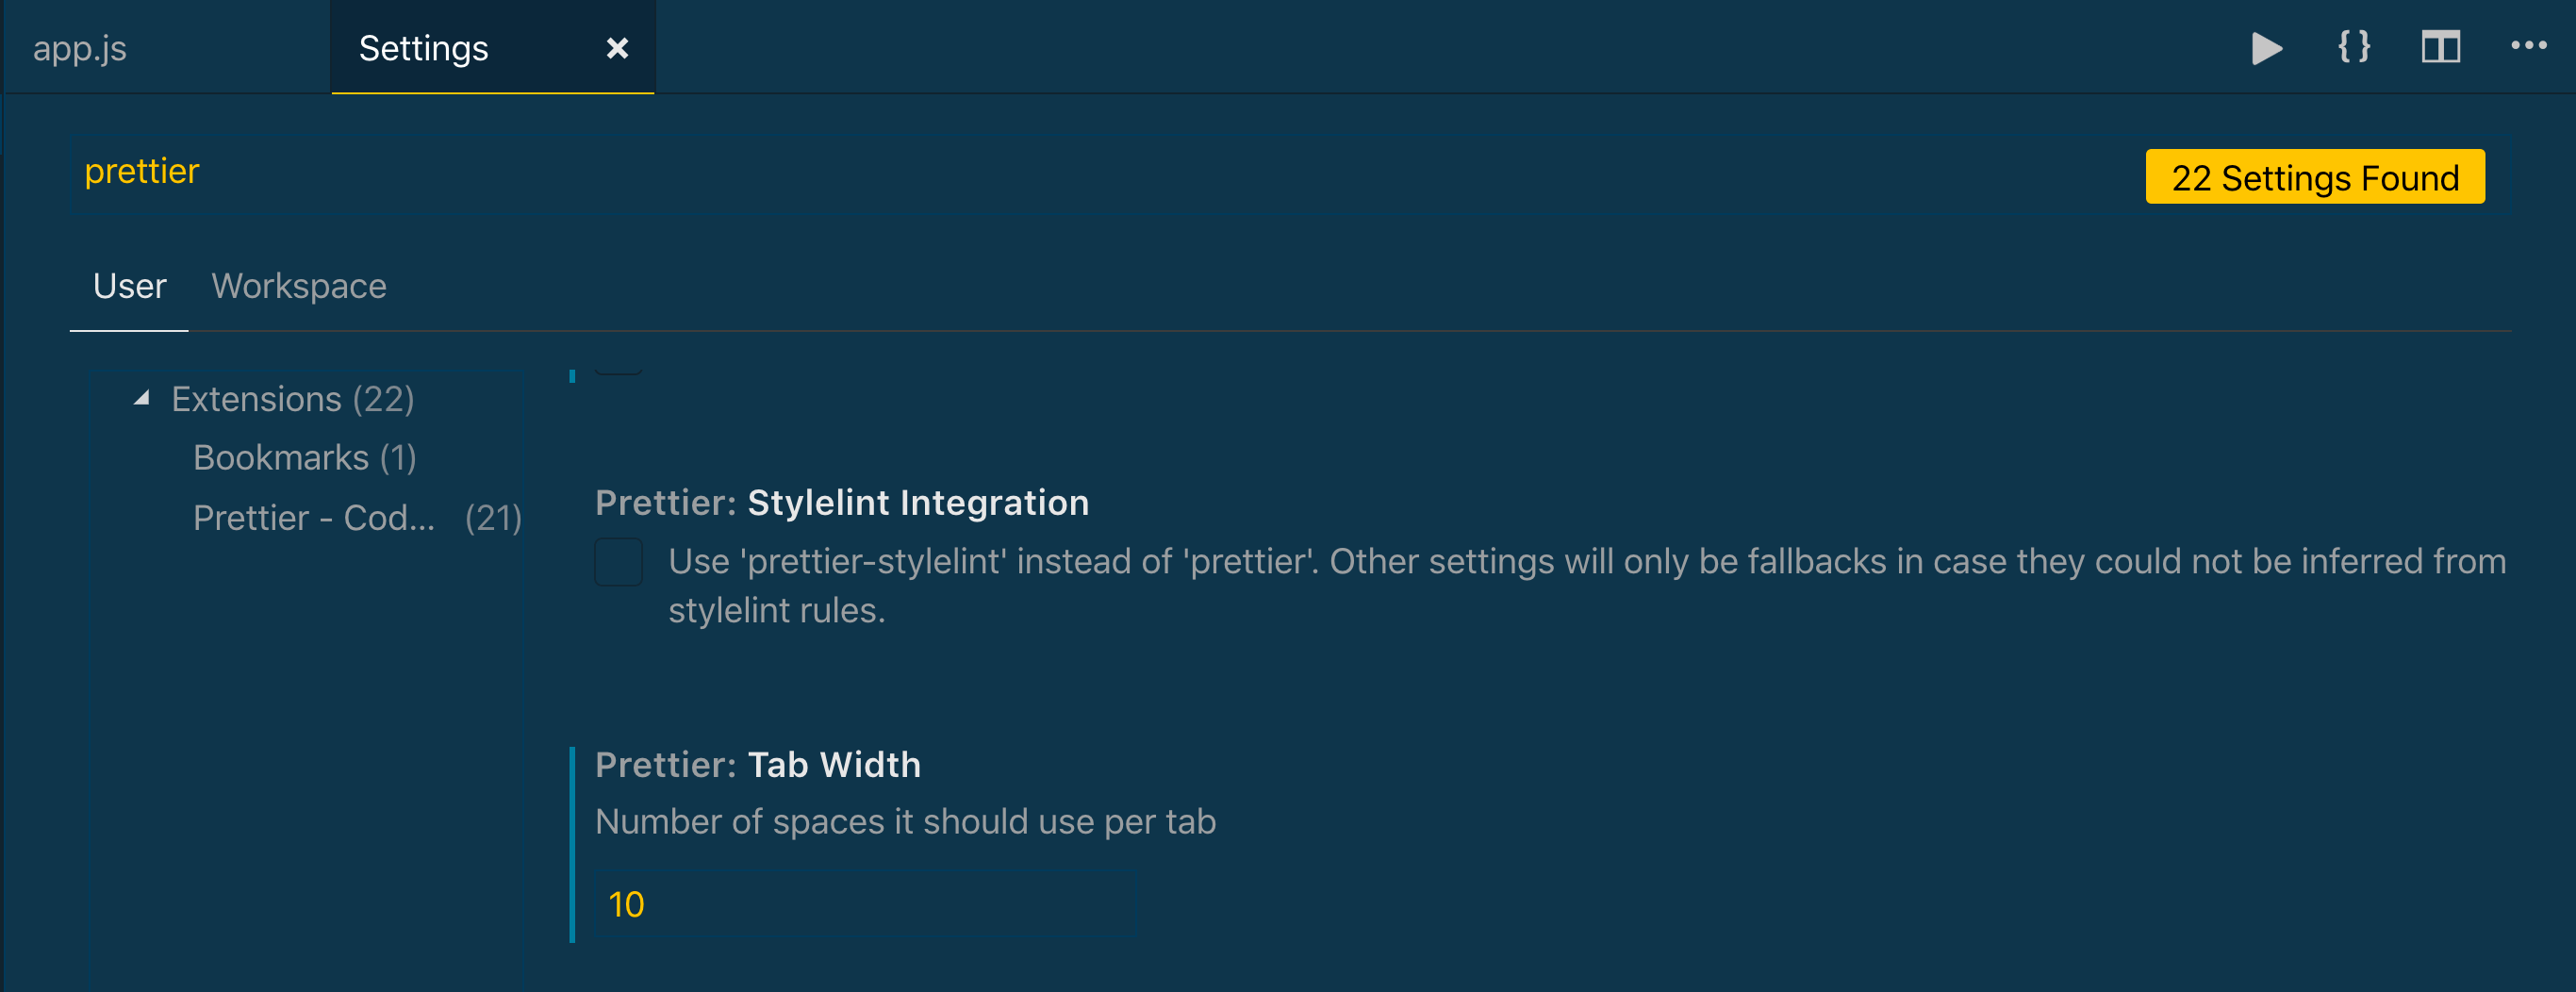
Тогда сохраните мой файл.

Довольно легко, правда?! Вероятно, это не та ширина вкладки, которую вы хотите сохранить, но все зависит от вас!
Создание более красивого файла конфигурации
Недостатком использования встроенного меню настроек в VS Code является то, что оно не обеспечивает согласованности между разработчиками в вашей команде. Если вы измените настройки в своем VS Code, у кого-то другого может быть совершенно другой набор настроек.
Создайте единообразное форматирование в своей команде, создав файл конфигурации!
Чтобы решить эту проблему, вы можете создать файл конфигурации Prettier. Он должен называться .prettierrc.(ext) с одним из следующих расширений.
- yml, yaml или json
- js
- томл
- включить в файл package.json (альтернативный вариант)
Обычно я предпочитаю файлы конфигурации JSON, в которых вы можете определить пары ключ **-› значение** для своих настроек. VS Code даже предоставит вам некоторый IntelliSense по мере ввода.
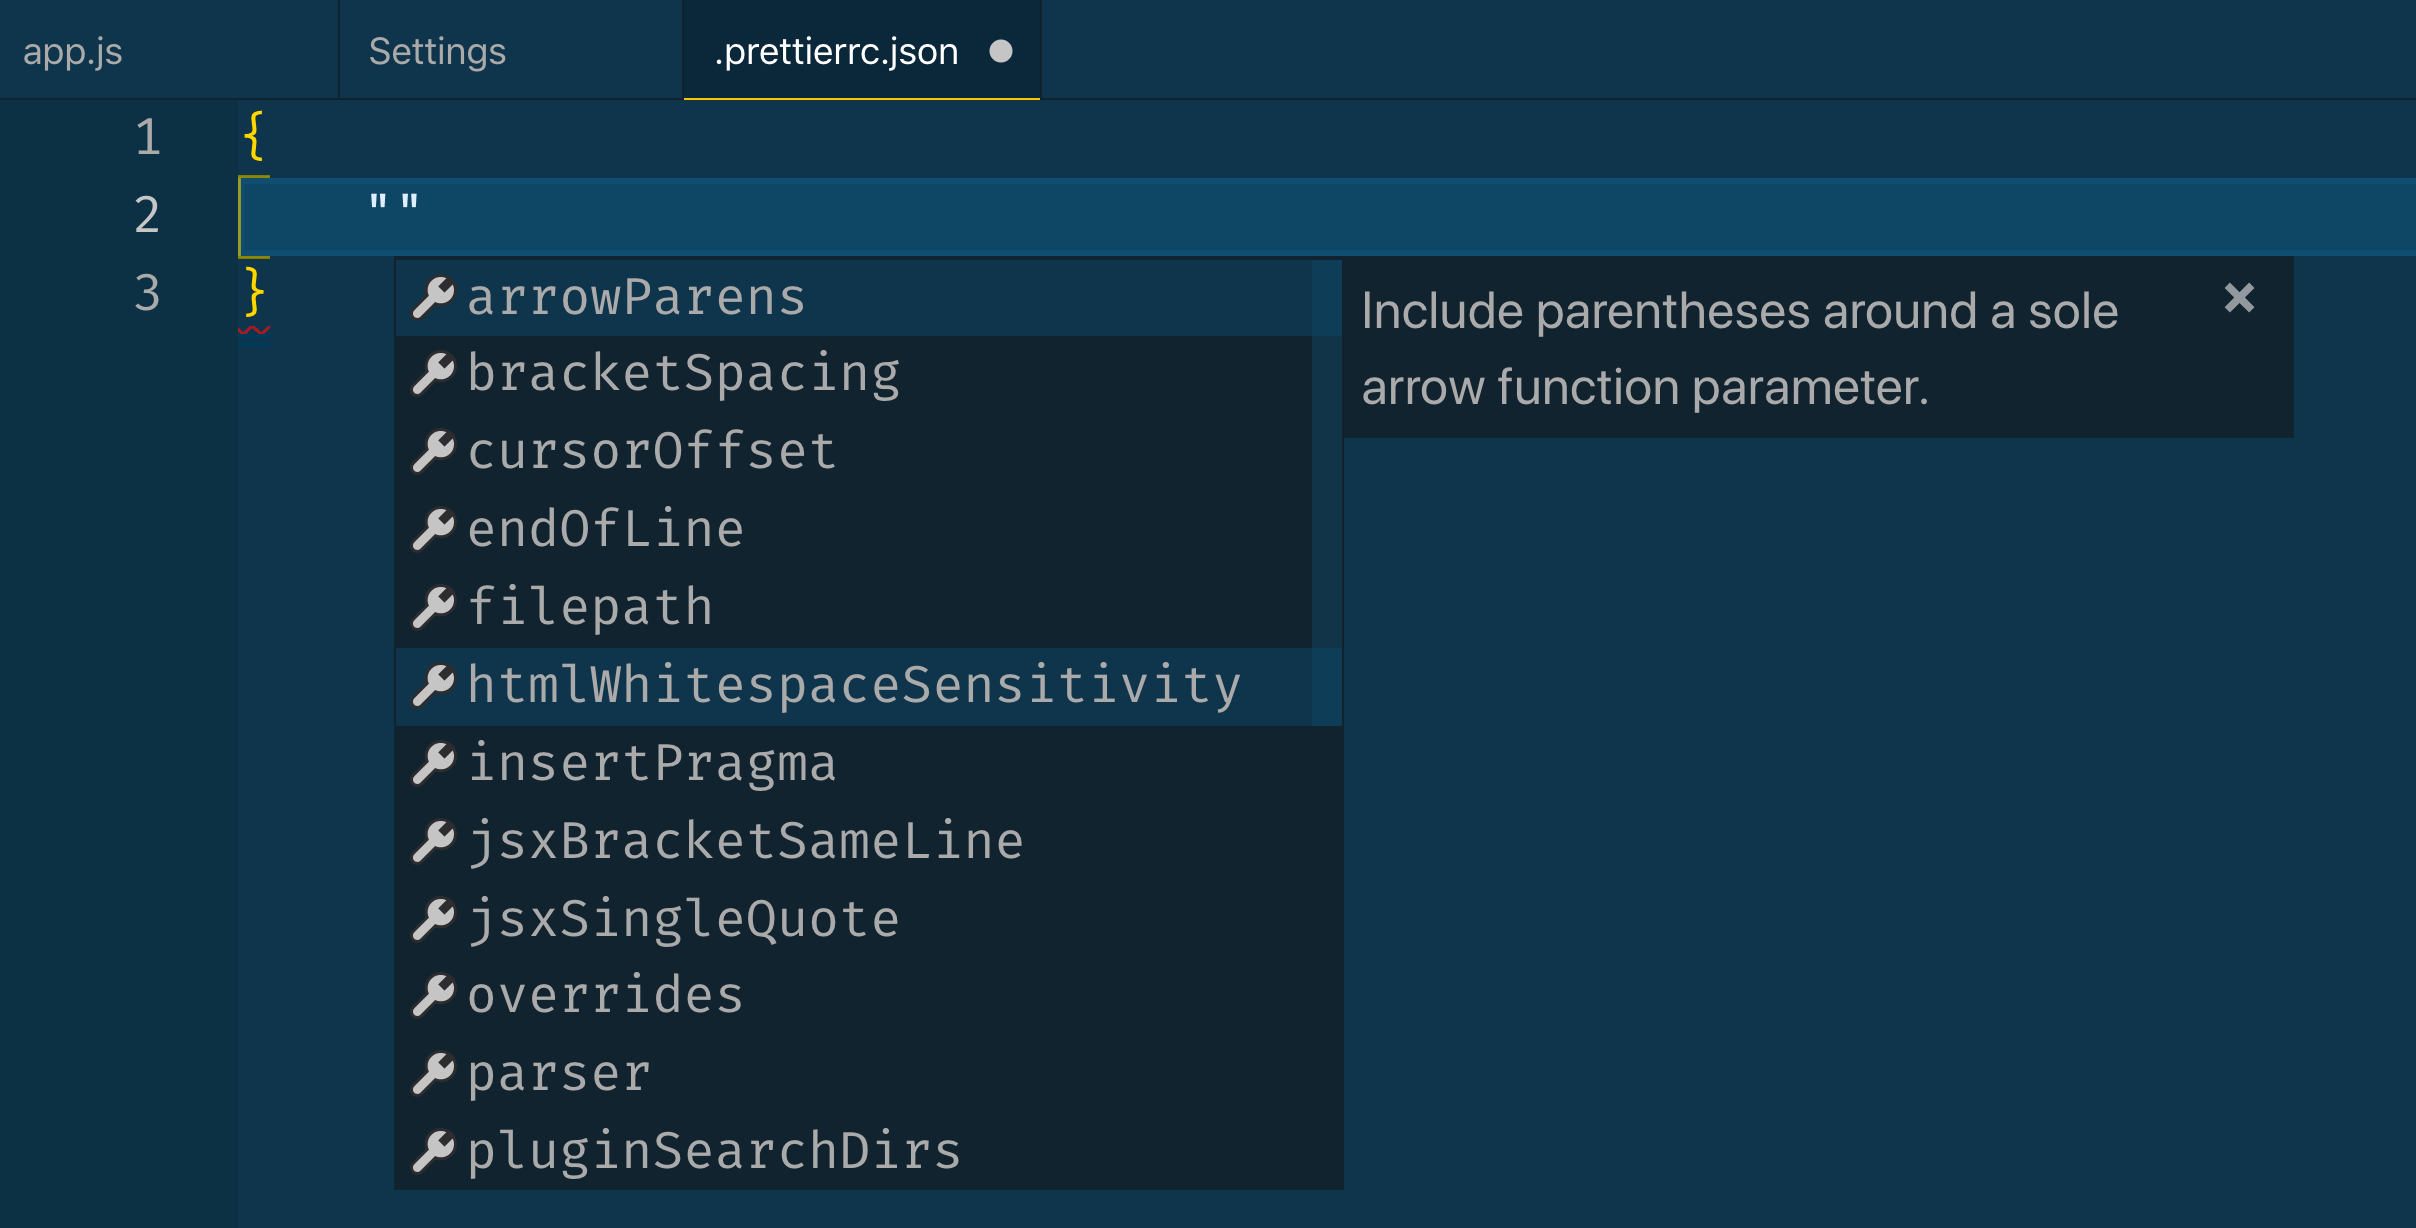
Вот пример простого файла конфигурации.

Для получения более подробной информации о файлах конфигурации ознакомьтесь с Prettier Docs. Создав один из них и зафиксировав его в своем проекте, вы можете убедиться, что все члены команды соблюдают одни и те же правила форматирования.
Вывод
Не тратьте время на ручное форматирование кода. Это требует времени, которое лучше потратить на написание большего количества кода. Воспользуйтесь потрясающими современными инструментами и настройте Prettier!
How to Auto-Format in VS Code to Save Time and Effort [2023]

Visual Studio Code, popularly known as VS Code, is one of the most used code editors. VS Code has built-in support for Node.js, JavaScript, and TypeScript. However, you can use various extensions to make it accessible to most of the other languages and runtimes.
Microsoft is the company that developed this free and open-source code editor.
VS Code is popular due to these features;
- Intellisense: VS Code provides code autocompletion and syntax highlighting.
- Cross-platform: You can use this code editor on Linux, Windows, and macOS operating systems.
- Availability of various extensions: The availability of various extensions can also transform VS Code into an integrated development environment (IDE).
- Multi-language support: You can use this tool with almost all programming languages through VS Code extensions.
- Integrated terminal: The built-in terminal in VS Code allow developers to execute Git commands right from the code editor. You can thus commit, push and pull changes from this editor.
Auto-Formatting in VS Code

Prerequisites
- VS Code: This code editor is free to download. If you don’t have it installed on your machine, download it from the official site, depending on your operating system.
- Select the language to use: You must decide on the language to use as there are different formatters for different languages.
- A formatter: VS Code uses extensions for code formatting. We will use Prettier in this article. However, you are free to use any formatter that suits the language you are using.
Auto-formatting is a feature that automatically formats blocks/ lines of code or a file on the code editor based on specific rules and guidelines. This feature is based on a configuration file specifying formatting rules on indentation, line breaks, and spacing.
When the auto-format feature is enabled, all these rules will be applied to all the files in your codebase as you write it.
However, you can also disable autoformatting for a specific code block if you want it to stand out from the rest. To achieve this, you can wrap the piece of code in a comment block that specifies the rules to be applied.
Benefits of Auto-formatting codes in VS code
- Saves time: Writing code and formatting can be time-consuming. Auto-formatting saves you time, and you can thus focus more on the writing process and syntax.
- Consistency: Even though the source code does not appear on the client side, there should be some consistency. Auto-formatting comes in handy, especially for large projects with multiple contributors.
- Observes best practices: The auto-formatting feature comes in handy in enforcing consistent indentation, spacing, and naming conventions.
- For easy code reading: Well-formatted code is easy to follow during code reviews. New developers who join your organization will easily understand well-formatted code.
How to enable Auto Format in VS code and customize it
Follow these steps to enable auto-formatting:
- You need a formatter in the form of an extension to enable the auto-formatting in VS Code. You can find the extensions icon on the menu of your VS Code.
- Install Prettier extension. Search for prettier; you will find a lot of extensions sharing the same name. Click on the first one, developer by Prettier, and click “install.”
Once Prettier is installed on your VS Code, you can enable the auto-format feature.
We use a simple HTML file of a login page to demonstrate how to enable auto-formatting.
We will use this code:
Even though the above code is functional, it is hard to read and follow along as it is not indented as expected. We will use Prettier to auto-format the code.
Follow these steps.
- Create an HTML (index.html) file and add the above code
- Locate Settings on the bottom left part of your VS Code
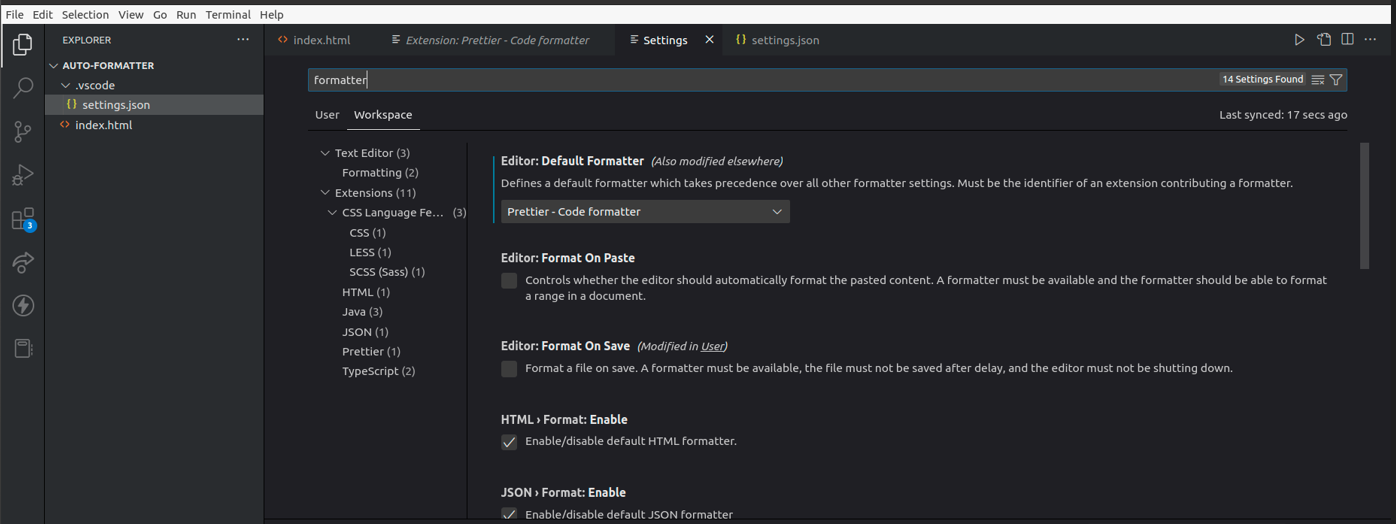
3. Type Formatter in the search bar and select Prettier on the Editor:Default Formatter tab.
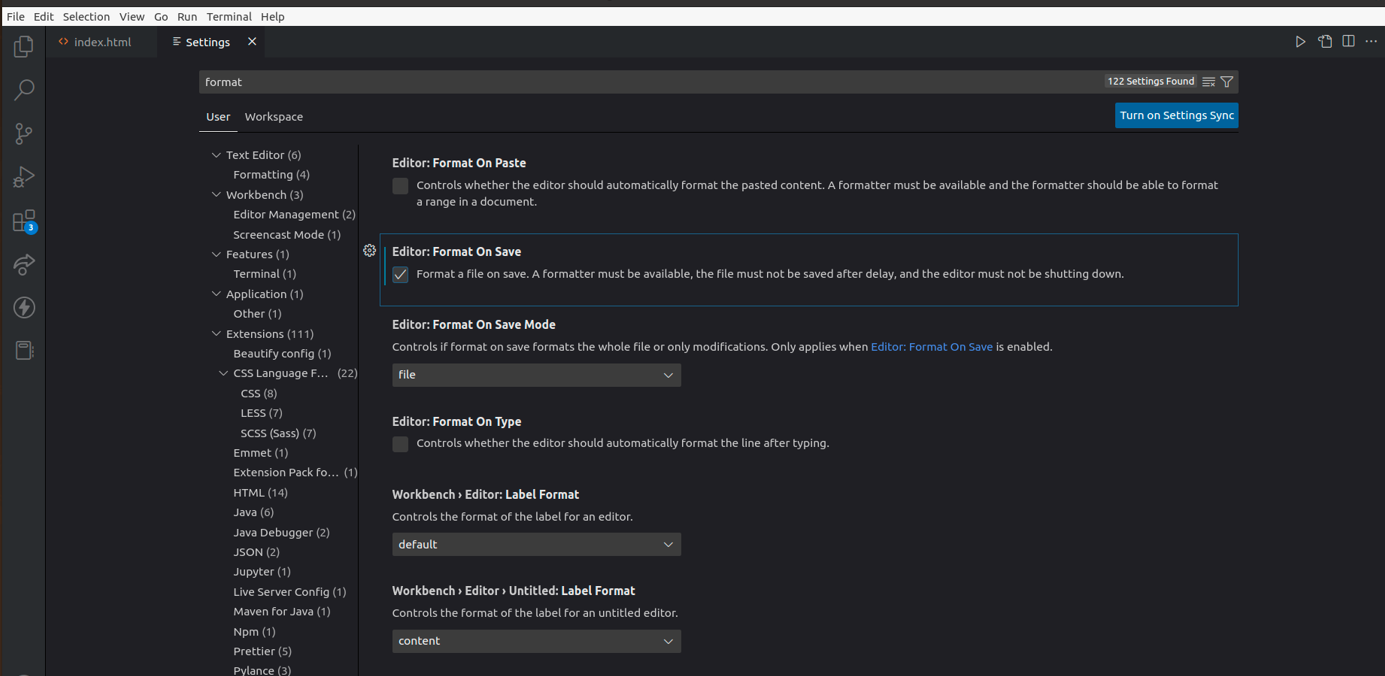
4. Locate Editor: Format on Save and tick the box.
5. Save your HTML file, select the inputs on your HTML document, right-click, and select Format Document .
6. Check if your document has been formatted. This extension will automatically format all the other code you write on your VS Code.
6. Adjust Prettier Configuration settings: Prettier is set up to perform many things by default. However, you can still customize it to suit your needs. Go to Settings on your VS Code, search for Prettier , and adjust the settings to your liking.
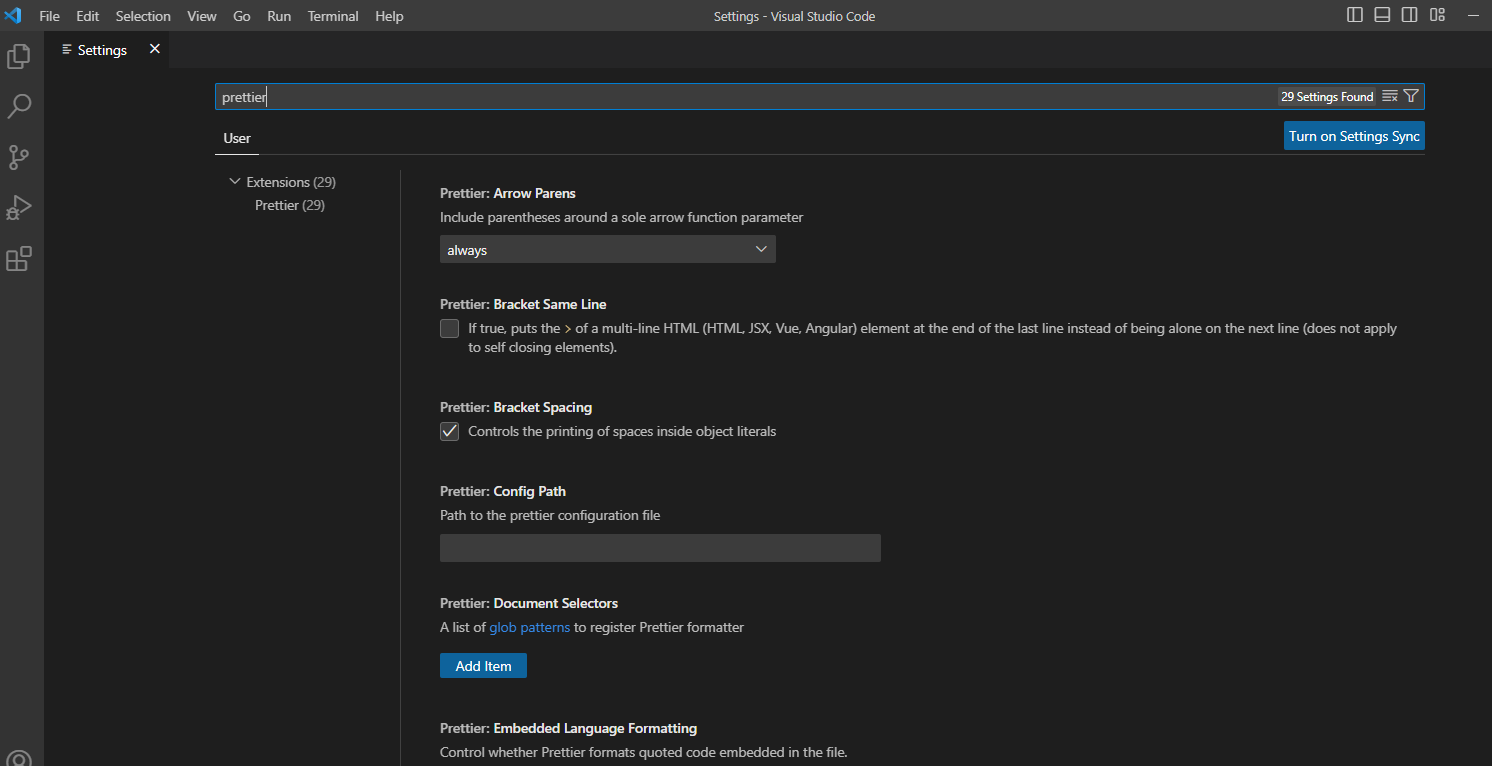
7. Create a Prettier Configuration file: The settings you have configured on your machine could differ from others if you work as a team. A Prettier configuration file will ensure you have a consistent code style for your project. Create a .prettierrc file with .json extension to configure your project settings. We can add this code to the JSON file for demonstration purposes;
The above code block specifies four things, trailing commas, the tab width, the use of semicolons, and whether to use single or double quotes. In this case;
- A trailing comma will only be added when the code is transpiled to es5.
- Tab width, the number of spaces for each tab, is set to 4.
- Semi indicates whether you should add semi-colons or not to your code at the end of statements. We have set it as false, which means semi-colons will not be added.
- You can either use single or double quotes in your code. We have specified that we should use single quotes for this project.
You can check out Prettier docs to understand how to create consistent configuration settings.
Best Practices for Auto Format in VS Code
Use the right formatted
Even though we have used Prettier in this article for demonstration purposes, it does not mean it applies to all languages. There exist hundreds of formatting extensions for VS Code, and it is up to you to determine what suits your needs. For instance, formatters such as Prettier and Beautify suit HTML and CSS. On the other hand, you can use Black or Python extensions to format your Python code.
Use a consistent code style
As you have seen, you can customize the settings of the formatter. If you are working as a team, ensure you have the same configurations to create a consistent code style. The best approach is creating a .prettierrc.extension file to include all the configurations for your project.
Use linters
You can use linters to check for style violations, syntax errors, and programming mistakes in your code. Combining linters with auto-formating will save you a lot of time and effort in making your code readable and debugging.
Utilize keyboard shortcuts
VS Code has hundreds of shortcuts to save you time in formatting. You can even customize these commands to something memorable.
Check your code before committing
Even though linting and auto-formatting may fix some issues on your code; you still have to review your code before you enter the commit command.
Code Formatting Shortcuts
VS Code is a multiplatform code editor that you can use on Windows, Mac, and Linux-based systems such as Ubuntu. You can use the following shortcuts to either format the entire document or specific-highlighted areas of your code;
Windows
- Shift + Alt + F combination formats the entire document.
- Ctrl + K, Ctrl + F combination formats a section of your code that you have selected. For instance, a div.
macOS
- Shift + Option + F combination formats the whole document.
- Ctrl + K, Ctrl + F combination formats a section of your code that you have selected. For instance, a div.
Ubuntu
- Ctrl + Shift + I combination formats the entire document.
- Ctrl + K, Ctrl + F combination formats a section of your code that you have selected. For instance, a div.
However, note that some of these shortcuts may fail if you have customized your VS Code with various shortcuts.
You can check your VS Code shortcuts using these steps;
- Open VS Code and click on the File item in the top left corner.
- Scroll to Preferences
- Click on Keyboard Shortcuts to view all the shortcuts you can use.
Conclusion
Auto-formatting can save you a lot of time when you enable it. The choice of an extension will differ depending on the language that you are using. You can install multiple code formatters depending on the programming languages you use for your projects.
Always check the documentation of the formatter you choose for your code. This will ensure you understand the languages it supports and how to make the best of it.
Check out our article on the best VS Code extensions developers should use.