How To Crop the Window Capture in OBS

By Lee Stanton Lee Stanton Author Lee Stanton is a versatile writer with a concentration on the software landscape, covering both mobile and desktop applications as well as online technologies. Read more • Edited by Beth Beth Editor Read more July 23, 2021
OBS Studio has multiple options that allow you to capture both the entire display and individual parts. For example, with Window Capture, you can screencast a single open window instead of the full screen. However, the feature doesn’t work well with tutorials and similar content since it’s limited to only capturing the main window and nothing else. That means if you want to record any pop-ups, menus, and additional panels, you’ll have to crop a standard Display Capture to fit the screen.

Luckily, there are several ways to do that with OBS Studio. Apart from a slew of built-in editing features, there are also third-party solutions for platforms like Windows. Window Capture works great with games in windowed mode, allowing you to record multiple monitors at once. However, there are some limitations to keep in mind. Mainly, you won’t be able to capture any pop-ups or menus.
If you want to make a comprehensive tutorial, your best bet is to crop a standard Display Capture to only show the open window. Then, you can pretty much cut out all the unnecessary parts, like toolbars, desktop icons, background, and more. There are three different ways you can do this: by applying the Crop/Pad filter, using the Edit/Transform feature, or with ALT Cropping.
How To Crop a Window in OBS on Mac or Windows PC
For starters, you can use the Edit/Transform feature to crop a window capture. Here’s what you should do:
- Scroll down to the “Sources” box and right-click on the Display Capture. From the pop-up menu, choose “Transform,” then click “Edit Transform.”

- A new window will appear. If necessary, press “Reset” to reconfigure the source settings.

- Enter the appropriate width in the field marked “Crop: Right.” The height field is labeled “Crop: Bottom.” If you don’t know how many pixels you need to crop, try subtracting the window size from the overall aspect ratio of the monitor.

- Once you’re done, close the window and go to “Settings.” Open the “Video” tab and set the Canvas Resolution to match that of the window capture.

Finally, you can crop a window capture the old-fashioned way: by using your cursor. There’s a nifty command that allows you to manually resize the screen capture in OBS. It’s probably the easiest method out of the four. Just follow these steps, and you’ll be able to crop or stretch the capture to your liking:
- Select the Display Capture source with your cursor. You’ll see a red outline with several small red dots placed at the top, bottom, sides, and corners.

- Hover your cursor over the red dots and press “Command.” For Windows and Linux Users, hold the “ALT” key.
- Left-click and move the red circles while holding the key to crop the Display Capture.

Linux
While Window Capture has its restrictions, it can still be pretty useful. For example, if you only want to screencast a single window without any additional content, the feature works like a charm. Also, it’ll save you the trouble of editing and resizing the capture, which is super convenient. So, here’s how to do a Window Capture in OBS Studio:
- Open OBS and scroll down to the “Sources” box.

- At the bottom-left corner of the box, click on the little “+” button. Next, select “Screen Capture” from the pop-up menu.

- A small pop-up window will appear. Name the source by typing in the corresponding field and click “OK.”

- Next to “Window” on the left-hand side, click on the tiny downward arrow to access a drop-down list. Select the window you want to capture from the list.

- Make sure you check the box that says “Capture Cursor.” Otherwise, your cursor will remain hidden during the recording. Hit “OK.”

- If the window capture isn’t the same size as the screen, go to “Settings.”

- Open the “Video” tab and set the Base Resolution to a lower value. It’ll shrink the canvas to fit the window capture.

Keep in mind that the window you want to capture can’t be minimized. You can have it run in the background, but it has to be open to appear on the list of available windows.
If you’re not happy with screencasting a single window, you can use Display Capture as the source and crop out the extra parts. OBS Studio has a built-in cropping filter that’s super easy to use. Here’s how to do it:
- Launch the OBS Studio app and scroll down to the “Sources” box. Right-click to access a pop-up options menu. Select “Add” and then click “Display Capture” as the source.

- A small pop-up box will appear. Name the source and then click “OK.”

- If you have more than one monitor, you have to select it manually. Scroll to the “Display” bar and click on the tiny downward arrow on the right-hand side. Choose the monitor from the drop-down list.
- Make sure to check the “Capture Cursor” box before you press “OK.”

- Scroll back down to the “Sources” box and right-click to access a pop-up menu. From the list of options, choose “Filters.”

- A pop-up window will appear. Click on the tiny “+” button in the lower-left corner. Find the “Crop/Pad” filter on the list and click on it. Hit “OK” to apply.

- Change the cropping parameters according to your needs. Then, in the corresponding fields, enter the pixel values you want for the capture. Once you’re done, click “Close.”

After you’re done, the window and OBS canvas should be perfectly aligned.
Additional FAQs
Why is OBS window capture not working?
OBS Studio is just as susceptible to occasional bugs and glitches, much like other streaming software. However, the most common issue Windows users face is the Black Screen error. There are several reasons why this can happen. To name just a few:
• You kept your computer on for too long.
• The OBS Studio version you have is incompatible.
• You haven’t downloaded the latest framework.
• OBS Studio doesn’t have administrative privileges.
• There’s an issue with the graphics card.
As you can see, you can fix most of these issues just by reinstalling the app or power cycling your computer. However, if the bug is caused by interfering graphics, it requires some more advanced troubleshooting measures.
Incompatible GPU and interfering graphics are usually the main cause of the Black Screen error, especially with laptops with multiple graphics adapters. Luckily, there’s a way to fix it. Just make sure to follow these steps carefully since you’ll be tampering with the processor:
1. Right-click anywhere on display to access a drop-down menu.
2. From the list of options, choose “NVIDIA Control Panel.”
3. Click on the “3D Settings” menu to expand it.
4. From the drop-down list, select “Manage 3D Settings,” then click “Program Settings.”
5. Find OBS Studio in the list of programs and select it.
6. Next, set the preferred GPU to “Integrated Graphics.” Finally, select “Apply” to save the changes.
7. Once you’re done, reopen OBS and check if the error’s been fixed.
If Something Else Crops Up
OBS Studio is wildly popular precisely due to its streamlined interface. While particular features like Window Capture have their limits, they’re still pretty useful. Furthermore, there’s a wide range of alternative solutions you can turn to instead.
You can use several cropping tools and features to resize a Display Capture to fit a single window. There’s also a third-party utility app that’s available for free. The catch is – it only works with Windows PCs. And even if a bug or glitch crops up, simply reinstalling the app or switching to a different GPU will do the trick.
Do you use OBS Studio for streaming and screen recording? What’s your preferred cropping method? Comment below and tell us if there’s another way to crop a window capture in OBS.
How to Crop Your Webcam in OBS Studio
Does your webcam exceed the dimensions of your custom overlay? Do you need to crop out an area of your room? Sometimes you need to crop a webcam image in OBS Studio (Open Broadcaster Software) before you can stream on Twitch, Facebook Gaming, or YouTube Gaming.
OBS Studio has been the leading program for streaming and capturing video since its launch. Many people have used it to showcase their game play with the hope of making it big on Twitch. Fortunately, you can use this simple method to quickly change the size of your video source with your mouse.
This article will cover how you can crop or resize the source selected in OBS Studio so that you can create the content you wish.
How to Crop Webcam Source on OBS Studio
Whether you use a green screen or show your background, it is important to know how to crop your webcam in OBS. This way, you can ensure that your viewers are able to see the rest of your screen. This will allow you to show off more of the game you are playing.
To crop your webcam image in OSB Studio, use the inbuilt crop feature by following these steps:
If you haven’t already, add your webcam to OBS Studio by adding it as a source. Once you can see it in your preview window, you’ll be able to move on to the next step.

Press the “alt” key on your keyboard as you adjust the camera, then right-click on one of the red lines and drag the edges you want to crop. (The lines will turn green as you crop them).
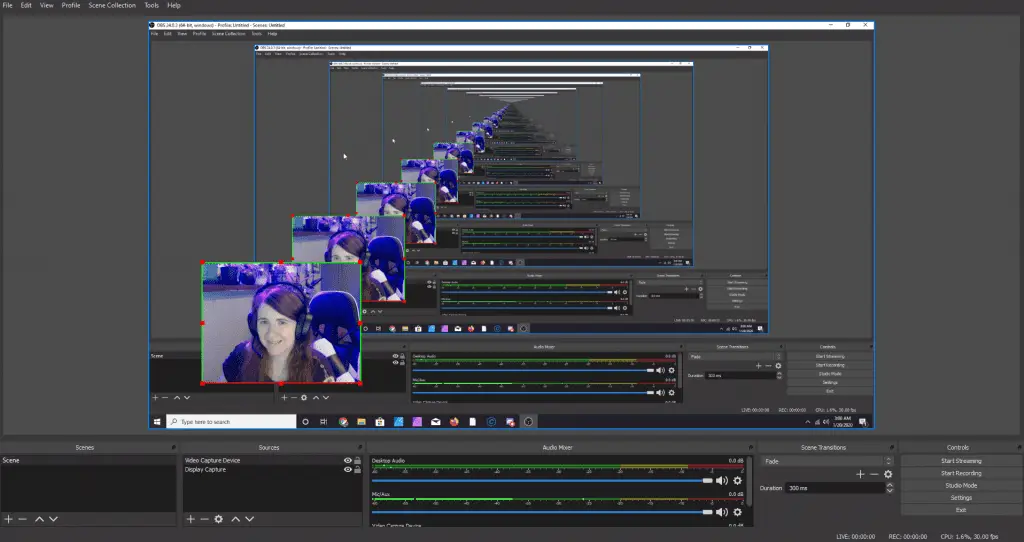
Press “alt” again to remove the cropping, then adjust the camera until the lines turn red again.
Stop cropping when you are satisfied. While you can keep to the aspect ratio if you choose, you can make your webcam in OBS Studio any rectangular shape you wish when using the edit transform option.
Decorate Your Cropped Screen
Once you have cropped your webcam, you can remove the background with a chroma key screen or decorate it with stickers or overlays. Try to keep things on brand, matching your colors, themes, and the style of content you produce.
Other Tutorials for OBS
If you want to learn more about OBS or find new tips on how you can improve the look of your screen, check out the following guides:
How to Crop Webcam in OBS Studio
Allowing the other viewer to see the other part of your environment on the cam can be awkward, especially when you are using it on a formal note, hence the need for cropping. Using OBS to crop webcam allows you to cut out irrelevant parts of the webcam video. To get a perfect cut, you have to crop from the side of the webcam screen. This is the easiest way to remove irrelevant background from the picture, and there is no better and convenient way to do this than the OBS tool.
There might be many other tools you can use to crop your webcam, but there is this convenience that comes with doing it in OBS. An OBS tool allows you to use the necessary features to get the perfect angles you want in a webcam, and it does that with ease. Other webcam cropping tools might give you conventional cropping, but using the OBS gives your cropping a more professional outlook. Below we have listed some step-by-step processes on how to crop webcam in OBS, which we encourage you to follow.
How to Crop Webcam via Alt
How to Crop WebCam Via Transform Cropping
OBS Studio: Webcam How to Resize, Crop, Flip, Move, Fullscreen & Transform
Using OBS as your preferred webcam tool can help you achieve a lot in that regard, but the complex nature of this tool cannot be easily overruled, thus, the need for a viable alternative. As much as many OBS webcam recording tool exists, one cannot but notice the uniqueness of FlexClip: an online tool designed to record webcam with so much simplicity. With a tool like FlexClip, you will be able to enjoy an HD recording feature, no download required. It also comes with easy editing options like trim and PIP options. Give it a try!
The Bottom Line
You have to understand that even easy as cropping a webcam is; you still need a good tool to help you out. Although the simplicity in using FlexClip to crop webcam is unique, the clarity is definitely an innovation to recon with. And same goes for the webcam recording feature: the clarity is simply awesome. So, go ahead, leverage the power of simplicity, convenience and clarity, try FlexClip.

Professional in video editing and video marketing, we’d love to give some constructive tips and tricks to help our users make fantastic videos.
Как обрезать видеокамеру в OBS под свои размеры

Ваша камера во время трансляции захватывает что-то лишнее на заднем фоне? Вы хотели бы обрезать это изображение, но обрезать именно во время трансляции, на ходу? То есть сделать так, чтобы выводилась только часть изображения веб-камеры?
Сегодня я расскажу, как обрезать видеокамеру в OBS под свои размеры, какие нужно сделать настройки вебки для стрима. Мы с вами сделаем рамку для вебки в OBS.
Я подготовил новый видео-урок, в котором показываю как именно нужно действовать, без лишних премудростей, как делают другие.
Подробная инструкция
Как обрезать камеру в obs
Для этого нам понадобится использовать такую функцию, как фильтры для видеоизображения камеры. В «Фильтрах» будем использовать «Маску изображения / Смешивание«.
Не забудьте выбрать пункт «Альфа-маска (канал прозрачности)«.
Ну и кроме этого нам ещё понадобится изображение, которое нужно заранее подготовить — картинку, у которой будет прозрачный фон и, например, прямоугольник, который занимает положение посередине картинки, оставляя слева и справа прозрачные поля.
Эту картинку также указываем в настройках фильтра, и всё готово!
Теперь видеокамера в OBS будет показывать только часть изображения, которое показывалось ранее.
Еще одну подробную видео-инструкцию можно посмотреть в этом видео:
Приглашение на воркшоп
 Воркшоп «Конкурентная разведка»
✅ Отстройка от конкурентов и золотой фонд самых прибыльных идей в вашей теме. Я научу вас узнавать скрытую информацию о ваших конкурентах.
Воркшоп «Промопост»
✅ Вы создадите настолько привлекательный промопост, что люди безоговорочно будут готовы записаться к вам. Потому что вы пишете именно про то, что они хотят.
Воркшоп «Магнит для клиентов»
✅ Бесплатный продукт – ваша авторская мини-книга, которая вдохновляет ваших клиентов сразу же подписаться на вас. Вы легко привлекаете подписчиков и клиентов, без необходимости их уговаривать и долго объяснять.
Воркшоп «Воронка вовлечения»
✅ Вы создадите простую эффективную мини-воронку, чтобы клиенты сами стекались к вам толпами. Вы захватываете внимание клиентов, люди приходят к вам, они доверяют вам настолько, что готовы покупать.