# pip: PyPI Package Manager
pip is the most widely-used package manager for the Python Package Index, installed by default with recent versions of Python.
# Install Packages
To install the latest version of a package named SomePackage :
To install a specific version of a package:
To specify a minimum version to install for a package:
If commands shows permission denied error on Linux/Unix then use sudo with the commands
# Install from requirements files
Each line of the requirements file indicates something to be installed, and like arguments to pip install, Details on the format of the files are here: Requirements File Format
After install the package you can check it using freeze command:
# To list all packages installed using pip
To list installed packages:
To list outdated packages, and show the latest version available:
# Upgrade Packages
will upgrade package SomePackage and all its dependencies. Also, pip automatically removes older version of the package before upgrade.
To upgrade pip itself, do
on Windows machines.
# Uninstall Packages
To uninstall a package:
# Updating all outdated packages on Linux
pip doesn’t current contain a flag to allow a user to update all outdated packages in one shot. However, this can be accomplished by piping commands together in a Linux environment:
This command takes all packages in the local virtualenv and checks if they are outdated. From that list, it gets the package name and then pipes that to a pip install -U command. At the end of this process, all local packages should be updated.
# Updating all outdated packages on Windows
pip doesn’t current contain a flag to allow a user to update all outdated packages in one shot. However, this can be accomplished by piping commands together in a Windows environment:
This command takes all packages in the local virtualenv and checks if they are outdated. From that list, it gets the package name and then pipes that to a pip install -U command. At the end of this process, all local packages should be updated.
# Create a requirements.txt file of all packages on the system
pip assists in creating requirements.txt files by providing the freeze
This will save a list of all packages and their version installed on the system to a file named requirements.txt in the current folder.
# Create a requirements.txt file of packages only in the current virtualenv
pip assists in creating requirements.txt files by providing the freeze
(opens new window) parameter will only output a list of packages and versions that are installed locally to a virtualenv. Global packages will not be listed.
# Using a certain Python version with pip
If you have both Python 3 and Python 2 installed, you can specify which version of Python you would like pip to use. This is useful when packages only support Python 2 or 3 or when you wish to test with both.
If you want to install packages for Python 2, run either:
If you would like to install packages for Python 3, do:
You can also invoke installation of a package to a specific python installation with:
On OS-X/Linux/Unix platforms it is important to be aware of the distinction between the system version of python, (which upgrading make render your system inoperable), and the user version(s) of python. You may, depending on which you are trying to upgrade, need to prefix these commands with sudo and input a password.
Likewise on Windows some python installations, especially those that are a part of another package, can end up installed in system directories — those you will have to upgrade from a command window running in Admin mode — if you find that it looks like you need to do this it is a very good idea to check which python installation you are trying to upgrade with a command such as python -c"import sys;print(sys.path);" or py -3.5 -c"import sys;print(sys.path);" you can also check which pip you are trying to run with pip —version
On Windows, if you have both python 2 and python 3 installed, and on your path and your python 3 is greater than 3.4 then you will probably also have the python launcher py on your system path. You can then do tricks like:
If you are running & maintaining multiple versions of python I would strongly recommend reading up about the python virtualenv or venv virtual enviroments
(opens new window) which allow you to isolate both the version of python and which packages are present.
# Installing packages not yet on pip as wheels
Many, pure python, packages are not yet available on the Python Package Index as wheels but still install fine. However, some packages on Windows give the dreaded vcvarsall.bat not found error.
The problem is that the package that you are trying to install contains a C or C++ extension and is not currently available as a pre-built wheel from the python package index, pypi, and on windows you do not have the tool chain needed to build such items.
The simplest answer is to go to Christoph Gohlke’s
(opens new window) excellent site and locate the appropriate version of the libraries that you need. By appropriate in the package name a -cp**NN******- has to match your version of python, i.e. if you are using windows 32 bit python even on win64 the name must include -win32- and if using the 64 bit python it must include -win_amd64- and then the python version must match, i.e. for Python 34 the filename must include -cp34-, etc. this is basically the magic that pip does for you on the pypi site.
Alternatively, you need to get the appropriate windows development kit for the version of python that you are using, the headers for any library that the package you are trying to build interfaces to, possibly the python headers for the version of python, etc.
Python 2.7 used Visual Studio 2008, Python 3.3 and 3.4 used Visual Studio 2010, and Python 3.5+ uses Visual Studio 2015.
Then you may need to locate the header files, at the matching revision for any libraries that your desired package links to and download those to an appropriate locations.
Finally you can let pip do your build — of course if the package has dependencies that you don’t yet have you may also need to find the header files for them as well.
Alternatives: It is also worth looking out, both on pypi or Christop’s site, for any slightly earlier version of the package that you are looking for that is either pure python or pre-built for your platform and python version and possibly using those, if found, until your package does become available. Likewise if you are using the very latest version of python you may find that it takes the package maintainers a little time to catch up so for projects that really need a specific package you may have to use a slightly older python for the moment. You can also check the packages source site to see if there is a forked version that is available pre-built or as pure python and searching for alternative packages that provide the functionality that you require but are available — one example that springs to mind is the Pillow
(opens new window) , actively maintained, drop in replacement for PIL
(opens new window) currently not updated in 6 years and not available for python 3.
Afterword, I would encourage anybody who is having this problem to go to the bug tracker for the package and add to, or raise if there isn’t one already, a ticket politely requesting that the package maintainers provide a wheel on pypi for your specific combination of platform and python, if this is done then normally things will get better with time, some package maintainers don’t realise that they have missed a given combination that people may be using.
# Note on Installing Pre-Releases
Pip follows the rules of Semantic Versioning
(opens new window) and by default prefers released packages over pre-releases. So if a given package has been released as V0.98 and there is also a release candidate V1.0-rc1 the default behaviour of pip install will be to install V0.98 — if you wish to install the release candidate, you are advised to test in a virtual environment first, you can enable do so with —pip install —pre package-name or —pip install —pre —upgrade package-name. In many cases pre-releases or release candidates may not have wheels built for all platform & version combinations so you are more likely to encounter the issues above.
# Note on Installing Development Versions
You can also use pip to install development versions of packages from github and other locations, since such code is in flux it is very unlikely to have wheels built for it, so any impure packages will require the presence of the build tools, and they may be broken at any time so the user is strongly encouraged to only install such packages in a virtual environment.
Three options exist for such installations:
- Download compressed snapshot, most online version control systems have the option to download a compressed snapshot of the code. This can be downloaded manually and then installed with pip install path/to/downloaded/file note that for most compression formats pip will handle unpacking to a cache area, etc.
- Let pip handle the download & install for you with: pip install URL/of/package/repository — you may also need to use the —trusted-host , —client-cert and/or —proxy flags for this to work correctly, especially in a corporate environment. e.g:
Note the git+ prefix to the URL.
- Clone the repository using git , mercurial or other acceptable tool, preferably a DVCS tool, and use pip install path/to/cloned/repo — this will both process any requires.text file and perform the build and setup steps, you can manually change directory to your cloned repository and run pip install -r requires.txt and then python setup.py install to get the same effect. The big advantages of this approach is that while the initial clone operation may take longer than the snapshot download you can update to the latest with, in the case of git: git pull origin master and if the current version contains errors you can use pip uninstall package-name then use git checkout commands to move back through the repository history to earlier version(s) and re-try.
# Syntax
-
install
- Click the lower-left Start button to open the Start Menu
- input cmd in the empty box and tap Command Prompt in the results
- Перейдите на официальный сайт Python по ссылке выше или через поиск в любом удобном браузере.
- Выберите раздел «Downloads».
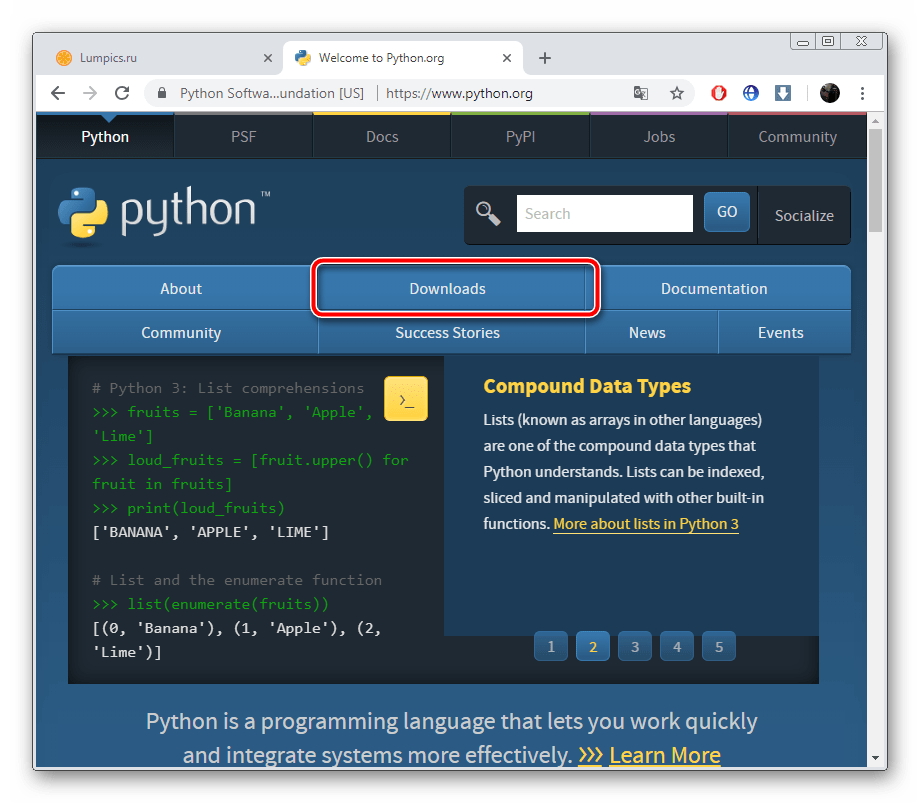
- Кликните на соответствующую кнопку для перехода к списку доступных файлов.
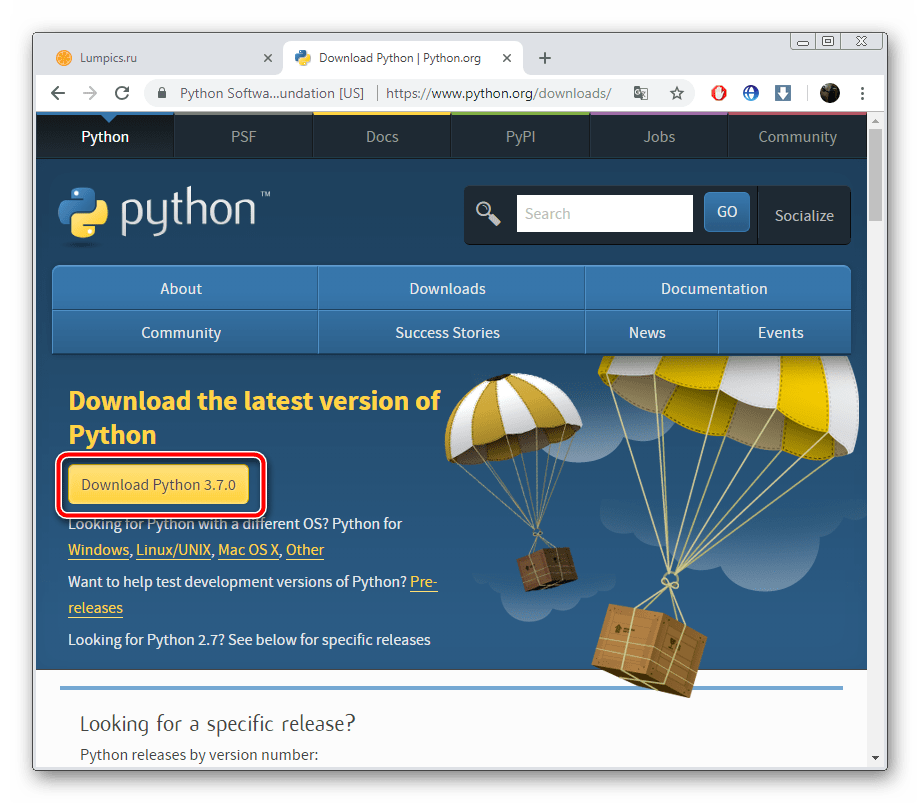
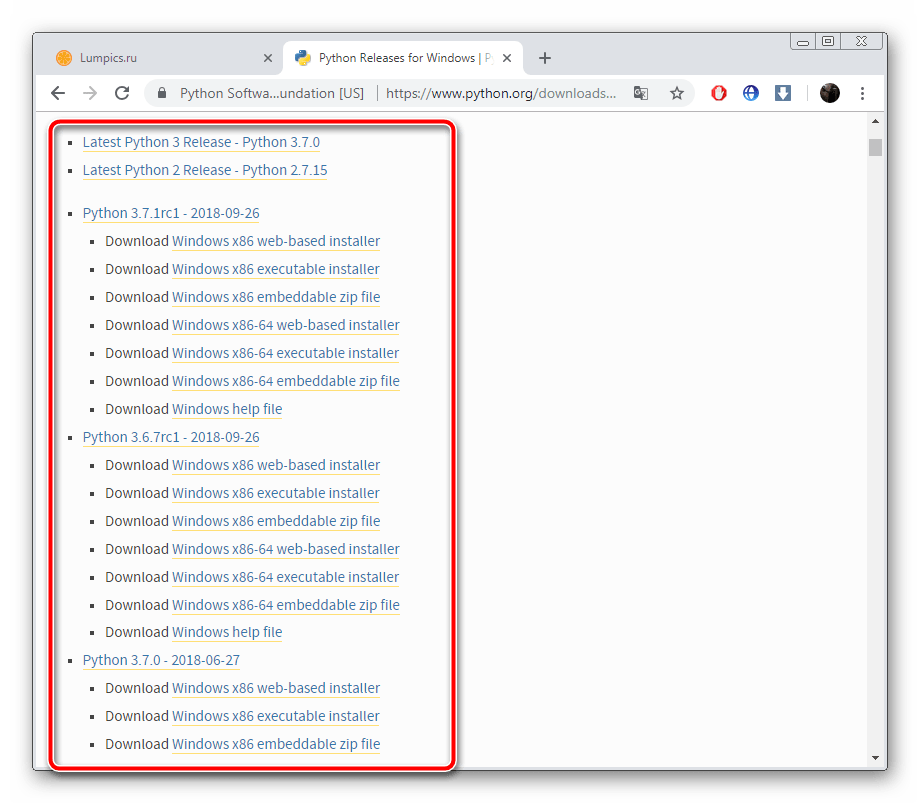
- В списке укажите сборку и ревизию, которую хотите поставить на свой компьютер.
- Перейдите на официальную страницу скачивания PIP по ссылке выше.
- Определитесь с подходящей версией из трех предложенных.

- Переместитесь к исходному коду путем нажатия на надпись «get-pip.py».
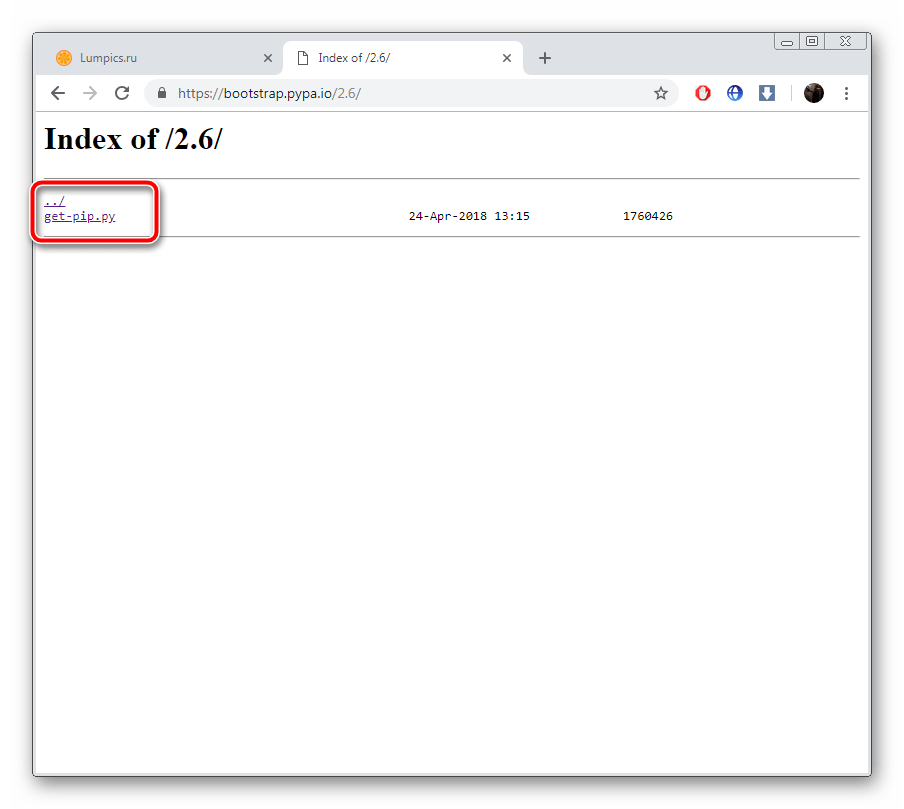
- Перед вами отобразится весь исходный код системы управления пакетами. В любом месте нажмите правой кнопкой мыши и выберите пункт «Сохранить как…».
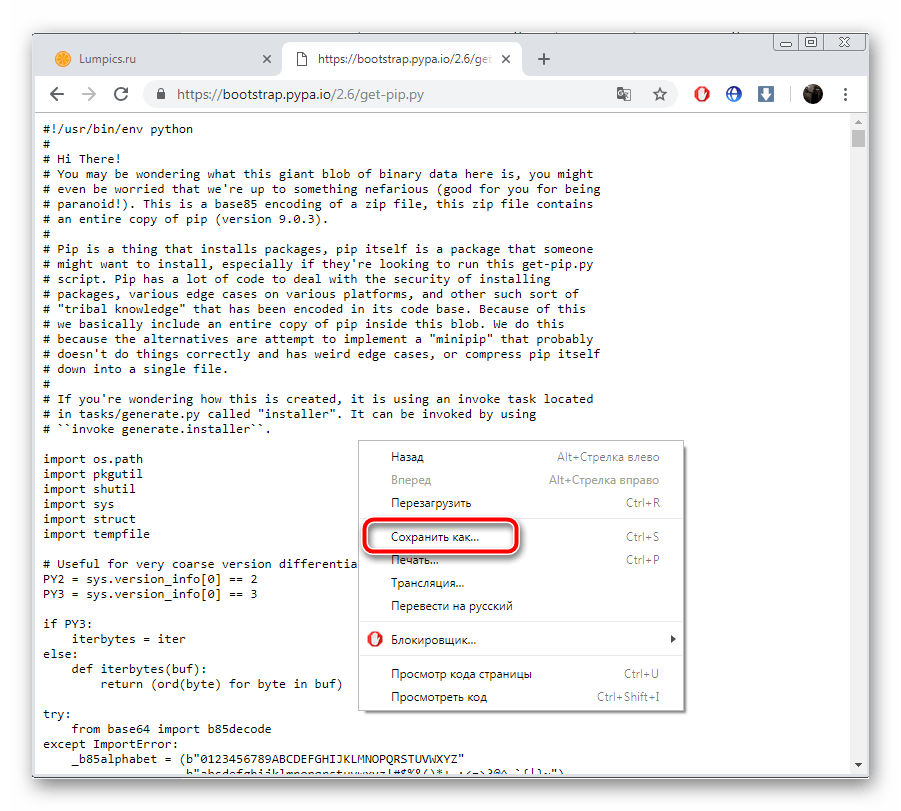
- Укажите удобное место на компьютере и сохраните данные туда. Его название и тип следует оставить неизменными.
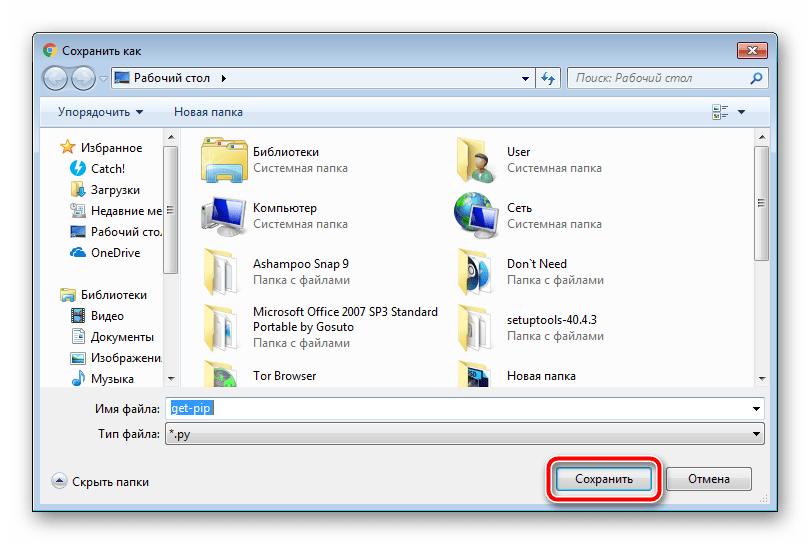
- Найдите файл на ПК, кликните на нем ПКМ и выберите пункт «Свойства».
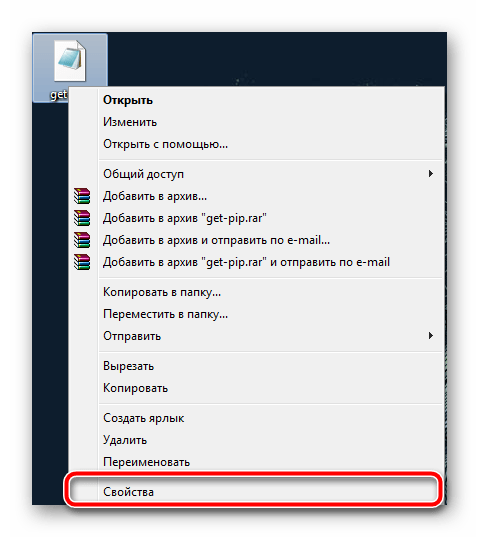
- С зажатой левой кнопкой мыши выделите строку «Расположение» и скопируйте ее нажатием на Ctrl + C.
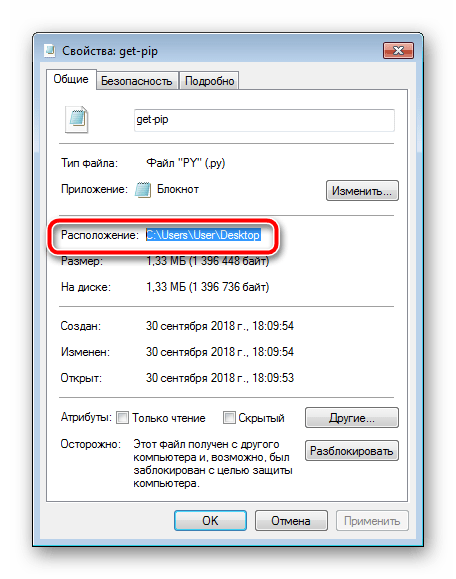
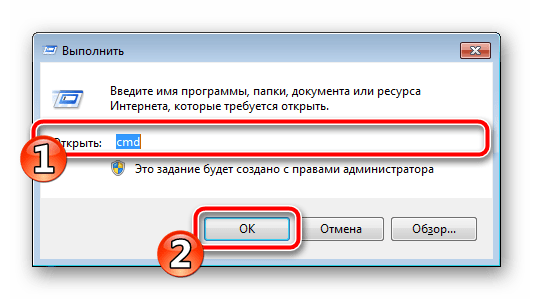
- Запустите окно «Выполнить» горячими клавишами Win + R, впишите туда cmd и кликните на «ОК».
- В открывшемся окне введите команду cd , а затем вставьте скопированный ранее путь с помощью комбинации Ctrl + V. Нажмите на Enter.
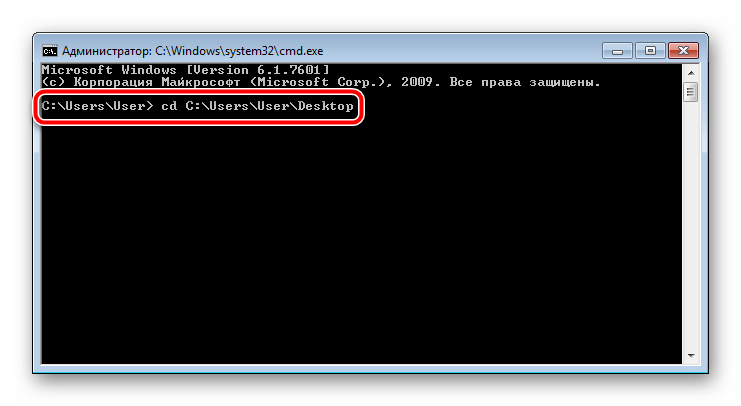
- Вы перейдете в выбранную директорию, где сохранен необходимый файл. Теперь его следует установить в Python. Для этого введите и активируйте следующую команду :
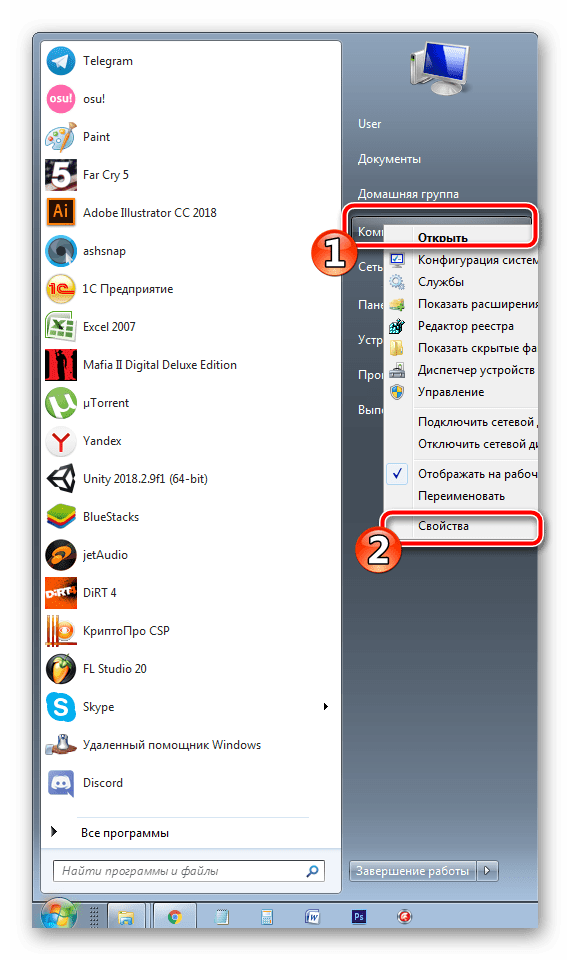
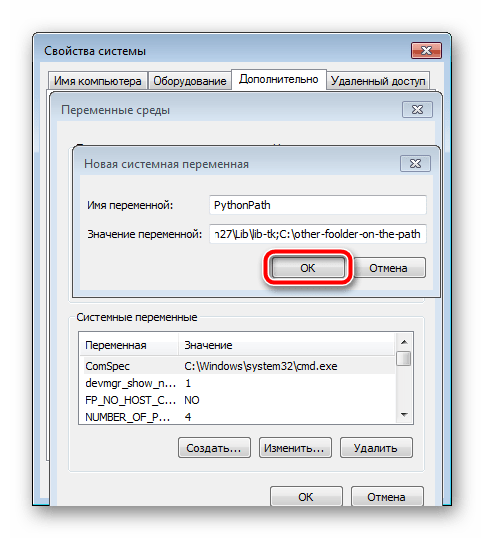
- Дело в том, что не всегда при распаковке Питон разных сборок происходит добавление системных переменных. Связано это чаще всего с невнимательностью пользователей. Для ручного создания этих данных сначала перейдите в меню «Пуск», где нажмите ПКМ на «Компьютер» и выберите пункт «Свойства».
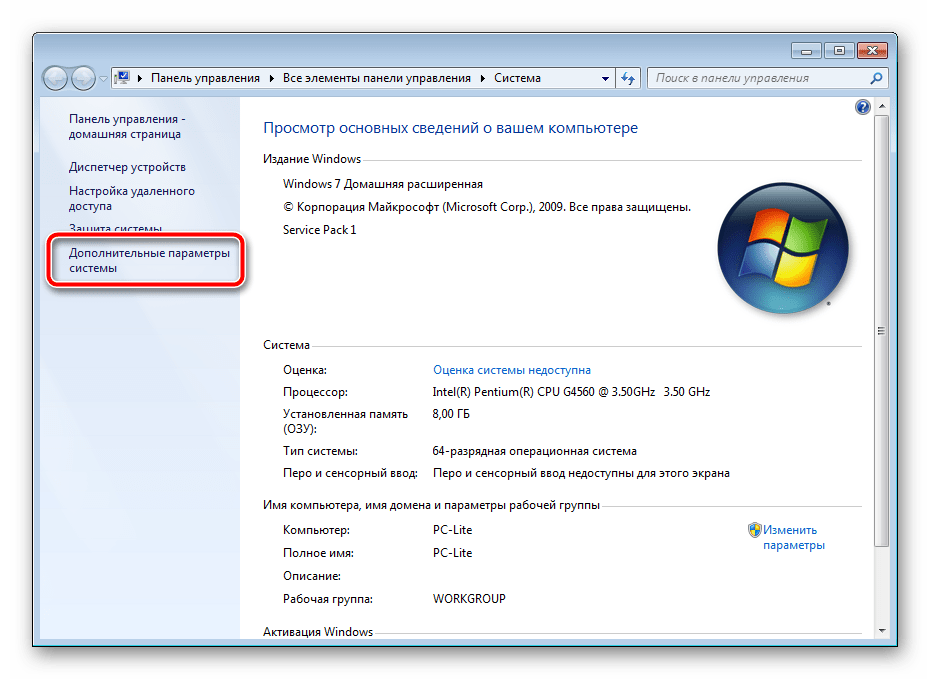
- Слева отобразится несколько разделов. Перейдите в «Дополнительные параметры системы».
- Во вкладке «Дополнительно» кликните на «Переменные среды…».
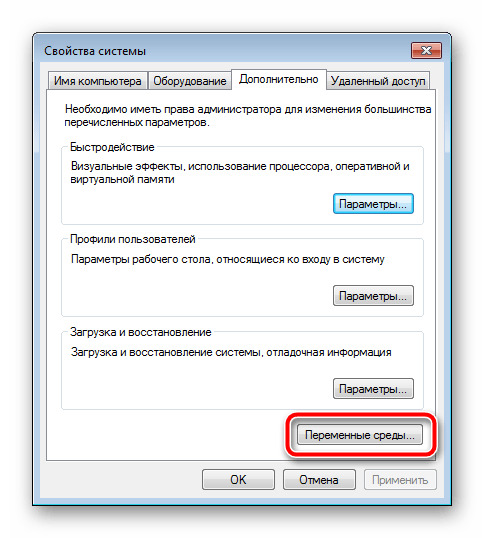
- Создайте системную переменную.
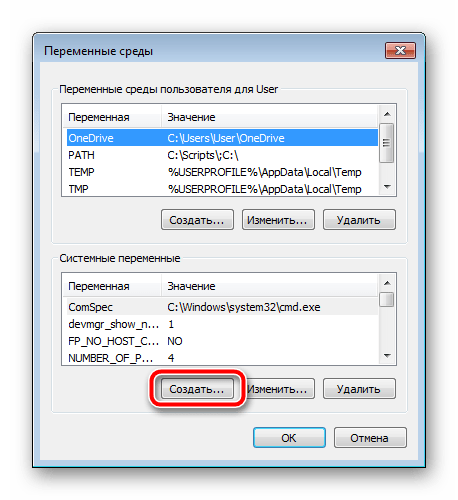
- Задайте ей имя PythonPath , в значении введите следующую строку и нажмите на «ОК».
- Перейдите на сайт загрузки модулей и скачайте их в виде архива.
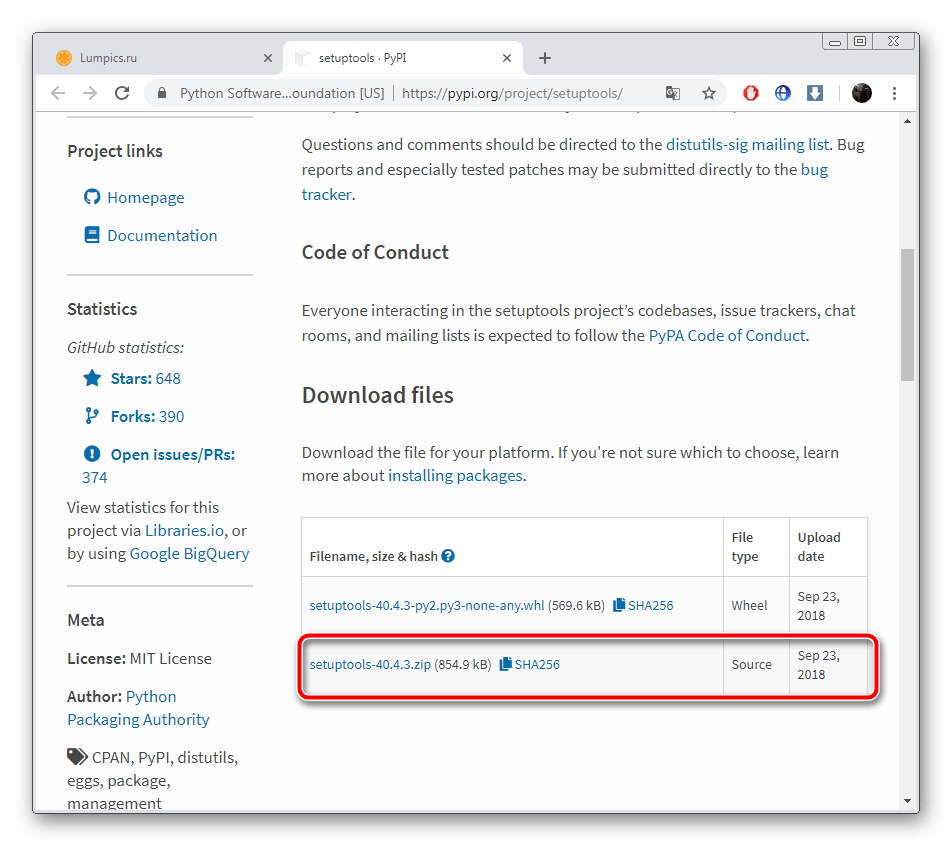
- Откройте директорию через любой удобный архиватор и распакуйте содержимое в любую пустую папку на ПК.

- Переместитесь к распакованным файлам и отыщите там Setup.py. Нажмите на нем правой кнопкой мыши и выберите «Свойства».
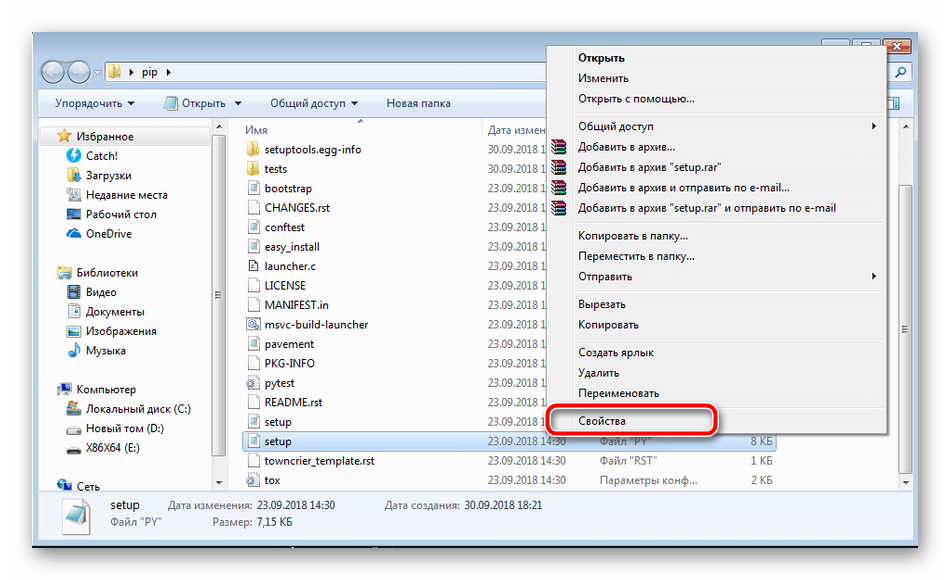
- Скопируйте или запомните его расположение.
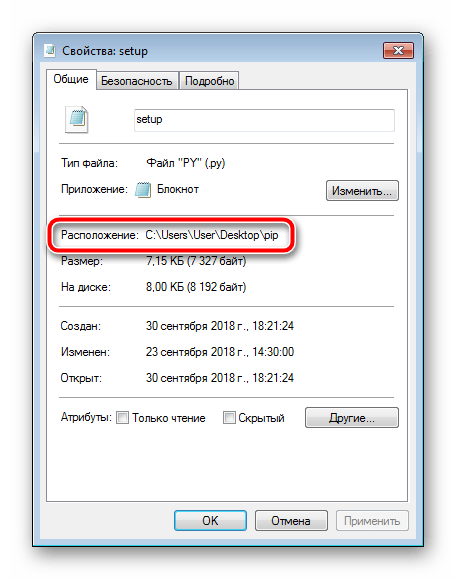
- Запустите «Командную строку» и через функцию cd перейдите к скопированной директории.

- Впишите следующую команду и активируйте ее:
-
— Install packages
Output installed packages in requirements format
List installed packages
Show information about installed packages
Search PyPI for packages
Build wheels from your requirements
Zip individual packages (deprecated)
Unzip individual packages (deprecated)
Create pybundles (deprecated)
Show help for commands
# Remarks
Sometimes, pip will perfom a manual compilation of native code. On Linux python will automatically choose an available C compiler on your system. Refer to the table below for the required Visual Studio/Visual C++ version on Windows (newer versions will not work.).
How to upgrade pip? [duplicate]
I want to install tensorflow, but I need to upgrade pip. How to upgrade pip? I tried to upgrade through the command line and this is what I got.

7 Answers 7
To upgrade pip from the command line:

You do not need to upgrade pip to install tensorflow. Although if you still wish to do so you can try this
Else try running the CMD as Admin

For permission error while installing Python dependencies, you need to run the terminal or command prompt or powershell as administrator


How to upgrade pip using command prompt:
Open the command prompt from the Start Menu
Use python -m pip install —upgrade pip to uninstall the old pip package and install the current version.

Adding up to @Iain Hunter’s answer, if the command prompt provides you with an error:
operable program or batch file.
Try changing python -m pip install —upgrade pip to py -m pip install —upgrade pip . If cmd still provides you the error, try downloading Python once again; Maybe you accidentally unchecked the download pip box while downloading Python.
Installation#
If your Python environment does not have pip installed, there are 2 mechanisms to install pip supported directly by pip’s maintainers:
ensurepip #
Python comes with an ensurepip module [ 1 ] , which can install pip in a Python environment.
More details about how ensurepip works and how it can be used, is available in the standard library documentation.
get-pip.py #
This is a Python script that uses some bootstrapping logic to install pip.
Open a terminal/command prompt, cd to the folder containing the get-pip.py file and run:
More details about this script can be found in pypa/get-pip’s README.
Standalone zip application#
The zip application is currently experimental. We test that pip runs correctly in this form, but it is possible that there could be issues in some situations. We will accept bug reports in such cases, but for now the zip application should not be used in production environments.
In addition to installing pip in your environment, pip is available as a standalone zip application. This can be downloaded from https://bootstrap.pypa.io/pip/pip.pyz. There are also zip applications for specific pip versions, named pip-X.Y.Z.pyz .
The zip application can be run using any supported version of Python:
If run directly:
then the currently active Python interpreter will be used.
Alternative Methods#
Depending on how you installed Python, there might be other mechanisms available to you for installing pip such as using Linux package managers .
These mechanisms are provided by redistributors of pip, who may have modified pip to change its behaviour. This has been a frequent source of user confusion, since it causes a mismatch between documented behaviour in this documentation and how pip works after those modifications.
If you face issues when using Python and pip installed using these mechanisms, it is recommended to request for support from the relevant provider (eg: Linux distro community, cloud provider support channels, etc).
Upgrading pip #
Upgrade your pip by running:
Compatibility#
The current version of pip works on:
Windows, Linux and MacOS.
CPython 3.7, 3.8, 3.9, 3.10, 3.11, 3.12, and latest PyPy3.
pip is tested to work on the latest patch version of the Python interpreter, for each of the minor versions listed above. Previous patch versions are supported on a best effort approach.
Other operating systems and Python versions are not supported by pip’s maintainers.
Users who are on unsupported platforms should be aware that if they hit issues, they may have to resolve them for themselves. If they received pip from a source which provides support for their platform, they should request pip support from that source.
The ensurepip module was added to the Python standard library in Python 3.4.
Обновление PIP для Python
PIP – утилита «Командной строки», предназначенная для работы с компонентами PyPI. Если данная программа инсталлирована на компьютере, это значительно облегчает процесс установки различных сторонних библиотек для языка программирования Python. Периодически рассматриваемый компонент обновляется, совершенствуется его код и добавляются нововведения. Далее мы рассмотрим процедуру обновления утилиты с помощью двух способов.
Обновляем PIP для Python
Система управления пакетами будет работать корректно только в том случае, когда используется ее стабильная версия. Периодически программные компоненты меняют свой вид, вследствие чего нуждается в обновлении и PIP. Давайте рассмотрим два разных метода инсталляции новой сборки, которые будут наиболее подходящими в определенных ситуациях.
Способ 1: Загрузка новой версии Python
PIP ставится на ПК вместе с Python, скачанным с официального сайта. Поэтому самым простым вариантом обновления будет скачивание самой свежей сборки Питон. Перед этим не обязательно удалять старую, новую можно поставить поверх или сохранить файлы в другом месте. Сначала мы рекомендуем убедиться в том, что установка свежей версии необходима. Для этого произведите следующие действия:
-
Откройте окно «Выполнить» путем нажатия комбинации клавиш Win + R, впишите cmd и нажмите Enter.
Процедура загрузки и распаковки новой версии происходит так:
Теперь команда PIP из системы управления пакетами с одноименным названием будет работать корректно со всеми дополнительными модулями и библиотеками. По завершении установки вы можете переходить к утилите и взаимодействовать с ней.
Способ 2: Ручное обновление PIP
Иногда метод с обновлением всего Python для получения свежей версии PIP не подходит по причине ненадобности выполнения этой процедуры. В таком случае мы рекомендуем загрузить компонент управления пакетами вручную, а затем внедрить его в программу и переходить к работе. Вам потребуется сделать всего несколько манипуляций:
На этом процесс обновления закончен. Вы можете смело пользоваться утилитой, загружать дополнительные модули и библиотеки. Однако если при вводе команд возникают ошибки, рекомендуем произвести следующие действия, а после снова зайти в «Командную строку» и начать инсталляцию PIP.
Python№ — директория программы (Название меняется в зависимости от установленной версии).
Теперь можно закрыть все окна, перезагрузить компьютер и перейти к повторному выполнению второго метода обновления системы управления пакетами PIP.
Альтернативный метод добавления библиотек
Не у каждого юзера получается обновить PIP и пользоваться его встроенной утилитой для добавления модулей к Питон. К тому же не все версии программы корректно работают с данной системой. Поэтому мы предлагаем использовать альтернативный способ, который не требует предварительной инсталляции дополнительных компонентов. Вам нужно выполнить следующее:
Python setup.py install
Осталось только дождаться завершения инсталляции, после чего можно переходить к работе с модулями.
Как видите, процесс обновления PIP довольно сложный, однако все получится, если следовать приведенным выше инструкциям. Если же утилита PIP не работает или не обновляется, мы предложили альтернативный метод установки библиотек, который в большинстве случаев функционирует корректно.