How to Change the Resolution and Aspect Ratio in Blender
The resolution is the dimension of a render measured in pixels. The aspect ratio is how wide a render is compared to how tall it is. Both the resolution and aspect ratio are easily changed in Blender.
There will need to be a camera in the scene for the resolution settings to work. Here’s an detailed guide for all of Blender’s camera settings.
How to Change the Resolution in Blender
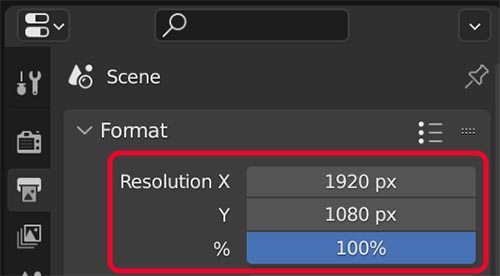
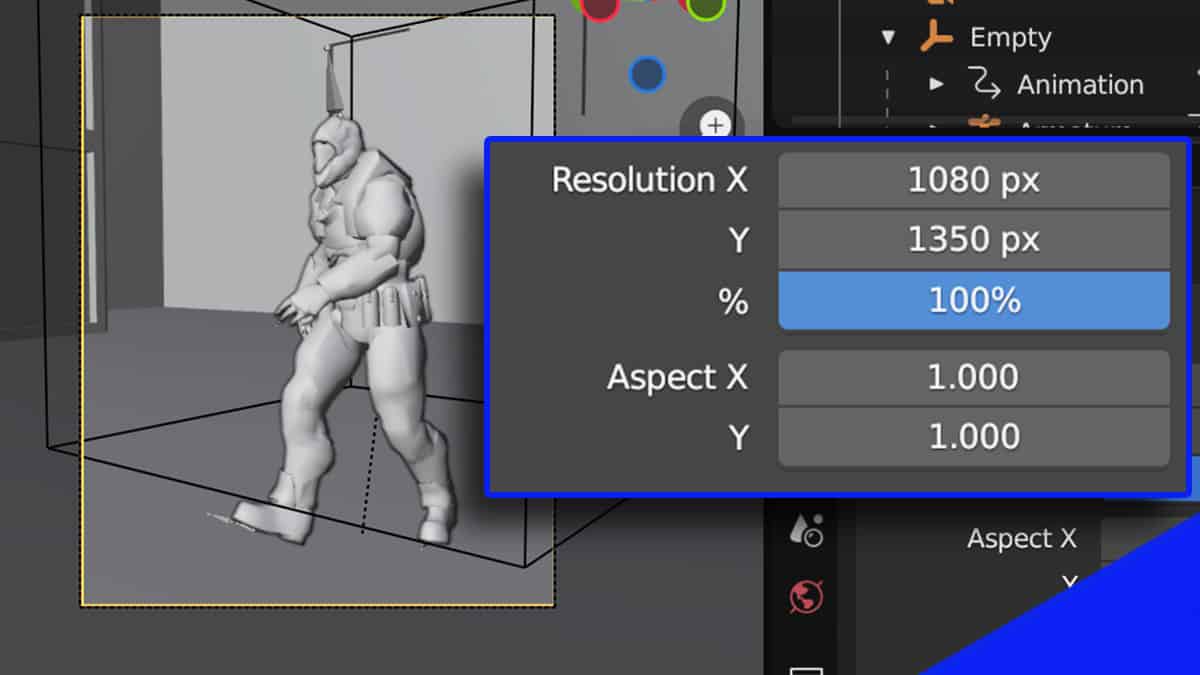
To change the render resolution in Blender, go to the Output Properties Panel. At the top are settings for the X (horizontal) resolution and Y (vertical) resolution. Enter the desired width and height (in pixels) for the render.
The Resolution % setting is an option to keep the same aspect ratio (width to height ratio) but increase the total number of pixels proportionally.
This can be used to set the final render resolution and then to test render at a lower resolution. For example, the test render may be 50% or 25% resolution.

How to Change the Aspect Ratio in Blender
The aspect ratio in Blender can be changed manually by changing the X Resolution, the Y Resolution or both to a desired resolution (ie: 4096 x 2160) in the Output Properties Panel.
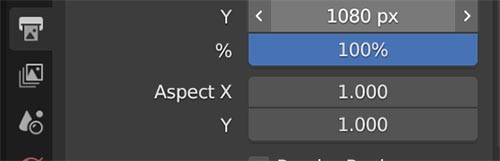
We can also adjust the horizontal and vertical ratio using the pixel ratio adjustment settings below the resolution settings. This should rarely be done.
The default pixel ratio will be 1:1 square pixels. Changing this value will actually change the aspect ratio of each pixel causing non-square (anamorphic) pixels.
Resolution Presets
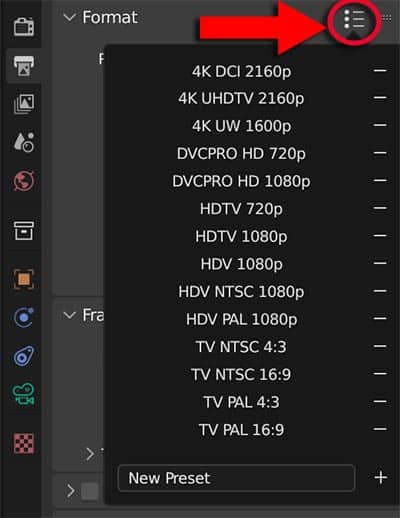
Blender has common resolutions (and aspect ratios) stored as presets. The presets can easily be selected and populate the horizontal and vertical resolution values and other render settings.
To use a resolution preset, click the preset icon to the right of the “Format” tab in the Output Properties Panel. Choose the desired preset from the list.
At the bottom of the list, we can enter a name and press the plus icon to save the current resolution as a preset for future use.
We can remove any resolution preset by clicking the minus icon next to the preset.
Common Resolution Presets in Blender
Here is a list of common resolution dimensions which come saved as presets in Blender. Presets include settings for the Resolution (X & Y), the pixel aspect ratio and the frames per second for animations.
| Preset Name | Horizontal Resolution |
Vertical Resolution | Aspect X | Aspect Y | Frames Per Second |
|---|---|---|---|---|---|
| 4K DCI 2160p | 4096 | 2160 | 1 | 1 | 24 |
| 4K UHDTV 2160p | 3840 | 2160 | 1 | 1 | 24 |
| 4K UW 1600p | 3840 | 1600 | 1 | 1 | 24 |
| DVCPRO HD 720p | 960 | 720 | 4 | 3 | 24 |
| DVCPRO HD 1080p | 1280 | 1080 | 3 | 2 | 24 |
| HDTV 720p | 1280 | 720 | 1 | 1 | 24 |
| HDTV 1080p (default) | 1920 | 1080 | 1 | 1 | 24 |
| HDV 1080p | 1440 | 1080 | 4 | 3 | 23.98 |
| HDV NTSC 1080p | 1440 | 1080 | 4 | 3 | 29.97 |
| HDV PAL 1080p | 1440 | 1080 | 4 | 3 | 25 |
| TV NTSC 4:3 | 720 | 486 | 10 | 11 | 29.97 |
| TV NTSC 16:9 | 720 | 480 | 40 | 33 | 29.97 |
| TV PAL 4:3 | 720 | 576 | 12 | 11 | 25 |
| TV PAL 16:9 | 720 | 576 | 16 | 11 | 25 |
Pixel resolution, aspect ratios and FPS for Blender output presets
Thank you for visiting my site. Have a look around for more helpful Blender 3D content. I’d love to see you on social media and I have video tutorials on my YouTube channel. Stay creative!
Get Brandon’s Newsletter
By submitting, you agree to receive periodic e-mails from me. You can unsubscribe at any time.
Format
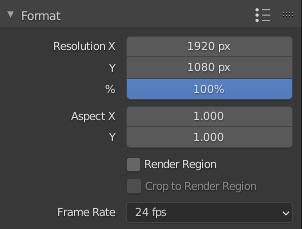
Several render presets exist with common resolution and frame rates for TVs and screens can be selected in the panel header.
The number of pixels horizontally and vertically in the image.
Slider to reduce or increase the size of the rendered image relative to the Resolution values. This is useful for small test renders that have the same proportions as the final image.
Older televisions may have non-square pixels, so this can be used to control the shape of the pixels along the respective axis. This will pre-distort the images which will look stretched on a computer screen, but which will display correctly on a TV set. It is important that you use the correct pixel aspect ratio when rendering to prevent re-scaling, resulting in lowered image quality.
Renders just a portion of the view instead of the entire frame. See the Render Region documentation to see how to define the size of the render region.
Crop to Render Region
Crops the rendered image to the size of the render region, instead of rendering a transparent background around it.
The number of frames that are displayed per second, relevant for Animation . The menu gives several common frame rates, custom frame rates can be used by selecting Custom which gives access to the following properties:
The frame rate, expressed in frames per second.
Some standards require a more precise frame rate, for example NTSC. These can be represent as a fraction where the Base value is used as the fraction’s denominator and the FPS being the numerator: \(\frac
© Copyright : This page is licensed under a CC-BY-SA 4.0 Int. License. Last updated on 09/06/2023.
How to change render settings and resolution in Blender
This Tutorial shows Blender Render Settings – Output Resolution with FHD 2K 4K 8K Resolution for Image and Animation Video. This is quick video to show how to set render settings. In this video, the Blender Render Settings are including Render Engine, Eevee, Workbench or Cycles ; Number of Sampling Settings ; Output Resolution, Full HD, 2K, 4K, or 8K Resolution ; Output File Location ; Output File Format. It shows how to save a render in Blender, and save renderer video as mp4 file format. The is Basics for Blender. Hope this helps. More Blender Tutorial, Tips and Tricks are available here.
Blender Render Settings – Output Resolution, File Format and Location
Watch on YouTube,
Timestamp
0:00 Render Settings
0:31 Render Engine
1:06 Render Resolution
2:08 Render Output File Format and Location
Click here to subscribe this YouTube channel, more video will be shared with you. Let’s play with Blender together! Welcome to watch more video on【Youtube Playlist】
Have fun with CGI, to make it simple.
#cgian #aritstB #b3d #blender
Welcome to share with your friend.
by [email protected]
Share this:
You May Also Like
How to make object transparent in Blender
Blender Colored Glass Material Shader

Blender File Format, that can Import and Export
Leave a Reply Cancel reply
You must be logged in to post a comment.
Follow to get updates
Blender Timelapse Video
Watch here,
Advertisement 2
Latest Post
Can’t find the thing you’re looking for.
Try to search here
How To Maximize The Quality Of My Renders In Blender 3D?
Don’t miss out on our biggest sale of the year. Get 70% OFF on our selected products.
Please enable JavaScript
Most projects in Blender will often finish with a rendered image or animation if the models created are not going to be used elsewhere, such as in a video game or for 3D printing. Sometimes these renders can appear low in quality, grainy, or pixelated. So how can we maximize the quality of our final render?
Here are seven tips for improving the quality of your rendered images…
- Increase the base resolution of the render
- Set the output to a PNG file format with low compression
- increase the sample count
- Use the Cycles X render engine for realistic materials and lighting
- Test your lighting from different angles
- Introduce post-processing effects
- Use low-quality renders to test your result
These are some of the easiest ways in which you will be able to improve the final look of your rendered image with as few imperfections as possible.
Increasing The Base Resolution Of The Image
The easiest way to improve the quality of your rendered images will be to change the base resolution of the image. The higher the resolution, the more pixels that will be packed into your image, and the more pixels there are, the more detail we can make visible.
To increase the resolution of the render, go to the Properties Panel > Output Tab; the first option in this tab will be to alter the resolution of any images you wish to render.
By default, this should be set to a resolution of 1920 x 1080p, which is often sufficient for most renders. However, if you have a scene that has a lot of smaller details, then you may want to increase the pixel density.
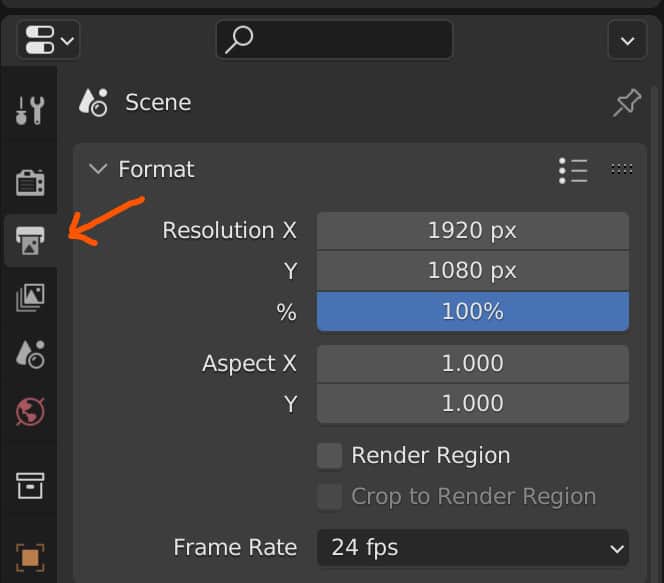 Resolution Location
You can type in the resolution you wish to use by clicking on the current setting for the X and Y axis, then typing in a new value for each. For a 4K image, you would set the resolution to 3840 x 2160p, double the resolution on each axis for four times the pixel count.
Alternatively, you have a percentage bar under the resolution, which can be used to set a new resolution using the current settings as the base.
If you have a 1080p setting, changing the resolution scale to 200% will boost the result up to a 4K image. This setting is helpful for creating test renders without having to change the base resolution.
A third option for changing the resolution is to use one of the presets. The resolution preset menu is viewed as an icon with three lines directly above the resolution settings.
Open the menu, and you will find many industry-standard resolution settings you can use for your
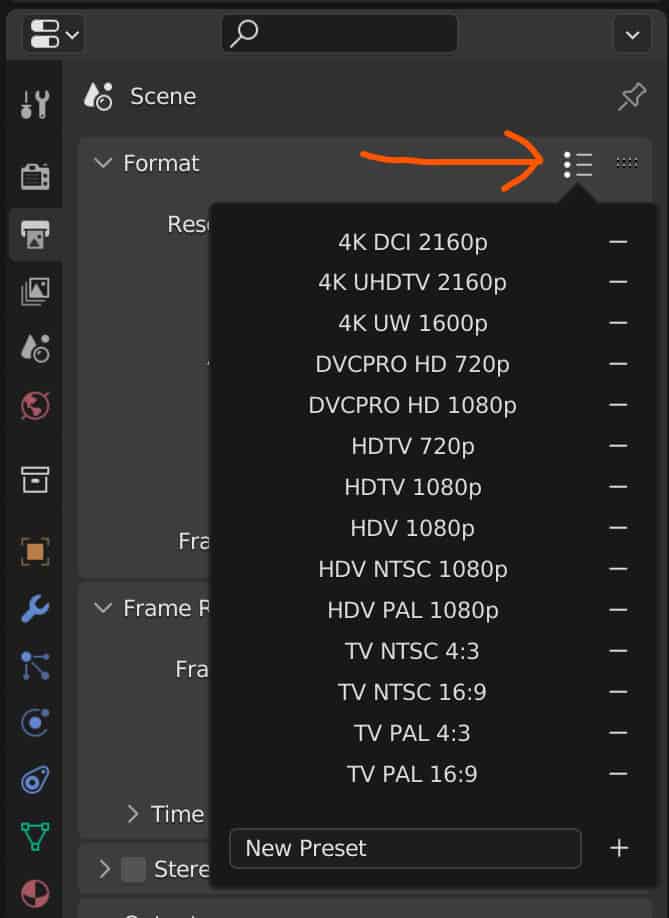 Preset Resolution
project. This list includes television and video standard resolutions like 1080p and 4K, so you can quickly select these presets here.
Note that if you decide to change the resolution values directly, you will be changing the camera aspect ratio, so keep that in mind.
Set The Output To A PNG File Format
Different file formats can store information at different levels, and each file format stores that information in its own way.
Some file formats will be better choices than others when maintaining the details of your render.
The JPEG is a popular file format because of its low file size but is not the best image type for clarity when you decide to blow up the image.
The PNG format is a lossless format that helps to prevent loss of detail on compression. The typical file size is larger than a JPG, but the quality is better maintained.
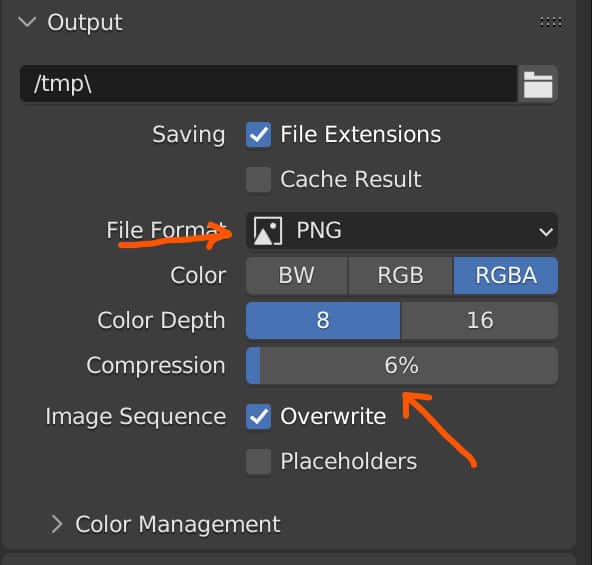 PNG File Format With Low Compression
Your Project should be using the PNG file format by default, but to double-check this, go to the properties panel and the Output Properties tab. Halfway down at the top, you will see the output section where you can determine your render’s file output.
Make sure this is switched to the PNG option if it is not already. To further maximize quality, ensure that the output is set to RGBA, which stores information on the red, green, and blue channels and the alpha transparency channel.
You can also decrease the compression level to increase the quantity of your final output. However, note that the lower the compression level, the higher the file size will be.
Choosing Your Render Engine
When creating your projects in Blender, you can choose between two rendering engines, each with a different purpose. The Eevee engine is used for lightning-fast renders at the expense of realistic lighting and materials. Instead, rasterization techniques are used to determine the lighting of your scene, similar to that of video games.
Wall materials and lighting may not be of the most realistic standard. The quality of renders using the Eevee render engine is often very clean. It is, therefore, very easy to get decent results in the EV render engine, so long that you are not aiming for a realistic scene.
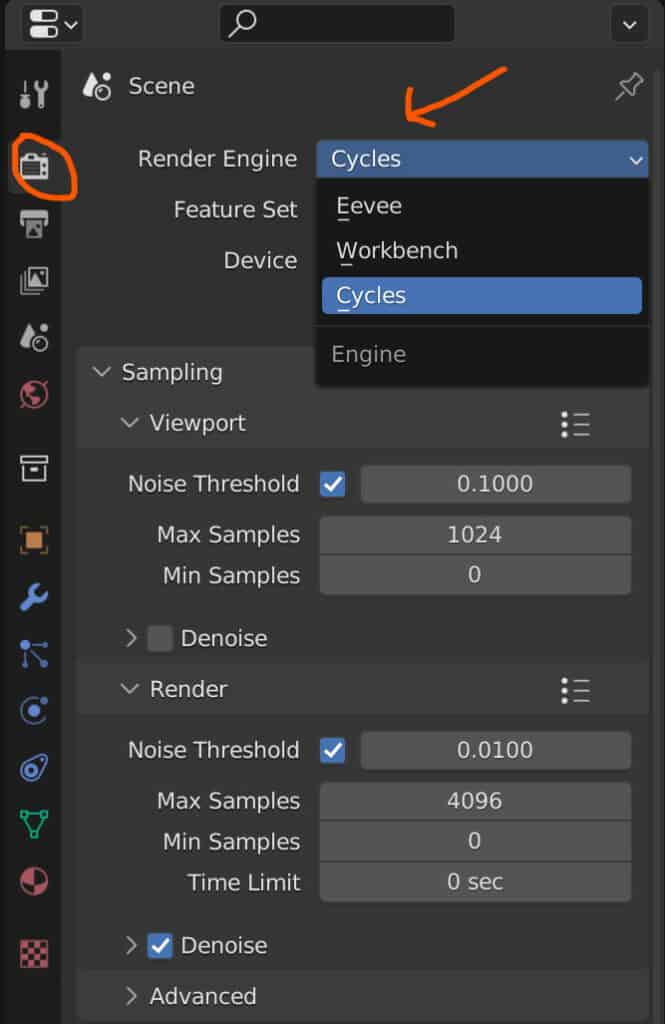 Choosing Your Render Engine
On the other hand, we have these cycles render engine, which is focused on the concept of part racing for mapping out the objects of the scene in your image.
When set up correctly, Cycles X offers the highest level of quality. Still, if set up incorrectly, it can offer a much lower quality than the Eevee render engine.
Increasing The Sample Count
Regardless of the render engine used, we render our images using samples where the computer will map out the scene.
The more samples we use for our rendering, the more times this process will be repeated and the more detail that will be maintained.
Many images appear grainy or pixelated with a low sample count, especially when using the cycles render engine.
In the Eevee engine, the sample count is not that important because the result will be clean regardless of the number of samples you use.
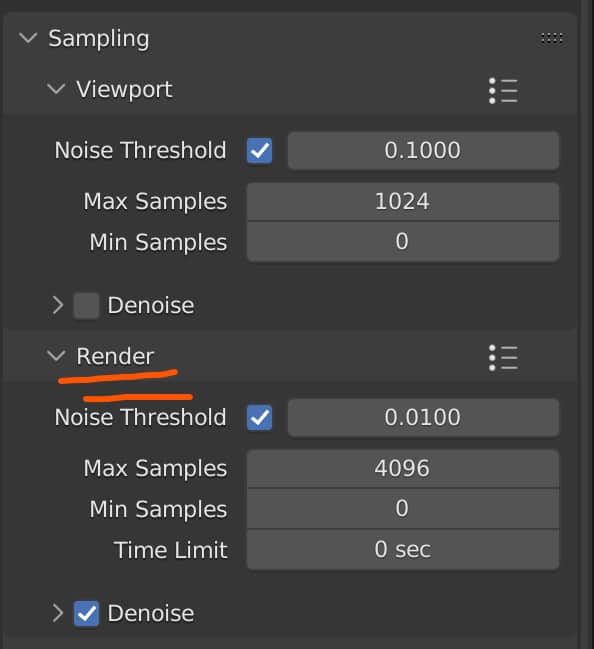 Control The Sample Count
However, samples are more critical when using these Cycles X rendering engine. You have the option in the render tab of the properties panel to manipulate the Max and minimum samples for rendering your image.
We combined this with the noise threshold value. To maximize the render quality, you would increase the number of Max samples and decrease the noise threshold value. This will come at the expense of render times and can impact your rendering time prime as changing the resolution.
Test Renders
If you want the best possible result, it’s essential not just to render once but to render multiple times to assess and improve your scene.
One way of creating test renders is to use a smaller sample count and then combine that with the denoising tool found in the render tab of the properties panel.
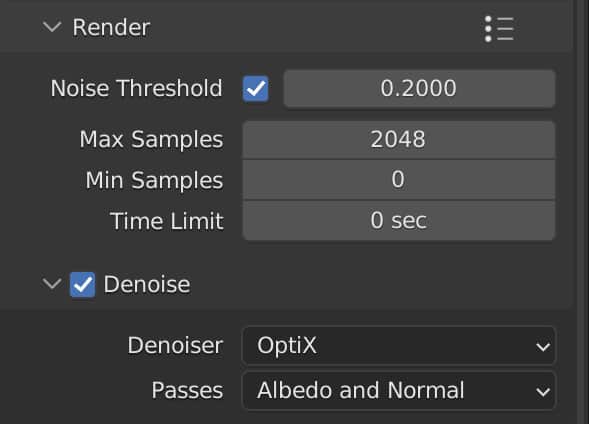 Reduced Sample Settings With Denoising For Quick Renders
This will allow you to create quick renders of your scene and a respectably clean result so that you can analyze your scene and make any improvements you require.
Another way of creating a lower-quality test render is to use the resolution scaler. Say, for example, you had the base resolution set at 4K. The resolution scale underneath that would be currently set to 100%, which is a pixel-per-pixel comparison to the resolution.
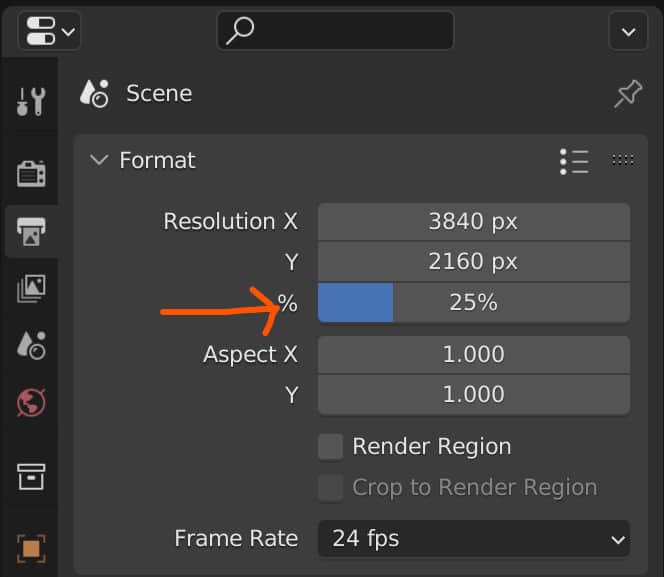 Lower The Resolution Scale For Test Renders
By reducing the resolution scale to 25%, we reduce the number of pixels on each axis by a factor of 4. This results in a much smaller image being rendered but allows us to get an excellent idea of what our image will look like before we decide to render it at the Max resolution.
Test Your Lighting
Sometimes the problem may not lie in the rendering settings but within the scene itself. Your lighting may not be best suited to the current scene when it comes to highlighting all relevant details.
As a part of your testing, you should consider changing your lighting setup with each render if you are not happy with it.
Post Processing
Even after you have created the render of your scene, it’s not the end of the road. You can still take your rendered image into the blender compositor and use the compositing node system to apply various effects to your image.
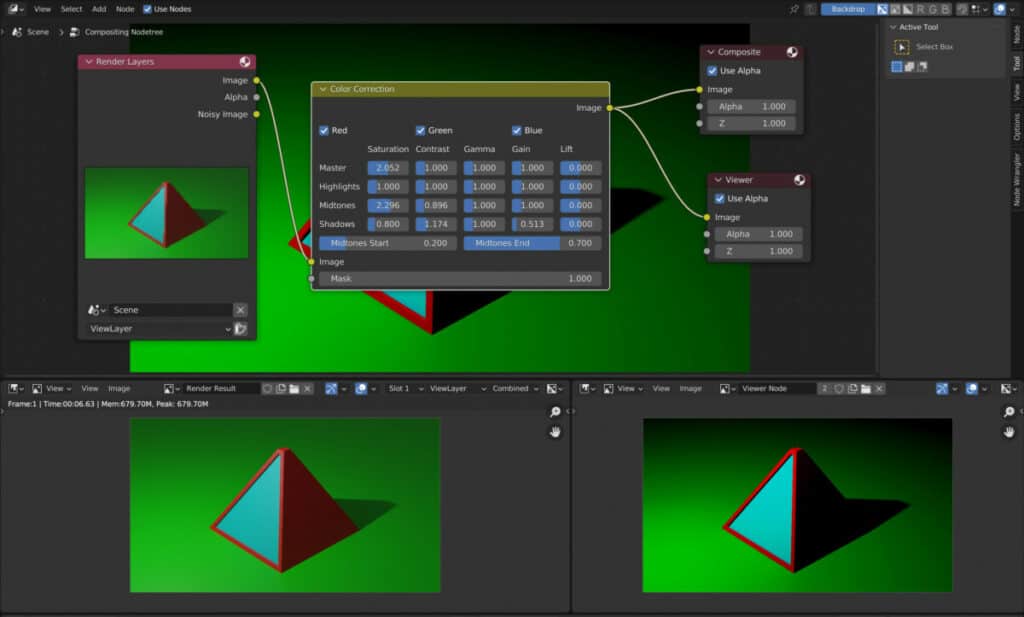 Edit Images With Compositing
These effects can include creating lighting effects such as glare or changing the color information of the rendered image to improve saturation, converting it to a grayscale image, et cetera.
Thanks For Reading
We appreciate you taking the time to read through the article, and we hope that you found the information you were looking for. If you are interested in learning more about rendering images with Blender 3D, you can look at a few of the articles we have listed below.