Как вручную изменить параметры IP в Windows 10

Перед тем как менять параметры IP самостоятельно, рекомендуем куда-то записать текущие значения, поскольку они могут пригодиться во время редактирования, а также на случай, когда потребуется вернуть предыдущие адреса.
Читайте также: Определение IP-адреса компьютера с Windows 10
Способ 1: «Параметры»
Обычно компьютеру автоматически присваивается IP-адрес провайдером. Но изменить его параметры можно вручную с помощью соответствующего раздела в системных «Параметрах». Этот вариант, скорее, подойдет для проводного типа соединения, когда ПК или ноутбук напрямую подсоединен к маршрутизатору:
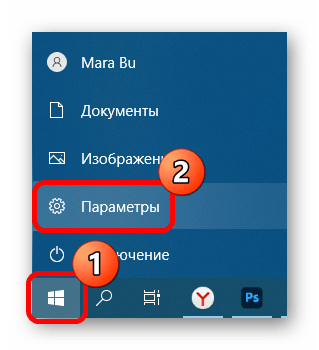
- Нажмите на кнопку «Пуск», затем выберите приложение «Параметры».
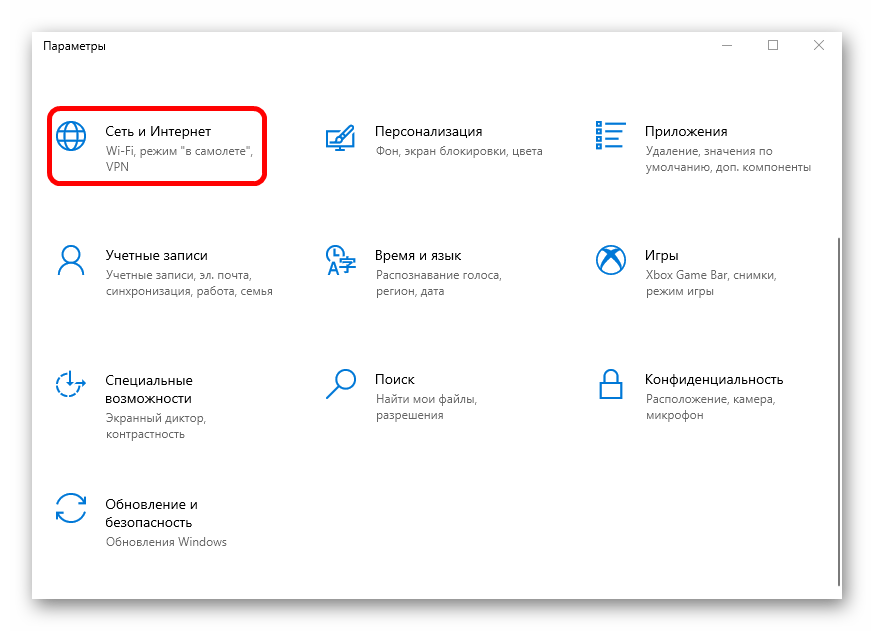
- Перейдите в раздел «Сеть и Интернет».
Следует отметить, что при редактировании параметров необходимо быть уверенным, что все данные верны, иначе подключение к интернету может быть нарушено. Если у вас не получается сохранить новые параметры, то ознакомьтесь с нашей отдельной инструкцией:
Подробнее: Что делать, если не удается сохранить параметры IP-адреса в Windows 10
Способ 2: «Свойства сетевого адаптера»
Этот метод классический, поскольку используется «Панель управления», свойственная и предыдущим Windows. Через нее нужно перейти в окно с настройкой свойств сетевого адаптера:
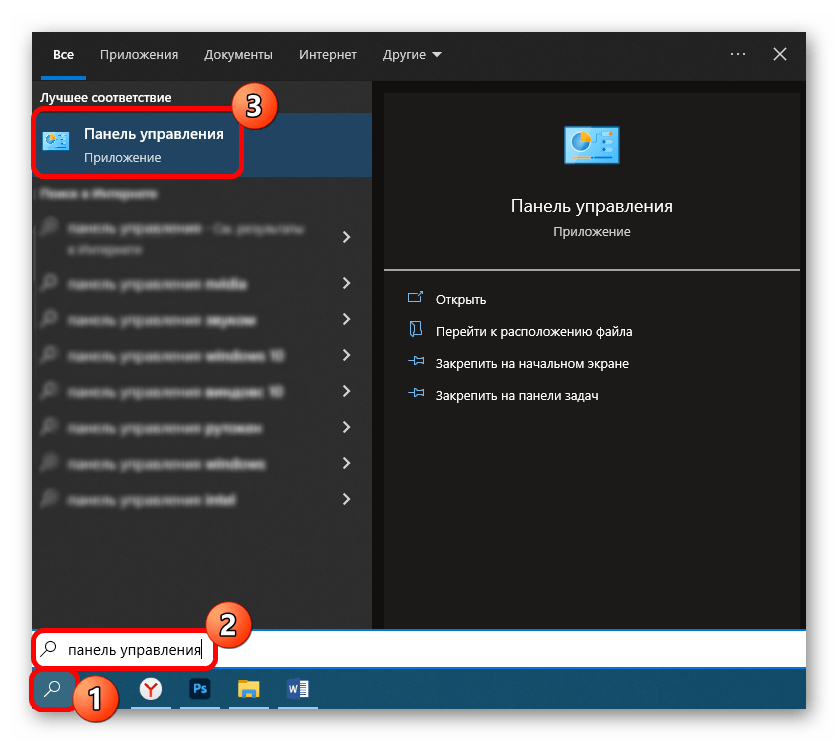
- Через строку системного поиска отыщите средство «Панель управления».
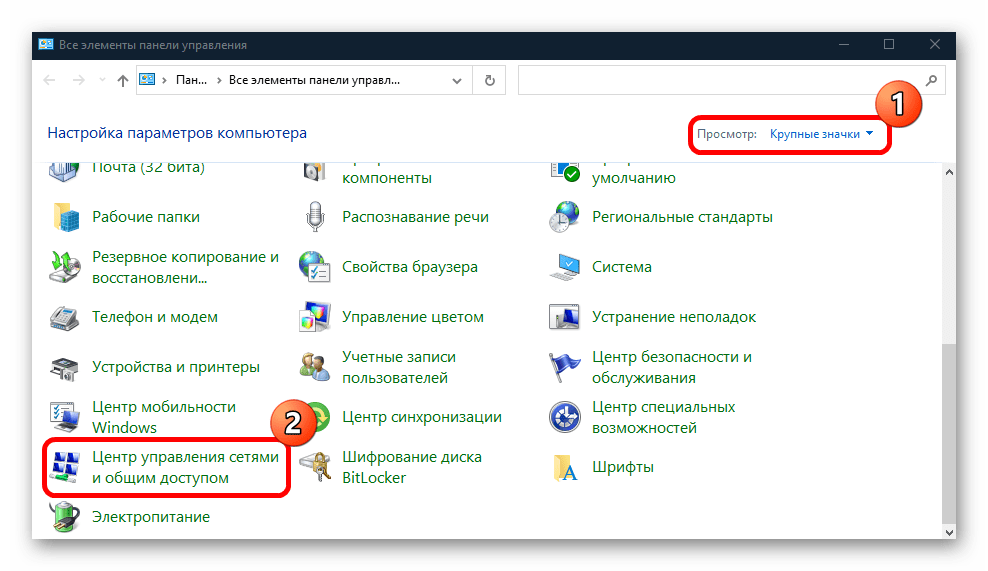
- Для удобства просмотра разделов выберите «Крупные значки» в верхнем правом углу, затем перейдите в «Центр управления сетями и общим доступом».
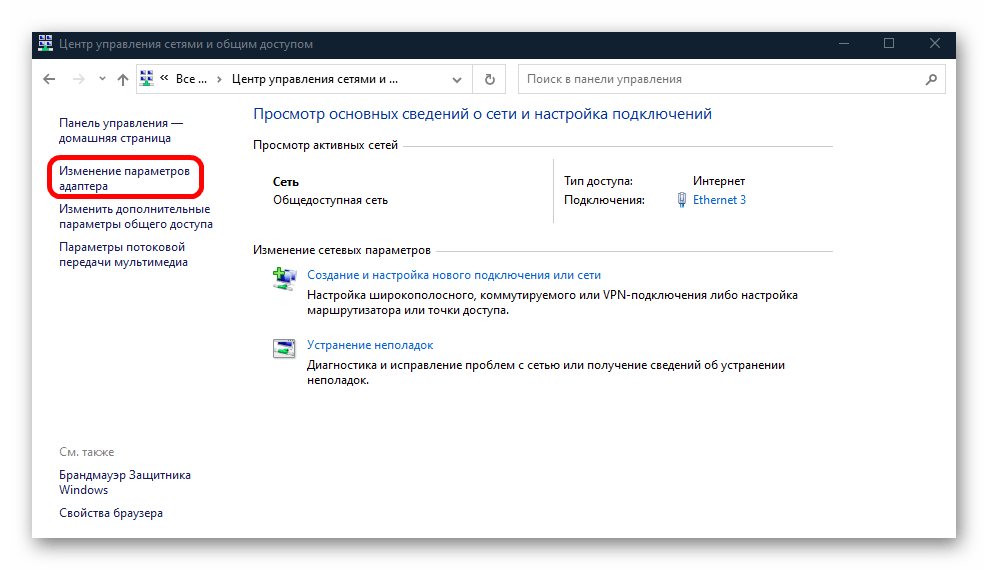
- В новом окне щелкните по ссылке «Изменение параметров адаптера» на левой панели.
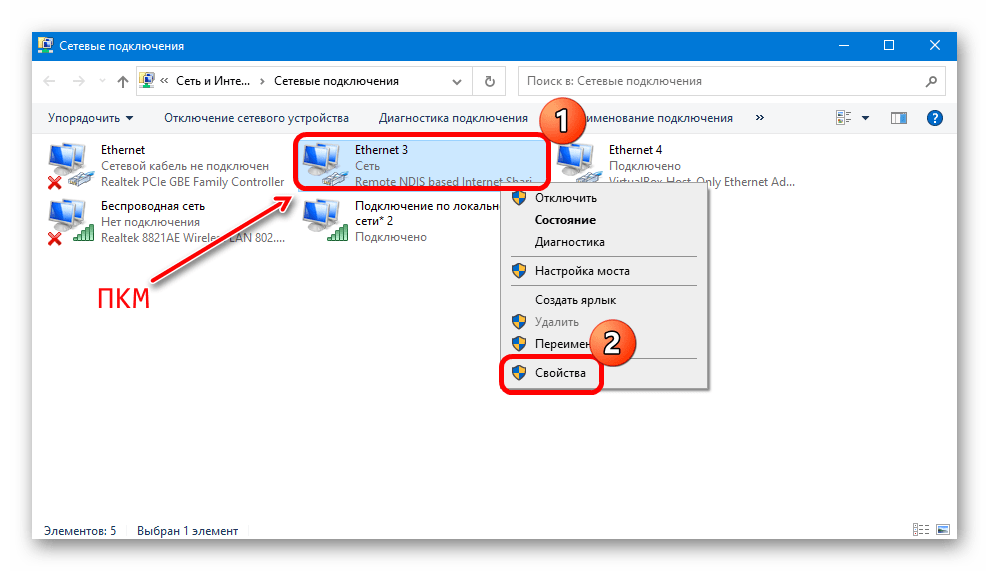
- Отобразится список всех подключений, которые были на ПК или ноутбуке. Отыщите нужное, затем щелкните по нему правой кнопкой мыши и из меню выберите пункт «Свойства».
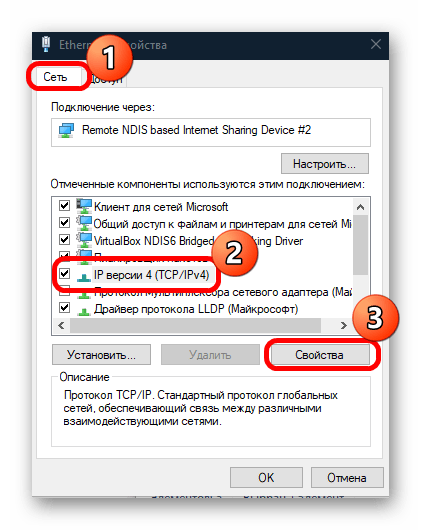
- На вкладке «Сеть» выделите нажатием левой кнопкой мыши пункт «IP версии 4 (TCP/IPv4)», а потом кликните по кнопке «Свойства».
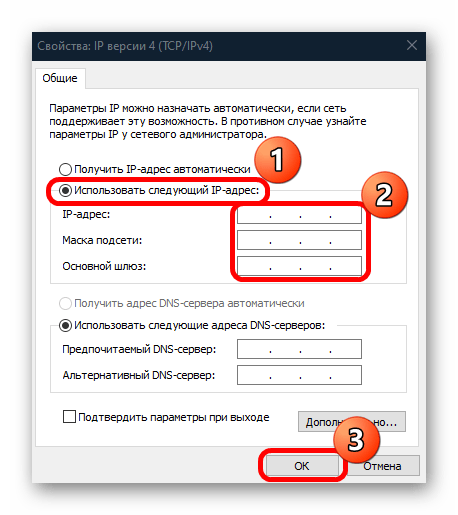
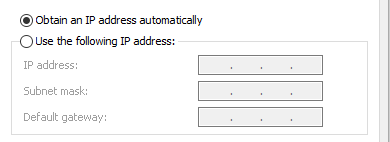
- Поставьте отметку у опции «Использовать следующий IP-адрес», после чего ниже поля станут доступными для редактирования. Введите нужные значения. Так же можно поступить и со сменой DNS-сервера. Сохраните настройки.
Аналогичные действия при необходимости есть возможность проделать и с протоколом «IP версии 6 (TCP/IPv6)», выбрав его в списке окна со свойствами сети.
Способ 3: «Командная строка»
Изменить некоторые параметры IP, в частности статический IP-адрес и DNS-сервер, можно, используя команды. Зная их, не придется копаться в настройках, что может сэкономить время:
-
Запустите «Командную строку» от имени администратора. Для этого воспользуйтесь поисковой строкой на нижней панели.
То же самое можно проделать и через консоль «Windows PowerShell», запущенную с расширенными правами.
Change IP Address and DNS Servers using the Command Prompt
The Command Prompt application, sometimes referred to as command shell, is found in most Windows NT-based operating systems. Its purpose is to execute specific commands for troubleshooting or solving specific Windows issues, performing advanced administrative functions, and automating tasks via batch files and scripts.
That said, you can also use it to change your IP address when you want to spoof it to bypass geoblocks or online bans on sites that impose such restrictions on their content, or change your Domain Name System (DNS) servers for troubleshooting reasons or to make surfing more secure and faster.

In this guide, we’re going to show you how to change your IP address and DNS servers using the Command Prompt in Windows 10.
How To Change IP Address Using Command Prompt
An IP address holds information about your device, location, your internet service provider (ISP), and browser information.
Changing it is useful when you have a malfunctioning router that’s providing addresses used by a different computer on the network or an invalid address is accidentally configured. It’s also helpful when you want to install a new router and reconfigure your home network to use the default IP address range.
The first step to changing your IP address is to find the network name for the interface you want to change.
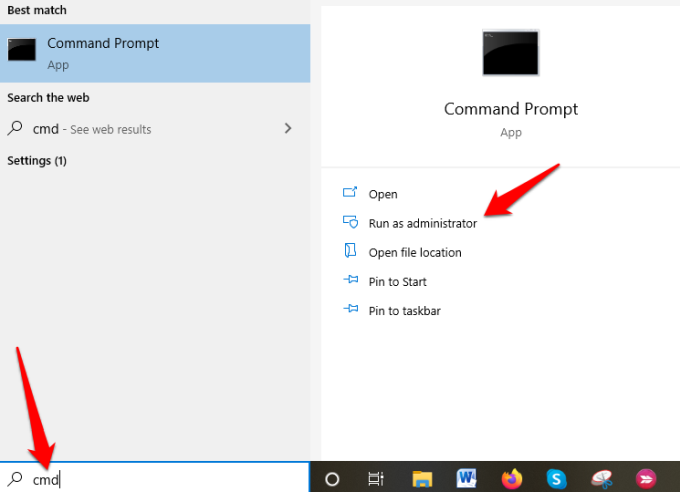
- Open an elevated Command Prompt by typing CMD in the search bar and clicking on Run as Administrator.
- Next, type netsh interface ipv4 show config in the command prompt window, press Enter, and scroll down to the interface you want.
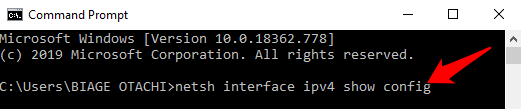
In our case, we’ll be modifying the WiFi interface, but you can pick the correct interface for your case. Make note of the interface name.
- To change the IP address, type this command: netsh interface ipv4 set address name=”YOUR INTERFACE NAME” static IP_ADDRESS SUBNET_MASK GATEWAY
In our example, this command would look like this: netsh interface ipv4 set address name=”Wi-Fi” static 192.168.0.173 255.255.255.0 192.168.0.0
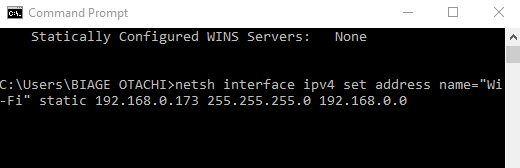
This command will use the Wi-Fi interface, set the IP address to 192.168.0.173, set the subnet mask to 255.255.255.0 and set the default gateway to 192.168.0.0.
If you want to switch to using an IP address automatically assigned by a DHCP server instead of a static IP address, use the netsh interface ipv4 set address name=”YOUR INTERFACE NAME” source=dhcp command.
How To Change DNS Servers Using Command Prompt
A DNS server holds public IP addresses and related hostnames in a database, and is used to resolve or translate the hostnames to IP addresses. The server does this by running special software to communicate with other servers through special protocols based on certain requests from the computer.
The conversion process is thoroughly vetted and verified, and it happens quickly behind the scenes so as to obtain information corresponding to the server that the computer is looking for, and then tells the original connecting computer where to go so that it can connect to that server.
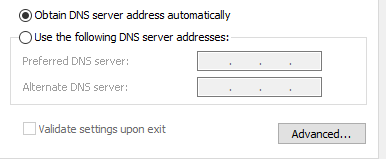
There are several reasons why you’d want to change your default DNS server, but the main ones are:
- Boost your privacy when getting around a firewall, bypassing geoblocks or ISP blocks on a website
- Increase security
- Parental controls like blocking websites from your router
- Speed your surfing, which your own ISP’s DNS servers may not offer because they’re not always reliable or up-to-date
Note: You can change DNS servers individually for your home network on your router or on computers, smartphone, and Chromebook, among other devices
How To Change DNS Servers With Command Prompt
Follow the steps below to learn how to change DNS servers using Command Prompt.
- Open an elevated Command Prompt by typing CMD in the search bar, and clicking Run as Administrator.
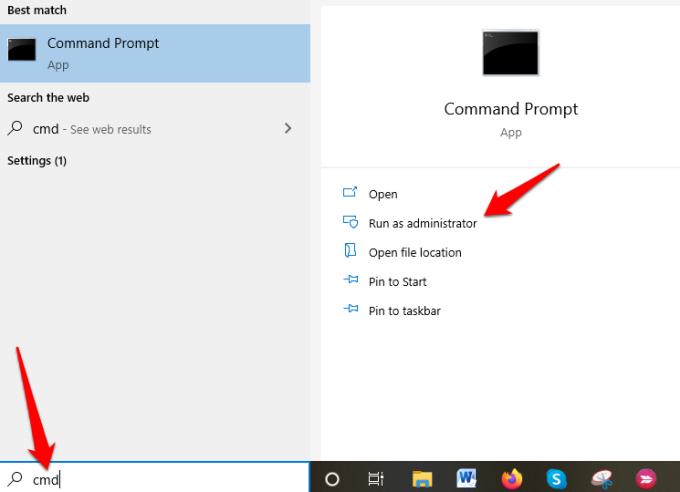
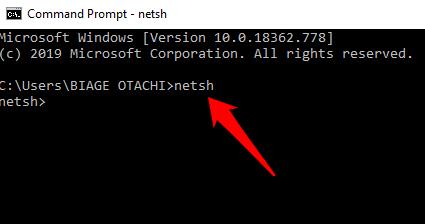
- Type netsh and press Enter.
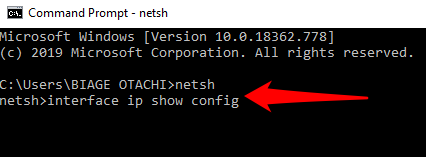
- Next, type interface ip show config and press Enter.
- Find the network interface whose DNS server you want to change, and enter the netsh interface ipv4 set dns name=”YOUR INTERFACE NAME” static DNS_SERVER. This will set your primary DNS server.
From our example above, we changed the IP address for the “Wi-Fi” interface, so we’ll use the same example to change DNS servers.
For purposes of this guide, we’ll use Google’s primary public DNS server, 8.8.8.8. The command will look something like this: netsh interface ipv4 set dns name=”Wi-Fi” static 8.8.8.8
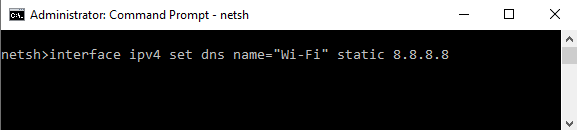
- Next, type the netsh interface ipv4 set dns name=”YOUR INTERFACE NAME” static DNS_SERVER index=2 command to set the secondary DNS server. Again, we’ll use Google’s public DNS secondary server, 8.8.8.8 as an example, which will look like this: netsh interface ipv4 set dns name=”Wi-Fi” static 8.8.4.4 index=2.
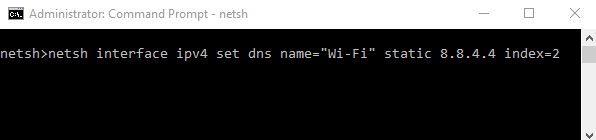
Note: You can use the netsh interface ipv4 set dnsservers name”YOUR INTERFACE NAME” source=dhcp command if you want the network interface to automatically pick DNS settings from a DHCP server. Continuing with our example, this command would look like this: netsh interface ipv4 set dnsservers name”Wi-Fi” source=dhcp
Conclusion
Command Prompt is a great tool to use when you want to change IP addresses and DNS servers. It’s faster and saves you the hassle of having to click through several windows and dialog boxes from the Control Panel interface just to get to the IPv4 Properties dialog box to do the same thing.
Was this guide helpful? Let us know by dropping your comment in the section below.
Elsie is a technology writer and editor with a special focus on Windows, Android and iOS. She writes about software, electronics and other tech subjects, her ultimate goal being to help people out with useful solutions to their daily tech issues in a simple, straightforward and unbiased style. She has a BCom degree in Marketing and currently pursuing her Masters in Communications and New Media. Read Elsie’s Full Bio
How to change IP Address from command prompt
In this post we’ll learn the steps to assign an IP address to Windows Server 2012 R2 from command prompt. We’ll use Netsh command to change an IP. IP (Internet Protocol) is an identify of your Computer. It is required for computers to communicate with teach other. There are multiple ways to change the IP address, in addition to that you can either assign static IP address to your Computer or Dynamic IP address to your Computer. DHCP Server is required if you want Dynamic IP Address to be assigned to your Server.
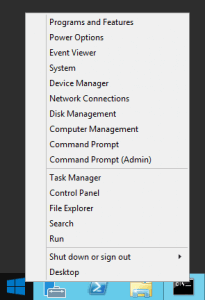
1. Right click on start and select the command prompt (admin).
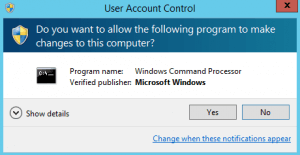
2. On User Account Control window click on “Yes” to open command prompt.
3. Type command “ipconfig” to check an IP address of your computer. This shows an APIPA IP address. APIPA is “Automatic Private IP Addressing“, this concludes that our computer is not able to communicate with DHCP Server as currently we don’t have any DHCP in our environment.
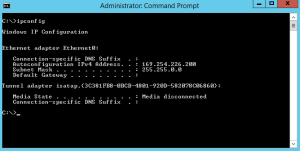
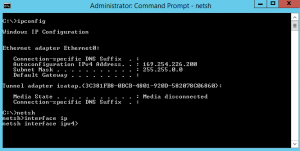
4. To assign an IP to our computer type “Netsh“. It will show “netsh>” console. Then type “Interface IP” this will change the console to “netsh interface ipv4“.
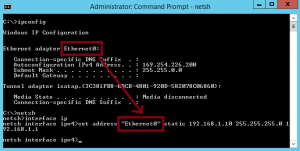
5. Type the command “set address “Ethernet0” static 192.168.1.10 255.255.255.0 192.168.1.1“. In this command “Ethernet0” is the name of our Ethernet Adapter. As we are assigning static IP address therefore we need to mention an IP address and a subnet mask. 192.168.1.10 is an IP address that we want to assign and 255.255.255.0 is a subnet mask. In addition to IP we are also assigning Gateway to this computer after subnet mask we can define the gateway which is 192.168.1.1 in this example.
6. Moreover we need to define DNS information. Type a command “set dnsservers “Ethernet0” static 192.168.1.10 primary” to define the primary DNS. Here, “Ethernet0” is the name of our network adapter and 192.168.1.10 is the IP of DNS.
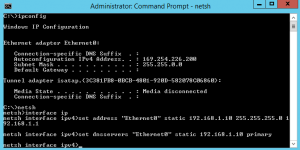
7. Type “Exit” to exit from netsh interface ipv4 console.
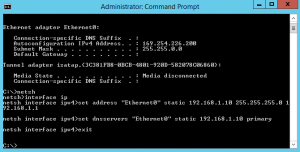
8. Type “ipconfig /all” to verify that static IP address, subnet mask, default gateway and DNS server IP is assigned.
 Как изменить IP адрес компьютера из командной строки или bat-файла

В процессе работы в ОС семейства Windows иногда бывает необходимо изменить IP адрес компьютера не через графический интерфейс, а с помощью пакетного файла (bat) или же с помощью командной строки (cmd). В данной статье мы расскажем о том, как это можно сделать.
Описание
Смена IP адреса компьютера осуществляется с помощью утилиты netsh, которая входит в состав Windows начиная с самых старых версий этой ОС. Чтобы правильно сменить IP адрес, сначала надо выяснить текущую конфигурацию. Сделать это можно в командной строке при помощи команды
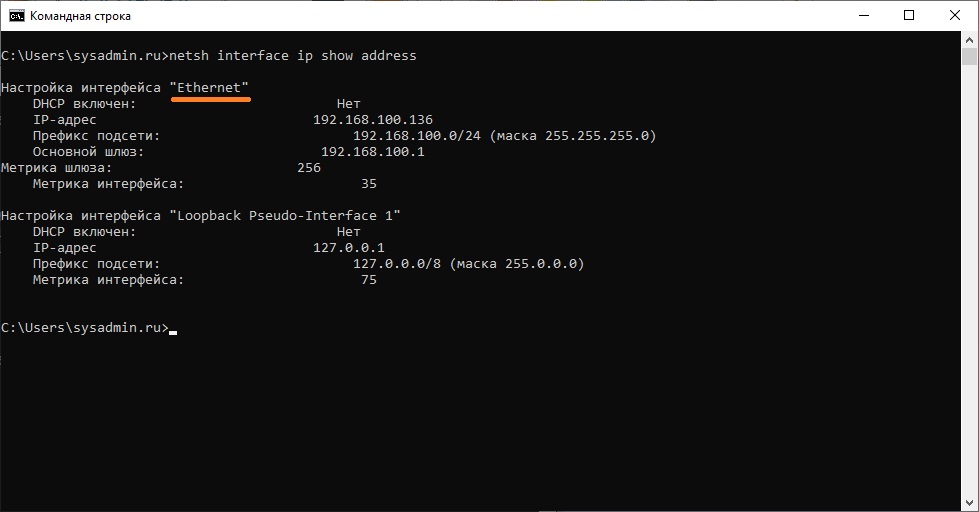
Результат работы этой команды — отображение текущей конфигурации всех сетевых интерфейсов, настроенных в ОС. Из всех, нам необходимо найти и запомнить название того интерфейса, для которого мы хотим поменять адрес. В нашем примере видно, что интерфейс называется Ethernet. Текущий IP адрес 192.168.100.136 , маска подсети 255.255.255.0 , а основной шлюз 192.168.100.1 .
Предположим, что нужно сменить наш IP адрес на 192.168.100.10 , адресация в сети статическая, без использования DHCP, шлюз остается прежним 192.168.100.1, маска тоже не меняется 255.255.255.0
В этом случае, команда, которая должна быть выполнена из пакетного файла или командой строки принимает следующий вид:
После выполнения этой команды у интерфейса Ethernet сменится IP адрес на 192.168.100.10 , как на скриншоте ниже. 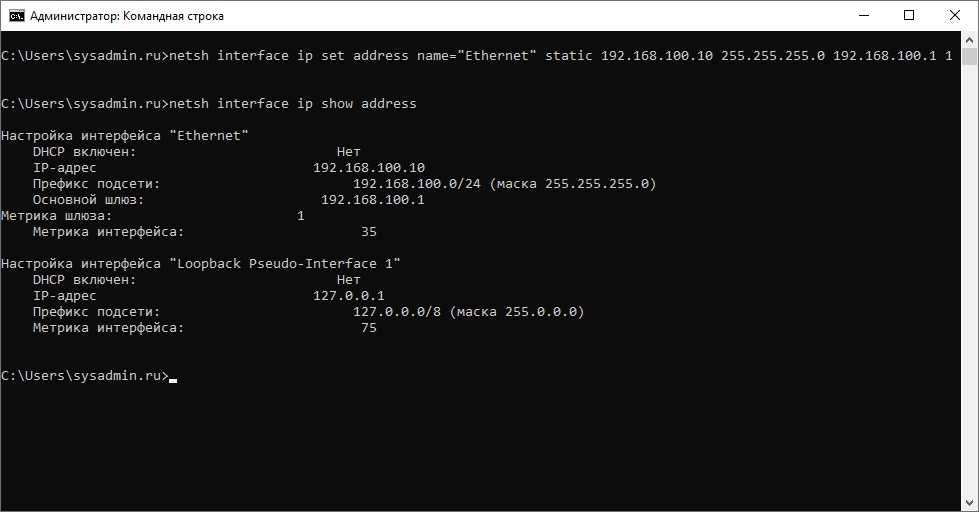
Команда netsh предоставляет широкие возможности по управлению сетевыми настройками из командной строки. Для ознакомления с другими ее функциональными возможностями пользуйтесь справкой при помощи netsh /?